
Introduction
It's only been about 7 months since we tested
Samsung's first Plane to Line Switching (PLS) technology screen, the
27"
S27A850D. This represented a new venture for Samsung who had for a long time
invested in TN Film and their own Patterned Vertical Alignment
(PVA) panel technology. However, due to the ever-growing popularity of IPS panels
which were seemingly starting to dominate the market, Samsung have instead moved
their focus onto development of this PLS technology as an alternative. There
have only been a few screens released so far featuring PLS panels, but the
initial release of the S27A850D (or SA850 as it is sometimes called) impressed
us in many regards.
Now Samsung have decided to update the model,
offering this time something a little bit different. The new S27B970D (or SB970
as it's more commonly known) is again a PLS-based screen, but is aimed more at
the professional end of the market. It features some very impressive specs and
features and carries a price tag reserved more for the high-end offerings from
the likes of NEC and Eizo. This is Samsung's first effort to compete with those
pro-grade models with a PLS panel and so it's an interesting step in the
development of the technology. Of particular interest here is the glossy screen
coating, high end sleek design, factory calibration, hardware calibration
support and uniformity correction. It will be interesting to see how this screen
compares with the more mainstream SA850 model, and whether it can really offer
the top-end performance you'd expect for the price point.
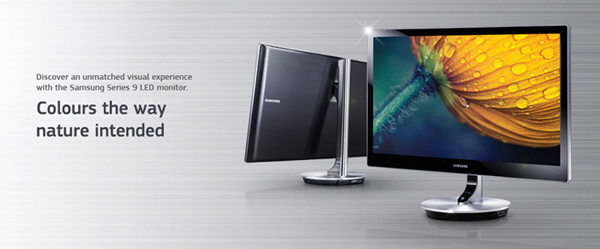
Samsung's website states: "Each manually calibrated Series 9 Monitor undergoes an expert, hour-long
adjustment process before it reaches your home or office ensuring you get the
highest-quality images right out of the box. And once it's yours the built-in
calibration engine enables in-home adjustments for the perfect picture every
time. The slim profile and sleek design of the Series 9 Monitor boasts a
sophisticated frame in front and a shimmering panel in back. The slim bezel and
crystal-clear glass hidden-panel display create a stunning look, while the solid
metal frame adds an elegant touch. Even when it's switched off, Series 9 is sure
to be the focal point of the room."
Specifications and Features
The following table gives detailed information
about the specs of the screen:
|
Monitor
Specifications |
|
Size |
27"WS |
Panel Coating |
Glossy with glass coating |
|
Aspect Ratio |
16:9 |
Interfaces |
Dual-link DVI-D, HDMI v1.4, DisplayPort (with
HDCP support) and MHL |
|
Resolution |
2560 x 1440 |
|
Pixel Pitch |
0.2331 mm |
Design
colour |
Glossy black and silver metal |
|
Response Time |
5ms G2G |
Ergonomics |
Tilt, 100mm height adjustments |
|
Static Contrast Ratio |
1000:1 |
|
Dynamic Contrast Ratio |
Mega DCR |
VESA Compatible |
No |
|
Brightness |
220 (standard mode)
285 (high bright mode) |
Accessories |
DL-DVI, USB 2.0, DisplayPort, MHL and power
cables |
|
Viewing Angles |
178/178 |
|
Panel Technology |
PLS |
Weight |
With stand: 7.9Kg |
|
Backlight Technology |
W-LED |
Physical Dimensions
|
WxHxD with stand at max height
645 x 567 x 247 mm |
|
Colour Depth |
16.7 million (8-bit) |
|
Colour Gamut |
Standard gamut, sRGB
81% NTSC, 99.5% sRGB, 78.1% Adobe RGB |
Special
Features |
Integrated 2x 7W stereo speakers, 2x USB 2.0, MHL link. Factory calibration,
hardware calibration engine, uniformity / gamma / colour coordinate
correction, 16-bit LUT |
Manufacturers website link:
Samsung
The S27B970D offers a very good range of
video connections which is great to see and I suppose should be expected given
the cost and position of this screen in their range. There are HDMI v1.4,
Dual-link DVI-D and DisplayPort provided for video interfaces. With the screen
offering a 2560 x 1440 resolution though only the DL-DVI and DisplayPort
connections can support the full resolution due to bandwidth limitations over
HDMI. It is nevertheless nice to see HDMI provided for users who want to connect
other devices, particularly external Blu-ray and DVD players. No D-sub VGA port
is provided on this model. The digital
interfaces are HDCP certified for encrypted content. The screen comes packaged
in the UK with a dual-link DVI, DisplayPort, MHL (HDMI to micro 5 pin) and USB
2.0 cables. An external power brick and cable is also provided along with a
handy cleaning cloth. According to the manual the accessories may vary from
country to country. There is no HDMI cable supplied here though.
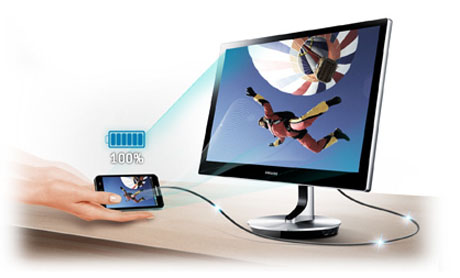
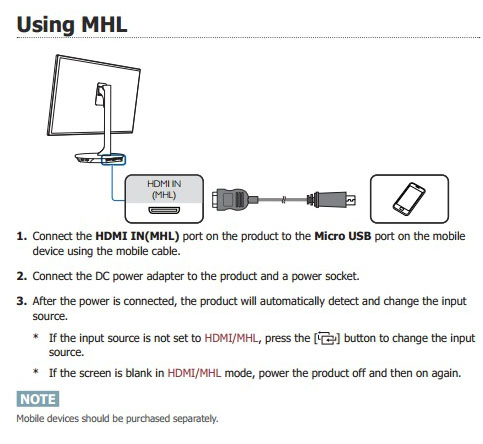
MHL is a new connectivity option which is starting
to appear on a few monitors. It allows you to connect an MHL-supporting mobile
or tablet device to the screen and view videos and photos saved on the device
via your screen. It also charges the device while connected which is useful.
There are 2x USB 2.0 ports available and the
screen features 2x 7W integrated stereo speakers. Samsung's website explains:
"With a built-in Samsung Stereo Speaker, a 5 Way Speaker delivers high-quality
stereo sound and a richer multimedia experience. You’ll enjoy enhanced movies
and music, as if you were in a theatre or concert, thanks to Samsung’s
outstanding audio. Experience total convenience and make the most of home or
office space with cost-efficient built-in speakers."
In addition the screen features hardware level
calibration support from its 16-bit LUT and uniformity, gamma and colour
coordinate correction technologies.
Below is a summary of the features and connections of
the screen:
|
Feature |
Yes / No |
Feature |
Yes / No |
|
Tilt adjust |
 |
DVI |
|
|
Height adjust |
|
HDMI |
|
|
Swivel adjust |
 |
D-sub |
|
|
Rotate adjust |
|
DisplayPort |
|
|
VESA compliant |
|
Component |
|
|
USB Ports |
|
Composite |
|
|
Card Reader |
|
Audio connection |
|
|
Ambient Light Sensor |
|
HDCP Support |
|
|
Touch Screen |
|
Integrated Speakers |
|
|
Hardware calibration |
|
Uniformity correction |
|
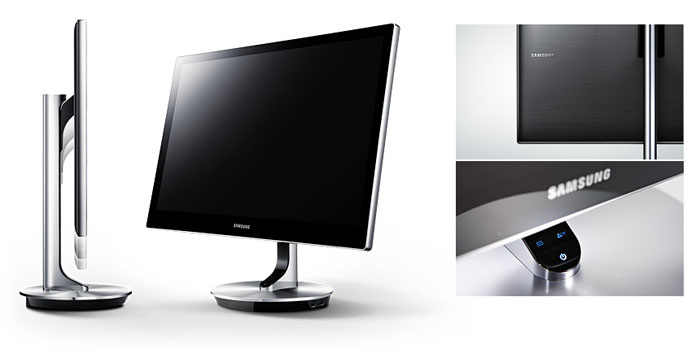
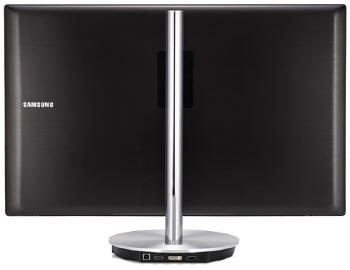
Design and Ergonomics

Above: front views of the screen. Click for larger versions
One of the first things that strikes you
about this screen as you unpack it is just how nice it looks. Samsung talk
about it a lot in their marketing material, but it is genuinely a very
attractive screen. The glossy glass front, ultra-thin profile, aluminium
base and slender arm all make for excellent aesthetics. It certainly looks
a premium display. The bezel edges of the screen are black in colour and
there is a very thin silver coloured metal trim around the edges. The
bezel measures ~24mm along the sides and top, and 43mm along the bottom.
Above: more front views of the screen. Click for larger versions
The entire front of the screen is covered
with a protective "Crystal Clear" glass coating which gives an overall
glossy appearance to the panel. This ensures clean and crisp images and
freedom from the grainy anti-glare (AG) coating you can find on some
models. The older SA850 model featured a light AG coating from the PLS
panel which was not as aggressive as competing IPS based screens,
which are often criticized in this area. The S27B970D goes for a full glossy
coating similar to that seen on models like the Apple 27" Cinema Display,
Hazro HZ27A/C/D and
DGM IPS-2701WPH. Thanks to the glossy coating, the image looks clear
and white backgrounds do not look dirty or grainy.
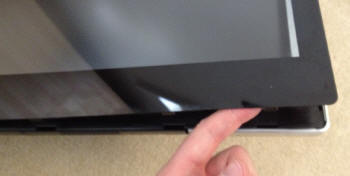
Above: view of glass panel coating. Click for larger version (left)
The glass coating is actually a sheet
applied in front of the panel as you can see from the above photo. If you
dismantle the screen you can pop this front cover off pretty easily which
is handy if you ever found dust or anything trapped behind the protective
layer. Obviously you can't pop this front off without unscrewing the metal
trim (along the bottom edge of the screen) which is what was done for the
photo above.
_small.jpg)
_small.jpg)
_small.jpg)
Above: front views of the screen. Click for larger versions
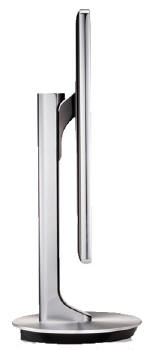
The screen is connected to a nice thin arm
at the back (pictures from behind in a moment). This connects into a
rounded silver aluminium base as you can see from the photos above. There
is a black edge to the base which is where the interface connections are
located.

The front of the screen features a shiny
silver Samsung logo in the middle. The rest of the bezel is clean and free
from any other labels, not even having a S27B970D label or anything similar.
_small.jpg)
_small.jpg)
Above: front views of the screen showing Samsung logo and bottom edge
speaker grills. Click for larger versions
The bottom edge of the screen has a couple
of grills as shown above which is where the integrated 2x 7W stereo
speakers are situated.
_small.jpg)

Above: rounded base of the screen and OSD control buttons at bottom of
arm. Click for larger versions
The thin monitor arm connects neatly into
the rounded silver base as shown above. The bottom edge of that arm is
curved and actually houses the OSD operational buttons. These are touch
sensitive and glow a subtle white colour when the screen is powered on, as
shown in the photo above.
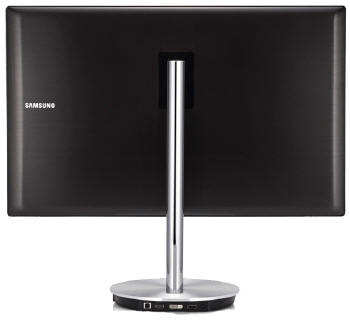
Above: rear views of the screen showing maximum height range. Click for
larger versions
The back of the screen is completely squared
off and again looks very tidy and sleek. There is a silver Samsung logo on
the left hand side and the back is finished in a semi glossy style black
plastic. The monitors silver arm connects a little above the centre of the
back. The full range of height adjustment is actually shown in the above
images as well. The back is very tidy since there are no interface
connections provided here, as they are instead in the base of the screen.
There is also no need for a cable tidy on the back of the arm as a result.
_small.jpg)
_small.jpg)
Above: rear views of the screen. Click for larger versions
Some further photos of the back of the
screen are provided above. The height adjustment of the stand is very
smooth, but a little stiff to operate. It does afford you a good
adjustment range of 100 mm which should be perfectly fine for
obtaining a comfortable position. At it's lowest setting the bottom edge
of the screen is ~65mm above the height of the desk, and at maximum
height it is ~165mm above the desk.
_small.jpg)
_small.jpg)
Above: rear views of the screen showing monitor arm. Click for larger
versions
The arm itself is a shiny silver metal which
again looks very nice. It has a sliding section which allows you to
control the height adjustment of the screen. The screen is not VESA
compliant and so cannot be wall / arm-mounted. As such you cant remove the
arm without completely taking the screen apart. Even if you did, with all
the interface connections housed in the base, you wouldn't want to.
_small.jpg)
_small.jpg)
Above: side views of the screen including maximum tilt range. Click for
larger versions
From the side, the S27B970D has a very thin
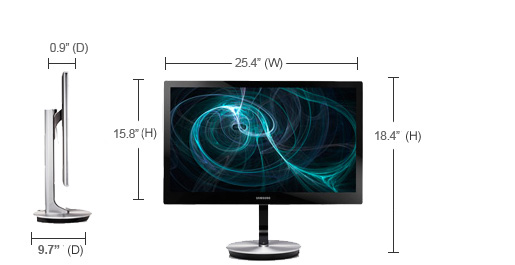
profile as you can see above. Overall the depth of the screen is 9.7"
(247mm). There is a tilt function available from the stand as well which
is smooth and easy to move. It doesn't give you a massive range tilting
forward though (bottom edge coming towards you) but should be adequate for
a decent viewing angle. There is no pivot or rotation function available
from the stand but they aren't as important as height and tilt and not
really missed here I don't think. The screen is pretty wobbly when you
make adjustments due to the thin arm and the size of the screen its
supporting.
A summary of the screens ergonomic adjustments
is shown below:
|
Function |
Range |
Smoothness |
Ease of Use |
|
Tilt |
not specified |
Smooth |
Easy |
|
Height |
100mm |
Smooth |
A
little stiff |
|
Swivel |
n/a |
- |
- |
|
Rotate |
n/a |
- |
- |
|
Overall |
Good height adjustment and decent enough
tilt. Smooth operation although height a little stiff. A bit wobbly due to
thin arm |
The back of the base houses all of the
connections for the screen. There is a USB upstream port to connect back to
your PC, which then allows the two ports on the side to function.
_small.jpg)
Above: view of interface connections on back of base. Click for larger
version
There is then DisplayPort, Dual-link DVI and
HDMI available and on the far right hand end is the power connection.
_small.jpg)
Above: side view of base showing USB ports. Click for larger version
There are 2x USB 2.0 ports on the right hand
side of the base as shown here which is handy for quick connection of external
devices.
Overall I felt the design of the S27B970D was excellent. It looks very
attractive and sleek and it was good to see a decent range of connectivity and
ergonomic options. Materials were of a very high quality, and there is no audible buzz from the screen.
It also stays nice
and cool during use thanks to the use of W-LED backlighting. The base does get
a little warm however as a lot of the internal electronics are housed there. The thin arm did
mean the screen was a little wobbly, and the nature of the design and lack of
VESA wall-mount compatibility might put some people off.
OSD Menu
Above: view of
OSD operational buttons
The OSD menu is controlled through a series of
touch sensitive buttons located on the bottom of the monitor arm. The buttons
glow a subtle white colour when the screen is powered on. In standby the power
button flashes on and off in the same white colour. Depending on the
height of the screen and the height of the user, you may not see some of these
buttons from your normal viewing position. The sensitivity of the buttons is
very good and they function very well. They again help give a premium feel to
this screen.
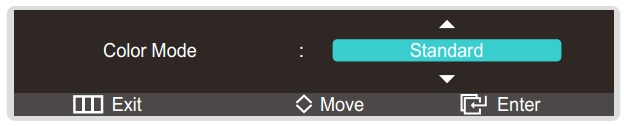
There is quick access to the 'Color mode' menu by
pressing the down arrow button, which is also identified with the little three
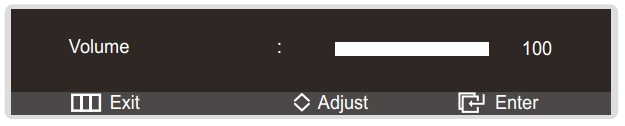
circles logo. The up arrow label gives you quick access to the brightness and
contrast controls when the screen is connected via DVI. When connected via HDMI
or DisplayPort this is instead a quick access to the volume control for the
integrated speakers. On the left, the top button switches quickly between the
video inputs and the bottom button brings up the main OSD menu.
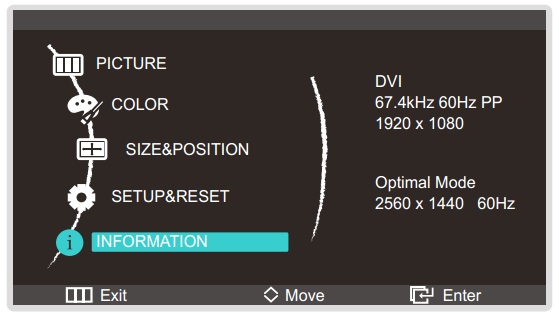
The main menu itself is divided into 5 sections
which are shown down the left hand side. As you scroll up and down the right
hand side of the menu software shows you some of the options which are available
in each section. Above shows the information section for reference. Pressing the
enter button takes you into a specific section and the software then switches to
a view of the specific options for that section.
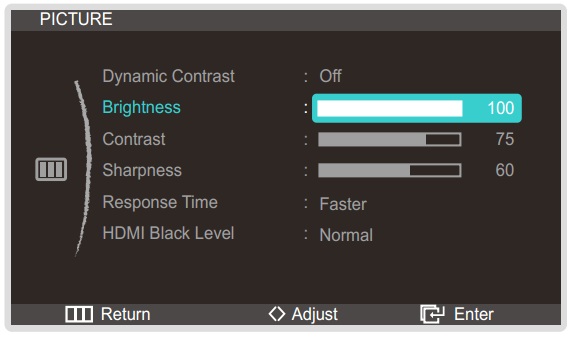
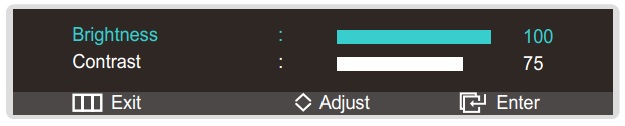
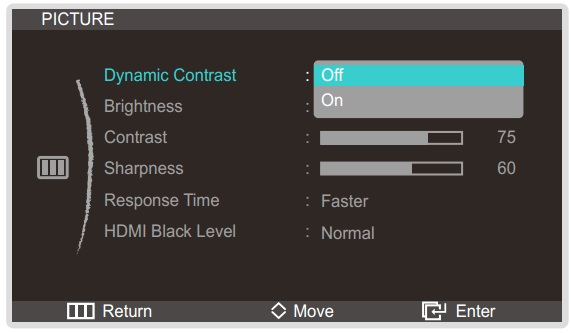
The first section is the 'picture' section. This
includes the normal options for brightness and contrast as you might expect.
There is also control over the
dynamic contrast ratio,
response time control and
HDMI black level (used to help with degraded picture quality and contrast when
connecting DVD players and set top boxes via HDMI). Some of these options will
be greyed out depending on your connection type and the preset mode you are in.
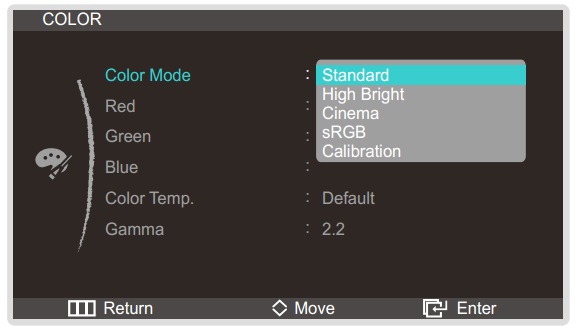
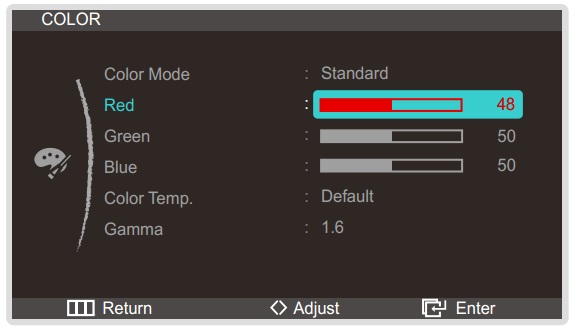
The second section is the 'color' menu. Here you
can choose the preset 'color mode' as shown above. You can also control the
individual RGB channels in each preset.
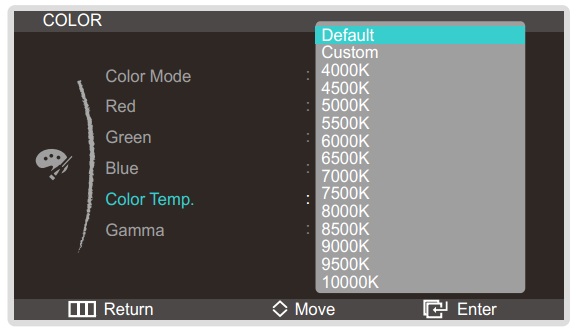
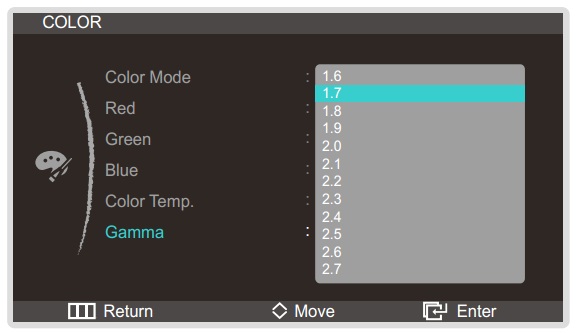
The color temp. menu offers a massive range of
pre-defined colour temperature modes as shown above. Likewise the gamma menu
allows you to define the gamma curve with a wide range of options available. We
will test all of these a little
later on.
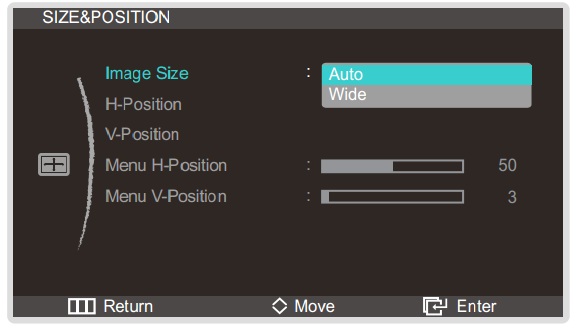
The size & position section is the third section.
You can control the hardware level aspect ratio control here (we will look at
this a little later on as there are also some other options here), and various
aspects of the OSD software itself.
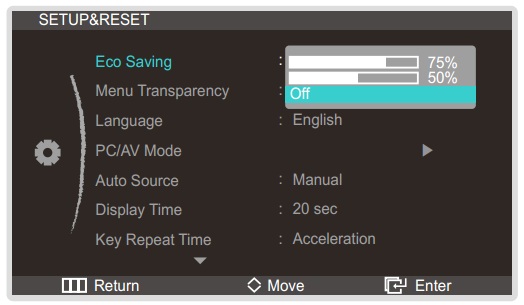
The setup & reset section offers you a few extra
controls. You can turn the ECO saving feature on here as shown above. You can
also control the input selection and a few other basic settings.
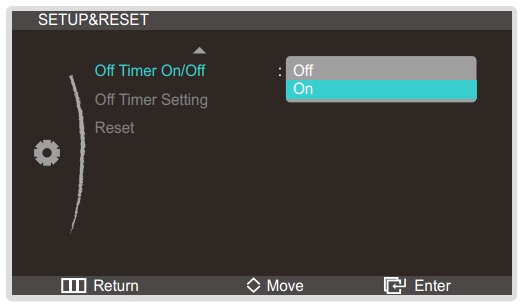
Scrolling down in this section reveals a few other
options related to power saving.
All in all the menu was easy and intuitive to
navigate. There was a decent range of options, particularly with the control of
colour temperature and gamma which we will test in a moment. The touch sensitive
buttons and their appearance gave a premium feel to the menu as well which was
nice. The only slightly confusing thing was that you had to enter the screen
using one button, but pressing it again would close the menu again. Once in the
menu you had to use the top button to 'enter' or select an option.
Power Consumption
In terms of power consumption the manufacturers spec states
typical
usage of 53W without anything connected to the USB ports. A maximum usage of 63W
is also specified when USB ports are in use. In standby the screen apparently
uses <0.5W.
|
 |
|
State and Brightness
Setting |
Power Usage
(W) |
|
Factory Default (100%) |
46.9 |
|
Calibrated (27%) |
29.1 |
|
Maximum Brightness (100%) |
46.9 |
|
Minimum Brightness (0%) |
22.8 |
|
Standby |
1.0 |
|
We tested this ourselves and found that out of the
box the screen used 46.9W of power while at its default brightness setting which
was 100%. At the lowest brightness setting, power
consumption was reduced to 22.8W. After calibration the brightness had been set
at 27% (in the High Bright preset) to achieve the desired luminance and this returned a power consumption of
29.1W. In standby the screen used 1.0W of power.
|
|
|
ECO mode Setting |
Power Usage
(W) |
|
ECO 75% |
35.5 |
|
ECO 50% |
25.6 |
|
We also tested the ECO mode options available in
the menu. They are affectively preset and locked brightness settings which seem
to correspond to brightness settings of 75% and 50%. The power consumption of
each is shown above. If you use either of these modes the main brightness
control is greyed out.
I have plotted the results of these measurements
on the graph below. You can see power consumption is pretty much identical to
the S27A850D model and both are considerably lower than some CCFL based units
(e.g. NEC PA271W) when calibrated to the same luminance. This is an advantage of
W-LED backlighting:

Panel and Backlighting
|
Panel Manufacturer |
Samsung |
Colour Palette |
16.7m |
|
Panel Technology |
PLS |
Colour Depth |
8-bit |
|
Panel Module |
LTM270DL02-201 |
Colour space |
~sRGB |
|
Backlighting Type |
W-LED |
Colour space coverage (%) |
81% NTSC, 78.1% Adobe RGB, 99.5% sRGB |
The Samsung S27B970D utilises a
Samsung LTM270DL02-201 Plane to Line Switching (PLS) panel which is capable of producing 16.7 million colours with
a true 8-bit colour depth. Some early information about the screen had suggested
that the panel would offer 1.07 billion colours through a "10-bit" panel but it
seems this has changed with the final release. All Samsung's spec pages confirm
the screen offers a 16.7 million colour palette. In addition, we know from
studying the detailed panel spec sheet for this particular module that it is an
8-bit panel.
_small.jpg)
Above:
dismantled view of the screen. Click for larger version
It is possible to dismantle the S27B970D by
unscrewing the bottom metal edge of the screen. We did this to investigate the
internal electronics and confirm the specific panel part being used.
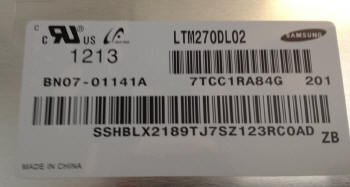
Above: stickers
labelling the panel in the screen. Click for larger versions
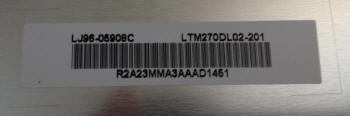
The stickers on the panel as shown above confirm
it is using the LTM270DL02 panel and it looks as though this is classified as
the 201 revision from what we can tell. This would suggest some minor changes
since the panel used in the S27A850D which would fit in with differences to the
specs of the two models.
_small.jpg)
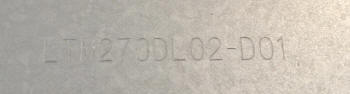
Above: etchings
on metal frames of the screen identifying panel part. Click for larger versions
The metal bracket which holds the panel in place
at the top (See top picture showing full view of the dismantled screen) has the
above label etched into the metal, saying "LTM270DL02-D01". This would actually
fit in more with Samsung's previous naming scheme for their panels as opposed to
the "201" suffix. However, the panel stickers seem to suggest it is a 201
revision so we will assume that is most accurate for now. The panel part is also
etched onto the metal on the front of the screen which is hidden behind the
protective glass front panel.
The S27B970D uses
White-LED (W-LED) backlighting producing a colour space
approximately equal to the sRGB reference. This means the screen is considered a 'standard gamut'
backlight type. Studying the detailed panel spec sheet confirms that the colour
space is equal to 81% of the NTSC space, 78.1% of the Adobe RGB reference and
99.5% of the sRGB space. A wide gamut screen would need to be
considered by those wanting to work outside of the sRGB colour space of course.
This coverage is actually a little wider than some other W-LED units which can
typically cover ~70% of the NTSC space. An emulation mode is provided if you
want to strictly match the sRGB space which we will
look at shortly.
PWM Flicker Tests at Various
Backlight Brightness Settings
100%
50%
0%

|
Pulse Width
Modulation Used |
No |
|
Cycling
Frequency |
n/a |
|
Possible
Flicker at |
|
|
100% Brightness |
No |
|
50% Brightness |
No |
|
0% Brightness |
No |
We tested the screen to establish the methods used
to control backlight dimming. Our recent article talks in more details about a
common method used for this which is called
Pulse Width Modulation (PWM). A series of photos was taken using the method
outlined in the article. These were taken at 100%, 50% and 0% brightness
settings. This
allows us to establish 1) whether PWM is being used to control the backlight, 2)
the approximate frequency at which this operates, and 3) whether a flicker may be introduced
or potentially noticeable at certain settings.
A thin white line was shown on an all-black
background and a photograph was taken at a slow shutter speed of 1/8 second (in
this example) as
the camera was scanned left to right in front of the screen. This produces a
series of white lines which can be used to identify the frequency of the PWM and
how quickly the backlight is cycled on and off. The higher this frequency, the
less likely you are to see artefacts and flicker. The duty cycle (the time for
which the backlight is on) is also important and the shorter the duty cycle, the
more potential there is that you may see flicker. Please remember that not every
user would notice a flicker from the backlight but it is something to be wary
of. It is also a hard thing to quantify as it is very subjective when talking
about whether a user may or may not experience the side effects. We are able to
at least measure the frequency of the backlight using this method and tell you
whether the duty cycle is sufficiently short at certain settings that it may
introduce a flicker to those sensitive to it.
Interestingly the Samsung S27B970D appears to not
use PWM at all for dimming of the backlight. Even at 0% brightness there was no
sign of the usual splitting of the white line that you'd expect to see in these
tests. We carried out the checks at a even slower shutter speeds which returned
the same result. This is great news for those who are affected by flickering
backlights and suffer from eye fatigue and eye strain. There are very few
monitors which don't use PWM for backlight dimming (the
HP ZR2740w and
DGM IPS-2701WPH spring to mind as others), but this model does not.
Factory
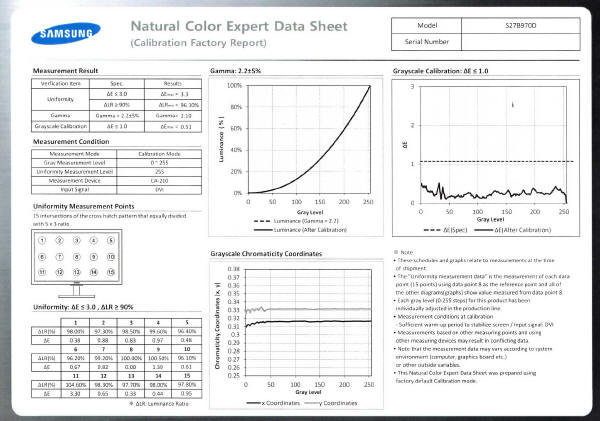
Calibration
According to Samsung's specifications, the
S27B970D "undergoes an expert hour-long adjustment process before it reaches
your home or office, ensuring you get the highest quality images right out of
the box". The manual states that the standard and sRGB preset modes have
been factor calibrated. The screen should come packaged with a Samsung "Natural
Color Expert Data Sheet" giving you a report of the calibration done in the
factory. This confirms the unit has passed the grey balance, uniformity
correction and gamma correction tests. It also confirmed the white point and
gamma curve along with the dE colour difference across the entire grey range.
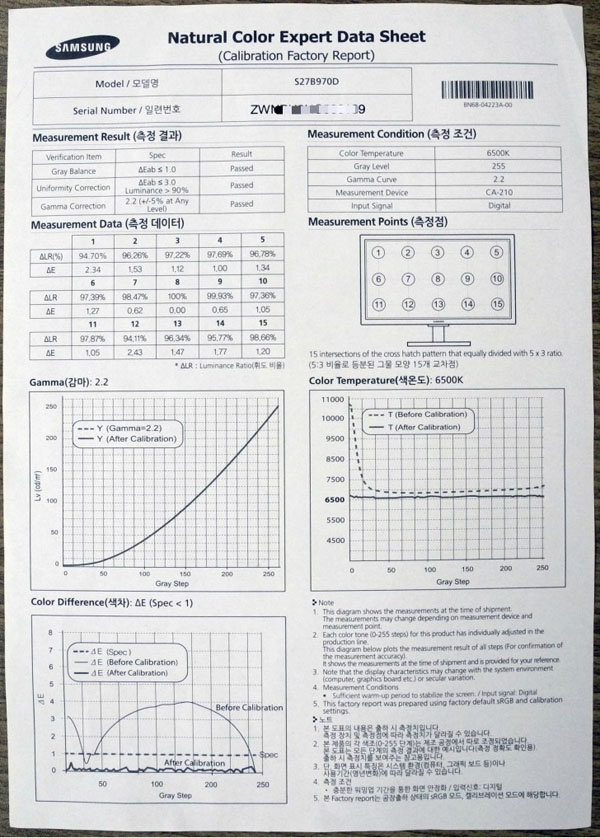
Above: Sample
duplicated
calibration report card (not from our unit). Image courtesy of colormgmt.com
Unfortunately in the review sample of the screen
we received this report was missing, presumably lost somewhere along the way.
Nevertheless, it is of course more important to find out how the default setup
is in real life, and so our
tests in the next section will establish the default setup in some of the
main preset modes. That will allow us to establish the quality of the factory
setup for ourselves.
Updated 5th September 2012
I did want to briefly touch on a report which was
brought to our attention relating to the factory report cards shipped with the
screen. It seems that the report cards for that were originally being shipped
with this screen may have be mass produced. Many different
samples appeared to have the exact same numbers and results on them when
compared. Some more
information is available about this at
colormgmt.com
with photos of several reports, all from different screen samples with differing
serial numbers. We have provided an example of this card above for reference,
note that it's not from our unit as there was not one provided. It would
seem to suggest that Samsung had just printed the same report for each unit to try and
demonstrate the factory calibration, but each report is not unique to the
specific unit you have. Maybe this is just supposed to be a representation of
their apparent factory calibration process, or a way to tell you what setup they
have gone for, but one would have hoped really for a unique report for the
specific screen as you get with some other screens (e.g. Dell U2410, U2711,
U3011 series). It perhaps brought into question the quality of the factory
calibration if they did not want to spend the time producing unique reports for
each sample.
Above: sample
updated calibration report (note: not from our unit)
Since writing this review we have however received
an update on the matter. We received the above sample of a calibration report
from the S27B970D from one of our readers. After discussing this with Howard Kim
at colormgmt.com we established that Samsung have actually updated the factory
calibration reports since, and perhaps because of his original article. This is
positive news and should mean the calibration reports received are specific to
your sample unit.
Testing
Methodology
An
important thing to consider for most users is how a screen will perform out of
the box and with some basic manual adjustments. Since most users won't have
access to hardware colorimeter tools, it is important to understand how the
screen is going to perform in terms of colour accuracy for the average user.
I
restored my graphics card to default settings and disabled any previously active
ICC profiles and gamma corrections. The screen was tested at default factory settings using the DVI interface, and analysed using
an
X-rite i1
Pro Spectrophotometer (not to be confused with the new i1 Display Pro
colorimeter) combined with
LaCie's Blue Eye Pro software suite. An NEC branded and customised X-rite i1 Display 2 colorimeter was
also used to verify the black point and contrast ratio since the i1 Pro is less
reliable at the darker end.
Targets for these tests are as follows:
-
CIE Diagram - validates the colour space
covered by the monitors backlighting in a 2D view, with the black triangle representing the
displays gamut, and other reference colour spaces shown for comparison
-
Gamma - we aim for 2.2 which is the default
for computer monitors
-
Colour temperature / white point - we aim
for 6500k which is the temperature of daylight
-
Luminance - we aim for 120
cd/m2, which is
the recommended luminance for LCD monitors in normal lighting conditions
-
Black depth - we aim
for as low as possible to maximise shadow detail and to offer us the best
contrast ratio
-
Contrast ratio - we aim
for as high as possible. Any dynamic contrast ratio controls are turned off here
if present
-
dE average / maximum -
as low as possible.
If DeltaE >3, the color displayed is significantly different from the
theoretical one, meaning that the difference will be perceptible to the
viewer.
If DeltaE <2, LaCie considers the calibration a success; there remains a
slight difference, but it is barely undetectable.
If DeltaE < 1, the color fidelity is excellent.
Default Performance and
Setup
Default settings of the screen were as follows:
|
Monitor OSD Option |
Default Settings |
|
Brightness |
100 |
|
Contrast |
75 |
|
Color mode |
Standard |
|
RGB Channels |
50, 50, 50 |
|
Color Temperature |
Default |
|
Gamma |
2.2 |
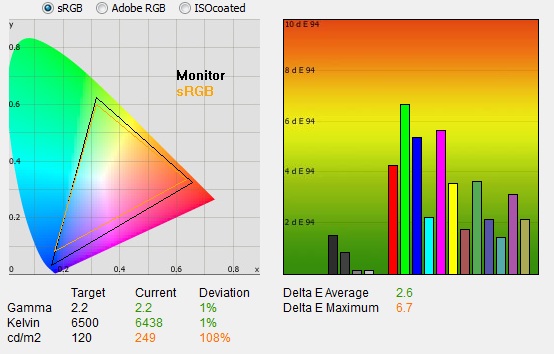
Samsung S27B970D - Default Factory Settings, Standard Mode


|
|
Default Settings,
Standard Mode |
|
luminance (cd/m2) |
249 |
|
Black Point (cd/m2) |
0.35 |
|
Contrast Ratio |
711:1 |
The default set of the screen actually felt very
good to the naked eye. Colours felt even and not too cold, not too warm. The
brightness was a bit high but not blindingly so, even at maximum brightness. The
image looked good to the naked eye, and colours and blacks "popped" thanks to the
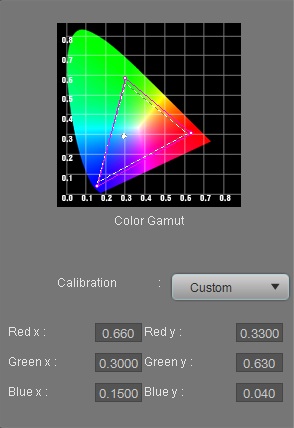
use of a glossy screen coating. In terms of measurements, the
CIE diagram on the left confirms that the monitors colour gamut (black
triangle) matches the sRGB colour space (orange triangle) reasonably closely. It
extends a little past the sRGB space in some blues and reds in particular in
this 2D view of gamut which fits in with the fact we know it can cover ~81% of
the NTSC colour space, and so extends beyond sRGB slightly. There is pretty much
no under-coverage of the sRGB reference space and we know from the panel spec
that it can cover 99.5% of the sRGB reference which is great.
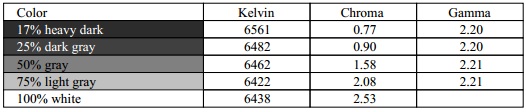
Default gamma was recorded at 2.2 average, leaving
it only 1% out from the target of 2.2 which was great. The gamma was a little
too high in lighter grey tones where it ranged up to 2.21 maximum which is
hardly a big difference. A very good
default gamma setup from the screen which was good news. White point was
also very close to the target, being recorded at 6438k and being only 1% out
from 6500k. Note that we are using a
spectrophotometer to make these measurements which is not sensitive to the W-LED
backlight as some colorimeter devices can be. When using a standard gamut colorimeter
not designed to work with modern backlighting units like W-LED, there can be a typical deviance of 300 - 600k in the white
point measurement which is why some sources may refer to a different white point
in this test incorrectly.
Luminance was recorded at a pretty high 249
cd/m2 which is
too bright for continued use. The black depth was a reasonable 0.35 cd/m2, giving us an
adequate static contrast ratio of
711:1. This was behind some competing IPS panels, and certainly not to the
standards of VA matrices, but it's still not too bad for most users. I would
also add that the presence of a glossy screen coating does make blacks pop and
does improve perceived black depth. Colour accuracy was pretty good at default factory
settings with an average DeltaE (dE) of 2.6, ranging up to a maximum of 6.7.
Along with the very good gamma and white point, this factory setup was very good
really, and the factory calibration seemed reliable out of the box. The gamma
and white point target in particular were well met. You can of course alter the
luminance simply by adjusting the brightness control.
|
Monitor OSD Option |
Default Settings |
|
Brightness |
100 |
|
Contrast |
75 |
|
Color mode |
High Bright |
|
RGB Channels |
50, 50, 50 |
|
Color Temperature |
n/a |
|
Gamma |
n/a |
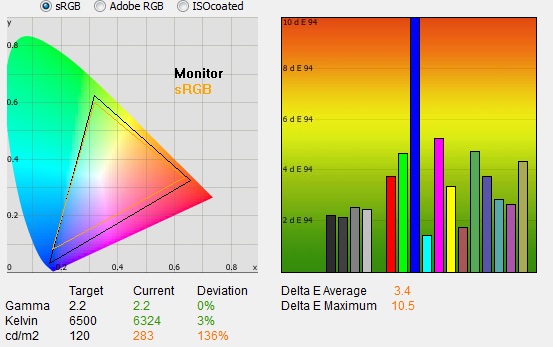
Samsung S27B970D - Default Factory Settings, High Bright Mode
|
|
Default Settings,
High Bright Mode |
|
luminance (cd/m2) |
283 |
|
Black Point (cd/m2) |
0.35 |
|
Contrast Ratio |
828:1 |
We also carried out tests to establish the default
setup in some of the other preset modes. We tested the 'High Bright' mode first of
all. The colour temperature and gamma settings were not available in this mode,
but you still had control over the RGB channels if you want. When switching to
this mode from the standard preset, you do see a jump in the luminance of the
screen. The luminance was now measured at 283
cd/m2, which
was a little higher than the 249 cd/m2 we'd seen in the standard
mode. This was as per the Samsung spec which claimed a higher brightness (of 285
cd/m2) in the High Bright mode than in standard. Note that the OSD
brightness control was 100% in both cases, so this preset just gives you an
additional bump in brightness. Black point remained as we had measured before at
0.35 cd/m2, so in fact this mode gave us a higher static contrast
ratio of 828:1 which was pleasing.
Gamma and white point
remained very accurate really although colour accuracy was not quite as good
with dE average now 3.4 and some big differences in blue shades where dE ranged
up to 10.5. The manual suggests that this mode does not carry the factory
calibration process (only the standard and sRGB modes), but nevertheless
performance was reliable in terms of gamma and white point, although the colour
accuracy was not quite as well set up in this mode.
|
Monitor OSD Option |
Default Settings |
|
Brightness |
50 |
|
Contrast |
n/a |
|
Color mode |
sRGB |
|
RGB Channels |
n/a |
|
Color Temperature |
n/a |
|
Gamma |
n/a |
Samsung S27B970D - Default Factory Settings, sRGB Mode
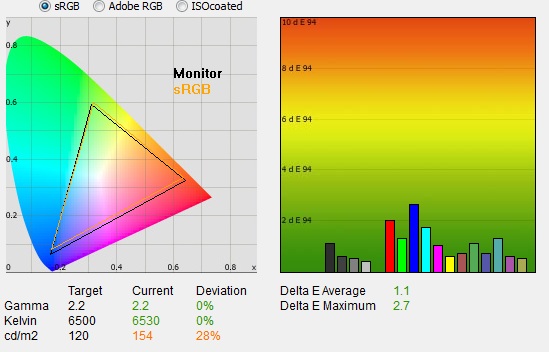
|
|
Default Settings,
sRGB Mode |
|
luminance (cd/m2) |
154 |
|
Black Point (cd/m2) |
0.34 |
|
Contrast Ratio |
457:1 |
We also tested the screen in the sRGB preset mode.
This preset was more locked down in terms of OSD settings. You could alter the
brightness still, but contrast, RGB channels, colour temperature and gamma were
all not available. The default brightness in this preset was 50% as well.
Interestingly this preset offered a pretty reliable emulation of the sRGB colour
space, reducing the native gamut of the screen pretty well. The black triangle
representing the monitors gamut now closely matched the sRGB reference in the
CIE diagram on the left, helping to cut back any oversaturation you might see in
the other preset modes.
Gamma and white point
remained very accurate and were both 0% out from the target which was excellent.
Colour accuracy was also excellent and this preset showed a great factory
calibration in that regard. dE average was now 1.1 and maximum was 2.7. The only
issue with this mode was that the contrast ratio seemed to be crushed quite a
lot. We measured a luminance of 154 cd/m2 now with the screen at 50%
brightness, but black depth remained at 0.34 cd/m2. This gave us a
static contrast ratio of 457:1 which was poor.
|
 |
This review had been made available to
download and save
in PDF format (.pdf) allowing you to:
-
Save a copy for personal use and
archiving
-
Save and read our reviews offline
-
Read our reviews on your eBook
reader (e.g. Kindle, iPad and other tablets)
Please
visit our Store
for more information and to download a copy. A small fee will contribute
towards the running of TFTCentral and allow us to continue to make high
quality and detailed reviews in the future. |
Testing Colour Temperatures and Gamma
The S27B970D features a huge range of colour
temperature
presets within the OSD 'Color temp' menu as shown above. We measured the screen
with the X-rite i1 Pro spectrophotometer in each of the preset modes to
establish their colour temperature / white point. All other settings were left
at factory defaults and no ICC profile was active. The results are recorded
below along with the deviance from the target setting.
|
Selected Preset Mode (k) |
Measured Colour Temperature (k) |
Deviance from target (k) |
|
Default |
6481 |
n/a |
|
Custom |
6481 |
n/a |
|
4000 |
3991 |
-9 |
|
4500 |
4488 |
-12 |
|
5000 |
4984 |
-16 |
|
5500 |
5478 |
-22 |
|
6000 |
5967 |
-33 |
|
6500 |
6484 |
-16 |
|
7000 |
6911 |
-89 |
|
7500 |
7389 |
-111 |
|
8000 |
7954 |
-46 |
|
8500 |
8344 |
-156 |
|
9000 |
8775 |
-225 |
|
9500 |
9288 |
-212 |
|
10000 |
9903 |
-97 |
As you can see, the default and custom settings
were very close to a 6500k colour temperature which is the temperature of
daylight, and the target we aim for during our calibration process. The warmer
colour temp settings then between 4000 and 6500k were very close indeed to
their targets, being on average only 18k out. The cooler settings beyond that
were a little further away from their targets but nevertheless remains very
close. The settings of 7000 - 8000k inclusive were on average only 82k out
which is still only around 1 - 2% deviance which is excellent. Even the cooler
settings of 8500k and above, which showed a higher deviance still only varied
by around 2.5% in the worst cases (-225k difference maximum). Overall these
settings seemed very reliable and accurate which was great news for those
wanting to work in different colour temperatures.
|
Selected Gamma Mode OSD |
Measured Average Gamma |
|
1.6 |
1.6 |
|
1.7 |
1.7 |
|
1.8 |
1.8 |
|
1.9 |
1.9 |
|
2.0 |
2.0 |
|
2.1 |
2.1 |
|
2.2 |
2.2 |
|
2.3 |
2.3 |
|
2.4 |
2.4 |
|
2.5 |
2.5 |
|
2.6 |
2.6 |
|
2.7 |
2.7 |
Similarly the OSD contains options for gamma
setup, ranging from 1.6 to 2.7. We tested the accuracy of these settings based
on a measurement of the average gamma. These were recorded above in the table.
As you can see, each preset gamma mode was very accurate and returned a
measured average gamma as intended.
Software Calibration Results
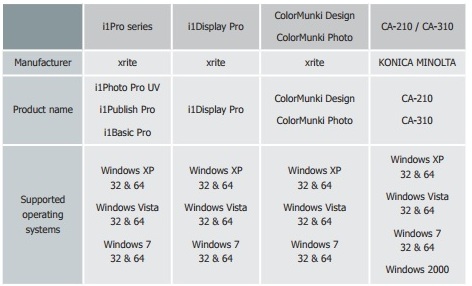
The Samsung S27B970D may well have a decent
factory setting but given the market for this screen I expect many users will
want to calibrate the screen personally to obtain even higher levels of accuracy
and allow profiling and matching between different devices. Samsung's user
manual even includes the compatible type of calibration tools they recommend for
use with this screen as shown below. Ultimately you need to ensure you have a
device capable of measuring and reading the spectra from the W-LED backlight
unit properly. Many older colorimeter devices are designed to work with standard
gamut CCFL units only and so they can often have difficulty reading LED (and
wide gamut CCFL) units properly. A spectrophotometer does not have this problem
and there are also some decent modern colorimeters like the i1 Display Pro which
can read W-LED without issue. While you can use other devices and various
software packages to complete software profiling of the screen, you may come
across issues if the device is not designed to work with a W-LED backlight unit.
It should be noted as well that the listed devices here are the only ones
supported by Samsung's Natural Color Expert (NCE) software which is needed for
hardware
calibration.
The S27B970D offers a hardware calibration engine
which can give you very high levels of accuracy and control over the hardware
itself. We will test that in a moment, but we also wanted to carry out the usual
software level "calibrations" (profiling) at a graphics card level. I used the
X-rite i1 Pro spectrophotometer
combined with the LaCie Blue Eye Pro software package to achieve these results
and reports. An NEC branded and customised X-rite i1 Display 2 was used to
validate the black depth and contrast ratios due to lower end limitations of the
i1 Pro device.
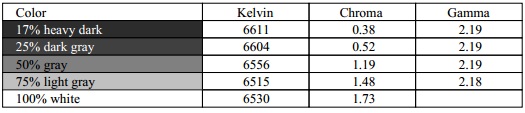
Samsung S27B970D - Software Calibrated Settings, Standard Preset Mode
|
Monitor OSD Option |
Calibrated Settings |
|
Brightness |
38 |
|
Contrast |
75 |
|
Color mode |
Standard |
|
RGB Channels |
48, 46, 50 |
|
Color Temperature |
Custom |
|
Gamma |
2.2 |
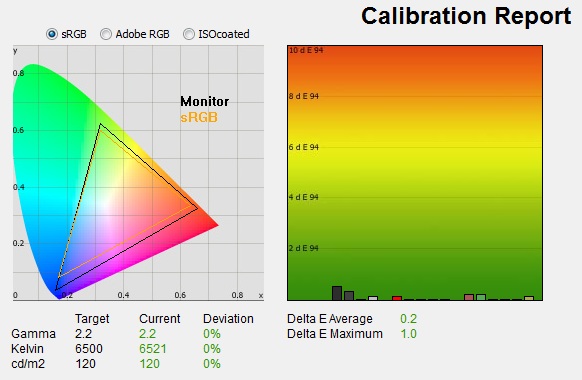
|
|
Calibrated Settings,
Standard mode |
|
luminance (cd/m2) |
120 |
|
Black Point (cd/m2) |
0.18 |
|
Contrast Ratio |
668:1 |
I remained in the 'standard' preset mode for now.
During the process adjustments were made to the brightness and RGB channels as shown in the table above.
We left the screen in the default 2.2 gamma mode as we had already established
from our gamma tests that
this was very accurate and closest to our target of 2.2. When changing the RGB
channels the colour temperature changed automatically from 'standard' to
'custom'. Changing the brightness and RGB channels allowed us to obtain an
optimum hardware starting point and setup before software level changes would be
made at the graphics card level. After this I let the software carry out the LUT adjustments and create an
ICC profile.
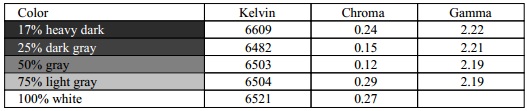
Average gamma remained very accurate at 2.2 with 0%
deviance according to the initial test. Checking the more detailed table shown
above, the average gamma was a little high in dark shades and a little low in
light shades, but not by much at all. White point had also been
maintained at target with only a very small deviance, now measured at 6521k. Luminance was now spot on at
120
cd/m2
thanks to the adjustment of the brightness control as shown. This gave us a
moderate black level however of 0.18
cd/m2, and a
resulting calibrated static contrast ratio
of 668:1 which was only a little less than the default performance in this
preset mode. I would also add that subjectively the blacks looked good to the naked eye as the glossy
screen coating did make them 'pop' and look deep. In reality though the contrast
ratio was not as good as other panels we have seen, including some IPS offerings which can reach up to
~1000:1 in some cases. Colour accuracy was improved very nicely though with dE
average now only 0.2, and maximum 1.0. LaCie would consider colour fidelity to
be excellent overall.
Testing the screen with various colour gradients
showed mostly very smooth transitions. There was some slight gradation in darker tones
and some very, very slight banding introduced due to the adjustments to the graphics
card LUT from the profilation of the screen. Nothing major at all though. It's
worth also commenting on the screen coating in this section of the review.
Unlike most other panels in the market, this screen does not feature the usual grainy and
dirty looking anti-glare (AG) coating. Instead it uses a glossy screen coating
and as a result the colours look very clean and crisp, the image quality is
sharp and whites in particular look a lot more pure than they do on heavy AG coated
screens like some of the IPS alternatives available. Glossy coating isn't to everyone's taste though as it can introduce
reflections which are annoying. You should probably try and see a glossy and an
AG panel in person if you are unsure what to buy.
You can use our settings and
try our calibrated ICC profile if you wish, which are available in
our ICC profile database. Keep in mind that results will vary from one
screen to another and from one computer / graphics card to another.
Samsung S27B970D - Software Calibrated Settings, High Bright Preset Mode
|
Monitor OSD Option |
Calibrated Settings |
|
Brightness |
27 |
|
Contrast |
75 |
|
Color mode |
High Bright |
|
RGB Channels |
45, 45, 50 |
|
Color Temperature |
n/a |
|
Gamma |
n/a |
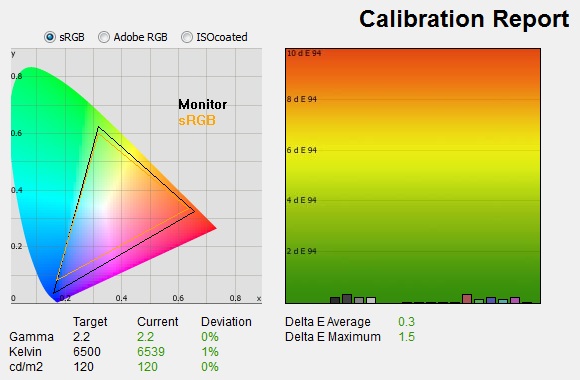
|
|
Calibrated Settings, High
Bright mode |
|
luminance (cd/m2) |
120 |
|
Black Point (cd/m2) |
0.15 |
|
Contrast Ratio |
800:1 |
I switched to the 'High Bright' preset mode to
again carry out the software calibration. During the process adjustments were made to the brightness
and RGB channels as shown in the table above. Other controls like the colour
temperature and gamma were not available in this mode.
Average gamma remained very accurate at 2.2 with
0% deviance according to the initial test. White point had also been
maintained at 1% deviance from the target, now measured at 6539k. Luminance was spot on at
120
cd/m2
thanks to the adjustment of the brightness control as shown. This gave us a
very good black level however of 0.15
cd/m2, and a
resulting calibrated static contrast ratio
of 800:1 which was pleasing. Colour accuracy was now excellent in this mode as
well, with average dE 0.3 and maximum of 1.5. LaCie would consider colour
fidelity to be excellent and certainly a nice correction compared with the
default setup in this mode. Colour gradients
again showed mostly very smooth transitions with some slight gradation in darker tones
and some very, very slight banding introduced due to the adjustments to the graphics
card LUT from the profilation of the screen. Nothing major at all though. Given
the elevated static contrast ratio in this mode, it seems to be the logical
choice for a calibrated preset mode if you are carrying out this kind of
profiling of the screen. By default, it had not been great in terms of colour
accuracy as it lacked the full factory calibration by Samsung in that mode. If
you have access to a calibration tool and can improve that, then the improved
contrast ratio compared with the other preset modes is welcome.
You can use our settings and
try our calibrated ICC profile if you wish, which are available in
our ICC profile database. Keep in mind that results will vary from one
screen to another and from one computer / graphics card to another.
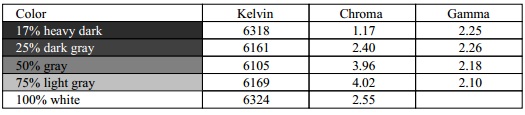
Samsung S27B970D - Software Calibrated Settings, sRGB Preset Mode
|
Monitor OSD Option |
Calibrated Settings |
|
Brightness |
37 |
|
Contrast |
n/a |
|
Color mode |
sRGB |
|
RGB Channels |
n/a |
|
Color Temperature |
n/a |
|
Gamma |
n/a |

|
|
Calibrated Settings, sRGB
mode |
|
luminance (cd/m2) |
120 |
|
Black Point (cd/m2) |
0.28 |
|
Contrast Ratio |
429:1 |
I switched to the 'sRGB' preset mode to again
carry out the software calibration. This had proved to have a very good factory
calibration in nearly every way, including a reliable emulation of the sRGB
colour space which was pleasing. During the process adjustments were made to the brightness
only, since all the other options including the RGB channels were not available.
Average gamma remained very accurate at 2.2 with
0% deviance according to the initial test. White point had also been
maintained at 1% deviance from the target, now measured at 6546k. Luminance was now spot on at
120
cd/m2
thanks to the adjustment of the brightness control as shown. This gave us a
weak black level however of 0.28
cd/m2, and a
resulting calibrated static contrast ratio
of 429:1. With no access to the contrast or RGB channels at the hardware level
it is not possible to change this unfortunately. Colour accuracy was now
excellent in this mode as well, even more so than the very good factory
calibration, with average dE 0.3 and maximum of 1.5. Colour gradients
again showed very smooth transitions with some slight gradation in darker tones
and not noticeable banding at all. While the sRGB mode offers a nice emulation
of a smaller colour space, has a very good factory calibration and can offer
some even more accurate performance once calibration, it remains weak when it
comes to contrast ratio. I'm not sure why this has been crushed so much during
the default settings but it's a shame.
You can use our settings and
try our calibrated ICC profile if you wish, which are available in
our ICC profile database. Keep in mind that results will vary from one
screen to another and from one computer / graphics card to another.
Software Calibration Summary
To summarise the above tests:
-
Results are based on normal software level
calibration of the screen. Basic OSD adjustments made to obtain optimum hardware
starting point, and then profilation of the screen using a calibration tool is
carried out. Corrections made at a graphics card LUT level through creation of
the ICC profile
-
A compatible calibration tool is needed for
correct results, it must be able to support W-LED backlight units
-
All modes had good default white point and gamma
anyway, OSD settings left as they were in those areas
-
Brightness adjustment made in each preset to
obtain target luminance
-
All modes offer excellent colour accuracy after
profiling with very low dE values
-
Standard mode improved through this process to
correct colour accuracy compared with default factory setup
-
High Bright preset mode offers the highest static
contrast ratio of 800:1 and is therefore probably the best preset to use if you
can calibrate at this level. However, without a tool the standard and sRGB modes
carry more accurate default colours thanks to factory calibration
-
sRGB mode can be calibrated well and offers good
emulation of the smaller colour space, but the static contrast ratio remains
poor. This seems to be a negative of the particular sRGB preset mode and cannot
be corrected through this process
Hardware
Calibration - Natural Color Expert

The S27B970D features a hardware calibration
engine. This means you can, with the right device and software, calibrate the
monitor at a hardware Look Up Table (LUT) level. This allows for a far more
finite adjustment of the screen for absolute image quality and accuracy. The LUT
has a 16-bit bit depth and allows for gamma, uniformity and colour coordinate
correction. The specs for the screen state an accuracy of:
-
Gray
Balance : ΔEab ≤ 1 on sRGB, Calibration Mode
-
Uniformity Correction : ΔEab ≤ 3, Luminance > 90% , on Standard, sRGB,
Calibration Mode
Hardware calibration is only available using
Samsung's own 'Natural Color Expert' (NCE) software. We did test various other
software packages including LaCie Blue Eye Pro, iColor Display, and BasICColor
Display but none allowed for hardware level adjustment of the monitors LUT, only
software level profiling as we have
already completed above.
The NCE software is available to download for free from
Samsung's website. We installed the latest v2.2.0.60 (dated 11 July 2012) of
the software under Windows 7. The installation itself was quick and easy and
there was nothing really to change. Once installed you must connect the monitor
to your PC using the USB connection and cable. You need to have a compatible
calibration tool then to make the adjustments and measurements of the display
(sold separately),
and this needs to be connected into the side USB ports on the base of the
screen.
When you load up the software the screen
automatically reverts to the 'calibration' preset mode. In fact you can't then
make any changes to the OSD settings, even for brightness or contrast as these
are greyed out. You can't even change out of the 'calibration' preset which is
strange, although if you turn the monitor off and back on, you can then change
back to one of the other preset modes. It seems once the NCE software is loaded
though, it locks the screen into the calibration preset and all changes are then
made through the software only.
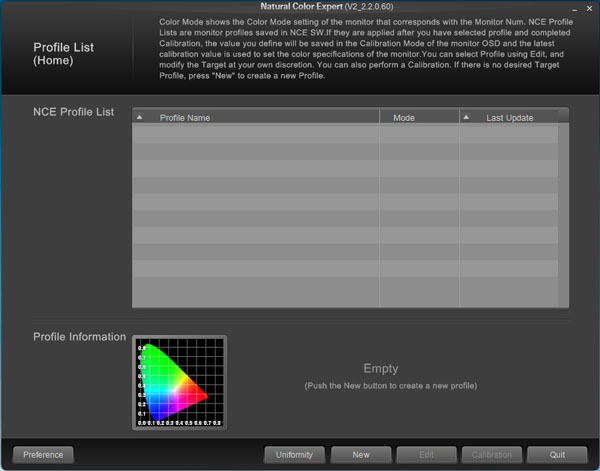
We loaded up the software as shown above. You are
initially presented with the above screen. In the middle would be your saved
profiles for the screen once you have created some, and this allows you to
switch between them depending on your requirements.
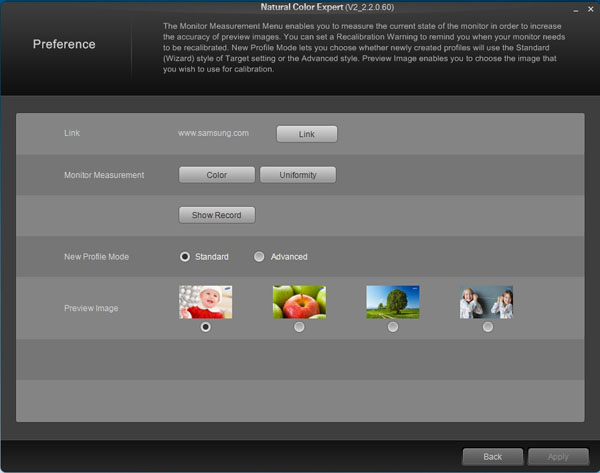
The preferences menu allows you to take a
measurement of the screen in its current state based on the active profile. You
can also select whether the creation of a new profile is in the standard or
advanced mode. You can also choose the 'preview image' which is shown at the end
of a calibration so you can compare the before and after views.
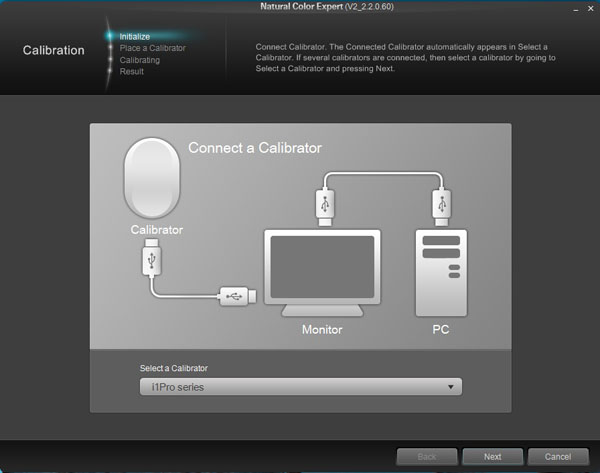
If you then proceed with a calibration you are
first asked to select your calibration device, or connect it if you have not
done so already. Here we are using the i1 Pro spectrophotometer again. The drop
down only allows for a defined set of compatible devices which we have already
discussed earlier on.
We tried using other devices including the X-rite i1 Display 2 but they were not
recognised.
Continuing into the calibration process allows you
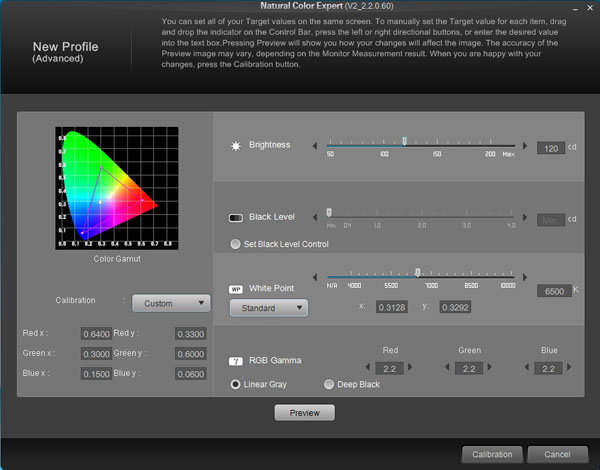
to create a new profile for the monitor, to be stored in its LUT. You can define
several settings as shown above, including the luminance, black level, white
point and gamma curve. On the left you can also define the gamut (colour space)
target although the only option in the drop down for this monitor is sRGB. You
can also define specific RGB coordinates if you wish, but there's no option by
default to just retain the monitors native gamut oddly. I opted to go with the
sRGB gamut although then altered the targets on the right to match
our normal review
targets. At the bottom you can also define the calibration priority, whether
that is "linear grey" or "deep black". You will see fro our tests in a moment
that this has quite a profound impact on contrast ratio.
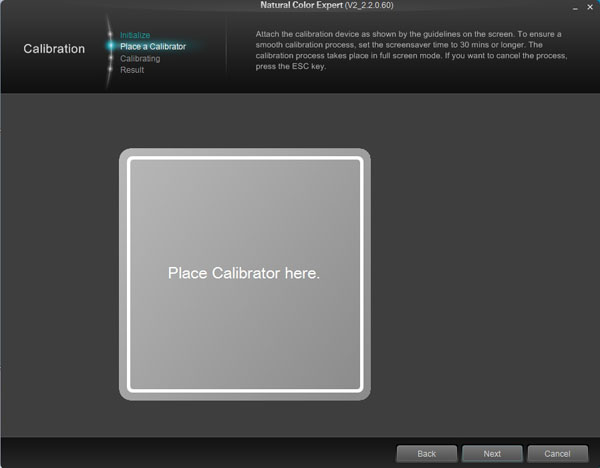
Continuing with the calibration you are asked to
then place the calibrator on the screen in the centre where a box is shown.
Pressing next then takes you into an automated process where a series of colours
are shown in front of the device for profiling and measurement. There is an odd
time indicator at the bottom suggesting how long should be remaining, but it
fluctuates and randomly skips between different times so it's not realistic.
Overall the process took about 1 minute to complete. You do not make any changes
to the screen yourself via the OSD (which is locked when this loads), and all
changes and adjustments are made via the software at the hardware LUT level.
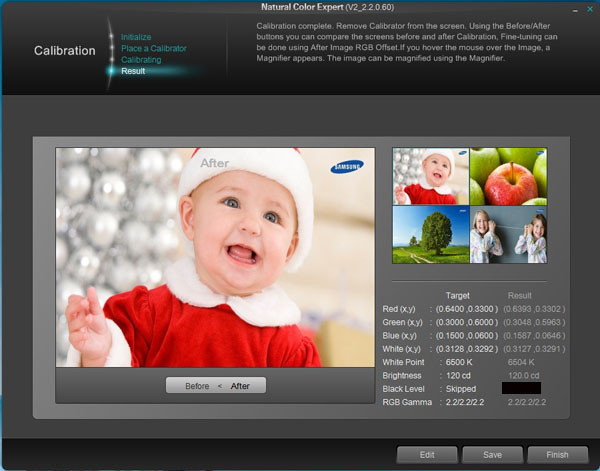
At the end you are presented with a summary screen
of the results. You can compare before and after states of 4 photos if you want
although that's only providing a very basic visual indication of the changes.
There are measurements shown to at least confirm the colour gamut coordinates reached, white
point, luminance and gamma. There is also a measurement of the black depth here
but since we are using the i1 Pro we have blacked that out as it's inaccurate.
The i1 Pro spectrophotometer has a low level accuracy limit of 0.20
cd/m2
and so with black depth being below that here (as we've established earlier on
in the review with a different device) the number fluctuated massively between
different calibration attempts. I've removed it to avoid confusion here. I will
validate the contrast ratio separately in a moment. You can then
save the calibration profile and you are given the option to load it into the
monitor LUT and make it active. That process takes ~13 seconds to load. Checking
the graphics card confirms no gamma curves or profiles are active at that level,
so all adjustments were indeed made at the hardware LUT level.
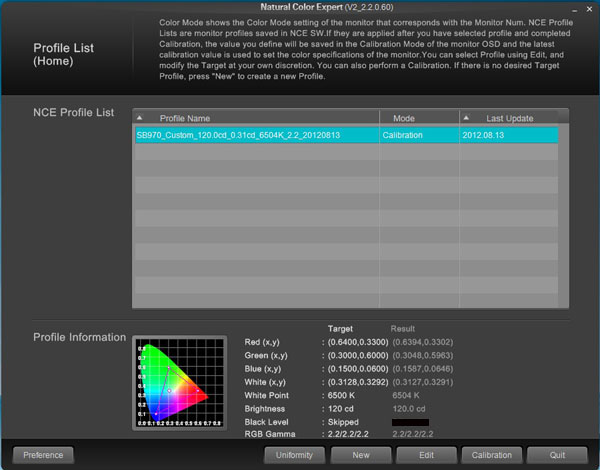
Returning to the main screen shows your saved
profile in the list now. For some reason there is no way to quickly switch
between saved profiles and change what is loaded into the monitors LUT. You have
to complete the calibration process again each time if you want to change
settings at all.
There are no further test and report functions
available to validate your results so you are left having to assume the results
are accurate. It would have been nice to see a more advanced test and report
process available given this software is designed for us with high end (and
expensive) screens. Other than knowing that the white point, gamma and luminance
values have been met we don't have any way here to test the colour accuracy for
dE values. The screen is entered into the 'calibrated' preset mode where you
cannot make any changes affecting the colours, brightness etc in the OSD menu.
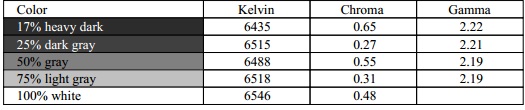
Samsung S27B970D - Hardware Calibrated Settings, sRGB gamut
|
|
Calibrated Settings,
Hardware sRGB Gamut |
|
luminance (cd/m2) |
120 |
|
Black Point (cd/m2) |
0.19 to 0.29 |
|
Contrast Ratio |
417:1 to 644:1 |
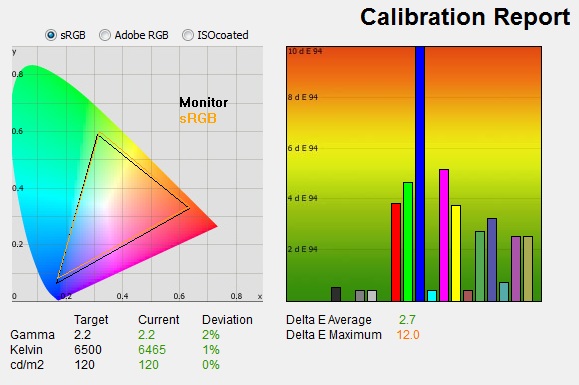
I instead loaded up the LaCie software to carry
out a simple test and report of the calibrated state. There may of course be
some subtle differences in the way the software measures everything but it
should give us an idea of the new hardware-calibrated state. You can see that
the native colour space of the screen has been reduced here to cover more
accurately the sRGB gamut. That's a promising sign as we had defined that in the
NCE process. Gamma, white point and luminance were all pretty close to the
target although the
gamma was measured here as being a little too higher in all shades (2.22 to
2.23). The main issue however seemed to be with the colour accuracy. dE was on
average 2.7 but there were some significant deviations in some shades,
particularly blues. The NCE software had not allowed us to validate the results
in this way, but LaCie's software didn't seem to feel accuracy was very good
after the hardware calibration.
We also tested the black depth and contrast ratio
after this calibration using the NEC customised i1 Display 2 device. This has a
much lower black level range (0.02
cd/m2) and so can give us a much more accurate contrast
ratio measurement than the i1 Pro had. It confirmed contrast ratio was only
417:1 which is a similar result to what we'd seen when we'd software calibrated
the screen in the sRGB preset mode. That had involved a hardware level emulation of
the smaller sRGB colour space, and a software profile to carry out corrections
and profilation of the screen. This was achieved when the priority of the
calibration had been selected as "linear grey". Repeating the process with "deep
black" as the priority returned a much better contrast ratio of 644:1.
Thankfully it seems that you can obtain a better contrast ratio with an sRGB
gamut emulation if you hardware calibrate the screen, but the native sRGB preset
itself crushed the contrast ratio.
I also carried out a validation using BasICColor
Display which gave us similar results as shown above. Some aspects were
confirmed as being met reasonably well, but the colour accuracy was poor in some
colours. Note, we had asked NCE to calibrate to the sRGB colour space so there
was an element of gamut emulation going on here as well, reducing the native
gamut slightly to match the sRGB space more closely.
So it seemed from these tests that although the
NCE software allows for easy calibration of the S27B970D at a hardware level
some aspects were achieved well while others were not. It does allow a decent
colour space emulation to sRGB, and pretty accurate setup for gamma, white point
and luminance. However, resulting colour accuracy was not very good when
calibrated to the sRGB gamut.
We went back into the NCE software to see if we
could do any better. While there isn't a specific option to retain the monitors
native gamut, you can manually enter the RGB coordinates. We therefore referred
to the spec sheet for the LTM270DL02 panel and found the native coordinates as
defined for the panel itself. We have provided them above in the screenshot as
they appear in the data sheet. You will notice that the colour gamut triangle in
the above image is now slightly outside of the sRGB space and looks more like
the native gamut measurements we'd seen
in our earlier tests. We
set the other targets for luminance, white point, black depth and gamma as
before and so the only difference was we were asking the screen to calibrate to
its native gamut, instead of the sRGB emulation.

After the calibration process we were presented
with the usual NCE confirmation window as shown above. You will note that the
resulting colour coordinates are different to our initial calibration in the
sRGB mode.
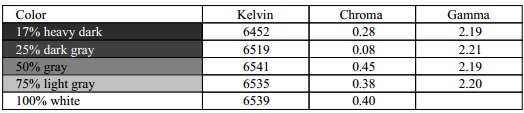
Samsung S27B970D - Hardware Calibrated Settings, Native gamut
|
|
Calibrated Settings,
Hardware Native gamut |
|
luminance (cd/m2) |
118 |
|
Black Point (cd/m2) |
0.19 to 0.29 |
|
Contrast Ratio |
421:1 to 634:1 |
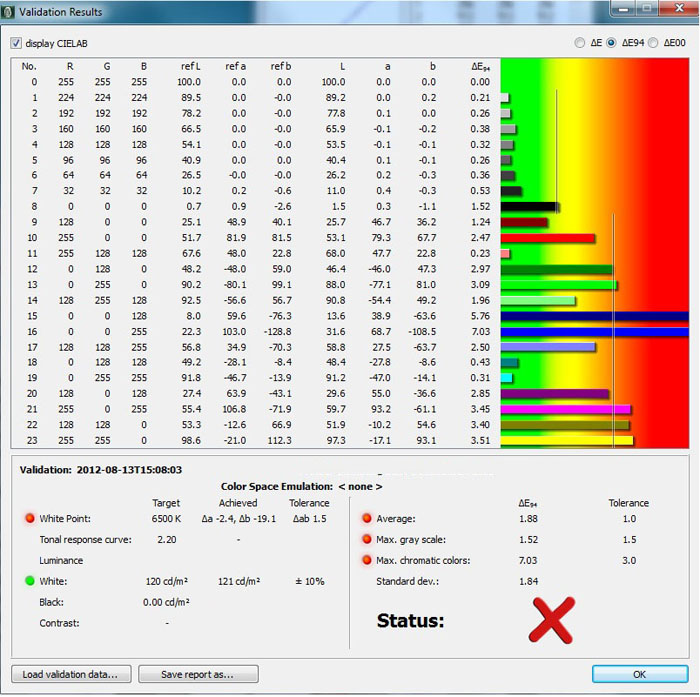
I exited the NCE software and again ran the test
and report feature from LaCie's Blue Eye Pro software. This time the results
were much different. You can see from the CIE diagram on the left that the
colour space measured was now the monitors native gamut and it was not trying to
emulate the smaller sRGB colour space as it had before. Gamma, white point and
luminance were all pretty close to the targets. Importantly the colour accuracy
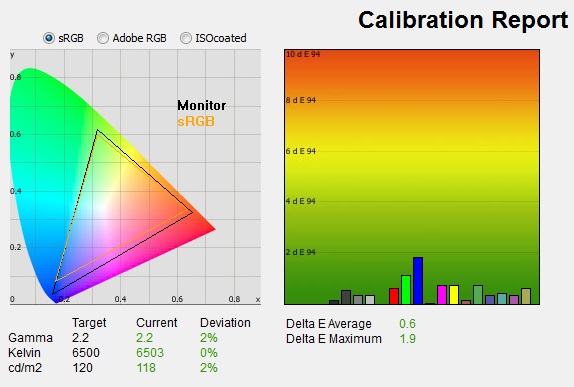
was now much better with dE 0.6 on average and 1.9 maximum. This was a much
better result and it seemed that a hardware calibration to the screens native
gamut offered far better results than when it was trying to emulate the smaller
sRGB colour space. The tricky thing is you need to manually define the gamut
coordinates in the NCE software as there's no option to just maintain the native
gamut of the screen on its own. Again we got different results for black depth
and contrast ratio depending on
whether the NCE calibration process had been
set to prioritise linear grey or deep black. The deep black setting returned
a much more reasonable calibrated static contrast ratio, closer to what we had
achieved during the
software calibration of the standard preset mode. We were not able to match
the higher contrast ratio achieved through the high bright preset mode though.
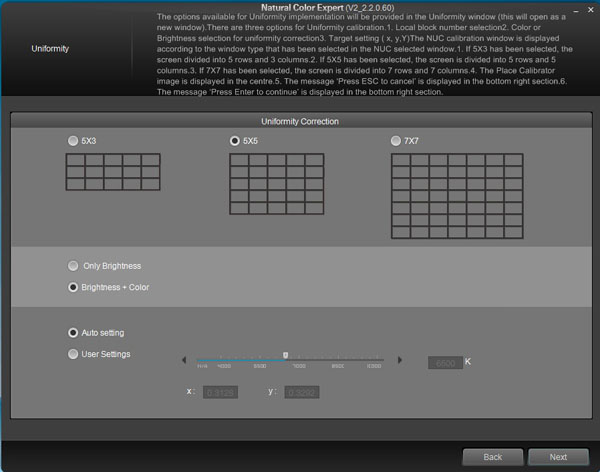
As an additional feature you can also use the NCE
software to measure and correct variances in the brightness and colour across
the screen. This is available through the screen shown above, where you can
define the number of measurement points in your grid. You are then directed to
place your calibrator on the screen and move it between each box as it tells you
to. The device then takes measurements at each point and corrections are made at
a hardware level to ensure an even brightness and colour across the whole
screen. We will test the brightness uniformity correction
a little later on in the
review.
Hardware Calibration Summary
There's a lot to take in there but we will try to
summarise the hardware calibration process on the S27B970D.
-
Hardware calibration provides higher level of
accuracy and control compared with basic software profiling. All adjustments
made at the hardware level and so tonal values are maintained
-
Samsung's NCE software is the only package which
can access the hardware calibration engine. The support for hardware adjustments
is therefore not very flexible
-
Only a defined set of devices work with the
software again giving you limitations
-
Software is easy to use on the most part and is
pretty quick. It is however missing an option to quickly switch between saved
profiles. You have to complete the calibration process again if you want to
change anything
-
Calibration process allows for reasonable set of
targets and process is pretty quick (~1 minute)
-
Reporting feature is limited, only really
confirming colour coordinates, gamma, white point and luminance. Missing colour
accuracy tests and dE measurements
-
sRGB emulation is simple through NCE although
resulting colour accuracy is poor for some reason (as verified with other
software reporting features). We had actually seen better performance from the
native sRGB preset mode to be honest.
-
Tricky to retain monitors native gamut, you need
to manually enter the coordinates which thankfully we obtained from the panel
spec sheet
-
Calibration at manually defined native gamut of
the backlight resulted in better colour accuracy afterwards
-
You can define the priority for calibration
between "linear grey" and "deep black". The latter produces a much better
contrast ratio as measured in our tests in both sRGB and native gamut
calibrations
All in all the hardware calibration was ok,
although pretty limited in its flexibility and reporting. You can achieve pretty
good results when calibrating at the native gamut and with deep black defined as
the priority, but sRGB calibration leaves some issues with colour accuracy for
some reason.
Calibration
Performance Comparisons
I've provided a comparison above of the S27B970D against some of the other screens we have tested.
There are a lot of different calibration results achieved in the previous
sections, both through software profiling in different preset modes, and through
hardware calibration. For reference I have taken the software calibration
results in the High Bright preset mode since this had produced the highest
contrast ratio, and so was a more useful comparison perhaps of the screens
optimum performance in that area in a moment.
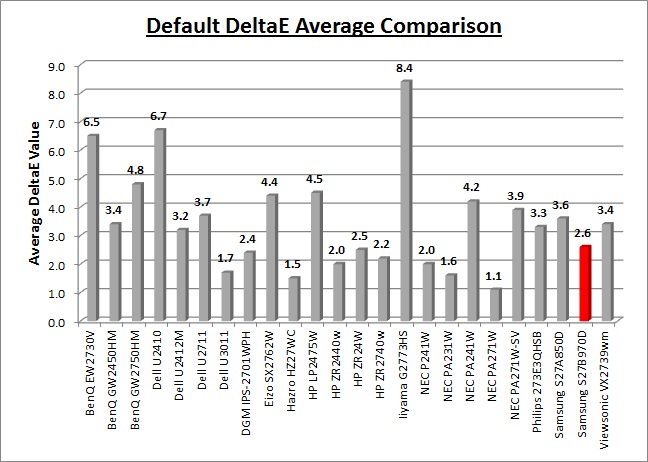
Out of the box
average dE was 2.6 which was pretty decent really and combined with the
excellent
default gamma and white point represented a good factory calibration.
It offered a similar level of accuracy to the
HP ZR2740w (2.2),
Hazro HZ27WC (1.5) and
DGM IPS-2701WPH (2.4) which also all had pretty good default gamma and white
point setup. All these screens were ahead of some of the other
27" models like the AMVA based
BenQ EW2730V (6.5) and the TN Film based
Iiyama G2773HS (8.4) for instance.
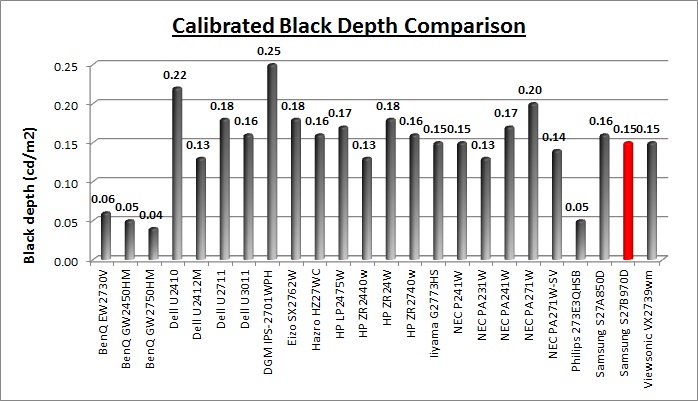
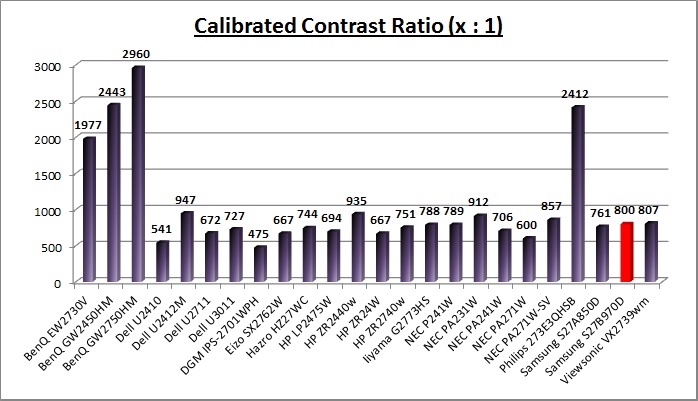
The calibrated black depth and contrast ratio of
the S27B970D varies depending on which mode you are operating in. We have
provided the figures from the High Bright mode here (software calibration) since
it had returned a calibrated contrast ratio of 800:1 which is the best you can
get from the screen really. Software calibration in the standard preset modes
left us with a more limited contrast ratio of 668:1, and in the sRGB mode the CR
was crushed to 429:1 unfortunately. Carrying out hardware calibration in either
the sRGB or the native colour space of the monitor allowed for a contrast ratio
of ~420:1 when linear grey was the priority of the process, but up to ~640:1
when deep black was instead the priority. Overall the 800:1 figure obtained in
the High Bright mode was pretty good and on par with many of the IPS screens we
have tested. It was not as good as the VA based models however which can reach
up to ~3000:1 in some cases.
Contrast
Stability and Brightness
I wanted to see how much variance there was in the screens contrast as we
adjusted the monitor setting for brightness.
In theory, brightness and contrast are two independent parameters, and good
contrast is a requirement regardless of the brightness adjustment.
Unfortunately, such is not always the case in practice. We recorded the
screens luminance and black depth at various OSD brightness settings, and
calculated the contrast ratio from there. Graphics card settings were left at
default with no ICC profile or calibration active. Tests were made using an
NEC branded and customised
X-rite i1 Display 2 colorimeter. It should be noted that we used the
BasICColor calibration software here to record these, and so luminance at
default settings may vary a little from the LaCie Blue Eye Pro report.
|
OSD Brightness |
Luminance
(cd/m2) |
Black Point (cd/m2) |
Contrast Ratio
( x:1) |
|
100 |
248.9 |
0.35 |
711 |
|
90 |
229.9 |
0.32 |
718 |
|
80 |
211.8 |
0.30 |
706 |
|
70 |
192.8 |
0.27 |
714 |
|
60 |
175.4 |
0.25 |
701 |
|
50 |
155.3 |
0.22 |
706 |
|
40 |
137.0 |
0.19 |
721 |
|
30 |
117.7 |
0.17 |
692 |
|
20 |
99.3 |
0.14 |
709 |
|
10 |
75.2 |
0.10 |
752 |
|
0 |
61.1 |
0.09 |
678 |
|
Luminance Adjustment Range = 187.8 cd/m2
Black
Point Adjustment Range = 0.26 cd/m2
Average
Contrast Ratio = 710:1
|
The luminance range of the screen was very pretty
reasonable. At a maximum brightness setting (in the standard preset mode) the screen reached 248.9
cd/m2 which was
a little higher than the specified 220 cd/m2 maximum in the standard
mode. You may need to think about whether you would ever require a higher
luminance than this (for movies or gaming perhaps) but I doubt many people would
in real use. You can boost the maximum brightness to around 283 cd/m2
if you use the High Bright preset as well. The luminance could be
adjusted all the way down to a low 61.1 cd/m2 through changes to
the brightness control, giving you a 187.8 cd/m2 adjustment range.
This should afford you a good range of adjustments for varying lighting
conditions. Those wanting to work in darker conditions should find the lower
level adjustment fine, and a setting of around 30 - 35% should return you a
luminance of around 120 d/m2 out of the box. Black depth ranged from
0.35 to 0.09 cd/m2 and the overall static
contrast ratio was on average ~710:1 which was adequate, but not great. Again
this could be improved to ~820:1 in the High Bright preset mode.
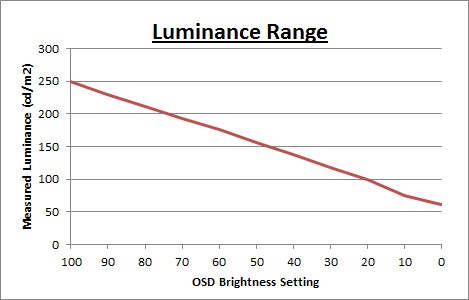
We have plotted the
luminance trend on the graph above. The screen behaves as it should, with a reduction in the backlight intensity controlled by the reduction
in the OSD brightness setting. This was pretty much a linear relationship.

Contrast stability was
fairly stable across the range, but there did seem to be some slight instability
at the lower adjustment end.
Dynamic Contrast
The Samsung S27B970D features a dynamic contrast
ratio (DCR) control within the OSD menu and the manufacturers spec talks about
an unspecified "Mega DCR". Dynamic contrast ratio involves controlling the
backlight of the screen automatically, depending on the content shown on the
screen. In bright images, the backlight is increased, and in darker images, it
is decreased. We have come to learn that DCR figures are greatly exaggerated
and what is useable in reality is often very different to what is written on
paper or on a manufacturers website. For this test I would use the colorimeter to record the
luminance and black depths at the two extremes. Max brightness would be
recorded on an almost all white screen. Black depth would
be recorded on an almost all black screen. In real use you are very
unlikely to ever see a full black or full white screen, and even our tests are
an extreme case to be honest. Carrying out the tests in this way does give you
a good indication of the screens dynamic contrast ratio in real life
situations however.
The DCR feature is available to select only when
you are in the 'High Bright' preset mode. This is a little fiddly as you have
to first enter that preset mode, and then go into the main OSD to find the DCR
setting. Once enabled it actually seems to move you out of any of the preset
modes, with the preset menu then telling you it is "not available". It has
a simple on or off setting you can select and once enabled, the brightness and
contrast controls in the OSD are greyed out also. You can't then change the
preset to simply revert back to previous settings and turn the DCR off.
Instead you have to turn DCR off and then go back to the preset menu again.
|
|
Dynamic Contrast |
|
Specified DCR Range |
Unspecified Mega DCR |
|
Available in Presets |
High Bright |
|
Settings |
On / Off |
|
Max luminance (cd/m2) |
284.8 |
|
Min Black Point (cd/m2) |
0.08 |
|
Max Dynamic Contrast Ratio |
3560:1 |
We tested the DCR feature as described above. When
switching between an almost all-white and an almost all-black screen you could
see the DCR kick in. The changes were smooth but very quick, taking about 1
second to alter the backlight between the two extremes. This controlled the
backlight up to a maximum of 284.8
cd/m2, which
was the maximum luminance in the 'High Bright' preset. At the darker end, it
controlled the black point down to 0.08 cd/m2. This gave us a useable DCR of 3560:1 which wasn't bad, but not
great. We tested the
screen again with a completely 100% all-black screen and you could see
that the backlight was being completely turned off. This would give you a DCR
trending towards infinity:1, but really in practice you are never going to see a
100% black image and so it's use is irrelevant.
Viewing Angles
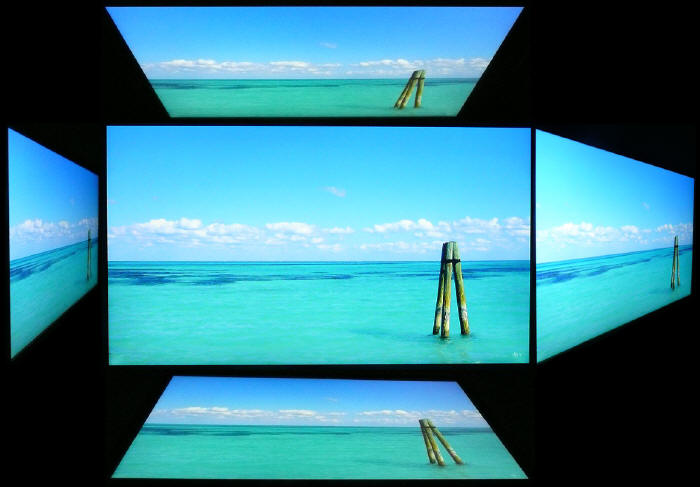
Above: Viewing
angles shown from front and side, and from above and below. Click for
larger image
Viewing angles of the Samsung S27B970D are very
good and very similar really to an IPS panel. Horizontally there are very wide
fields of view with a small contrast shift only really becoming noticeable from
a wide angle of about 45° and beyond. Vertically, the contrast shift was a
little more pronounced but the fields of view were still good. As a result of
the change in pixel structure from Samsung's PVA to their PLS technology the
panel is free from the off-centre contrast shift which you see from VA matrices.
This is one of the reasons why IPS technology is so highly regarded in the
colour enthusiast and professional space since it can offer very wide viewing
angles and freedom from this contrast shift. With PLS offering the same freedom
it could well become a popular choice for colour critical work as well where
wide viewing angles are important. The PLS panel is also free of the very
noticeable contrast and colour tone shifts you see from TN Film panels
vertically.

Above: View of an all black screen from the side. Click for larger version
On a black image, like many IPS panels, there is a
white glow when viewed from an angle. This picture was taken in a
darkened room though and in normal working conditions this shouldn't present
much problem. There is no A-TW polarizer or equivalent film on this panel which
was something rarely used in the IPS market, but was implemented on some older
IPS screens to improve the off centre black viewing. Because of the size of the
screen you may notice some of this glow from the corners when you are viewing it
head on. This is only really noticeable in darkened room conditions and when
viewing dark content and is quite similar to IPS panels.
Panel Uniformity
Measurements of the screens luminance were taken
at 35 points across the panel on a pure white background. The measurements were
taken using BasICColor's calibration software package, combined with the NEC
customised X-rite
i1 Display 2 colorimeter. The above uniformity diagram shows the difference, as
a percentage, between the luminance recorded at each point on the screen, as
compared with the reference point of a calibrated 120 cd/m2. This is
the desired level of luminance for an LCD screen in normal lighting conditions,
and the below shows the variance in the luminance across the screen
compared with this point. It is worth noting that panel uniformity can vary from
one screen to another, and can depend on manufacturing lines, screen transport
and other local factors. This is only a guide of the uniformity of the sample
screen we have for review.
Uniformity of Luminance (Standard Mode)

The luminance uniformity of the S27B970D was
very good overall. There was some slight variance in luminance, mostly along
the bottom edge where it dropped down to 104
cd/m2
in the worst cases (-14% deviance). All in all
though 97% of the screen was within 10% deviance of the centre of the
screen, and 77% was actually within 5% deviance. A good result here from the
S27B970D. This is the standard uniformity of our sample in all preset modes.
Uniformity Correction
As an additional feature available in the NCE
software is an option to measure and correct variances in the brightness and
colour across the screen within the 'calibration' preset mode. This is available
through the 'uniformity' section as shown above. You can define the number of
measurement points in your grid for this correction and you are then directed to
place your calibrator on the screen and move it between each box as it tells you
to. Obviously the more measurement points the better in terms of the results,
but the longer it will take to complete.
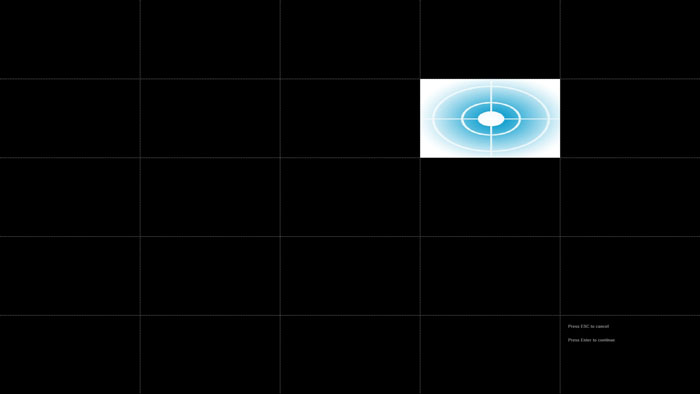
The grid appears on the screen as shown above. The
device then takes measurements at each point and corrections are made at a
hardware level to ensure an even brightness and colour across the whole screen.
The software makes two passes through each box. The first pass takes about 5
seconds per box and the second pass takes about 3 seconds. It's quite a
long-winded process and a bit annoying as you have to keep re-positioning your
calibrator across the screen.
Afterwards you are presented with a results screen
which looks like the above. You are then asked if you want to load the NCU
corrections into the monitor which takes about 8 seconds to complete. This is
then saved to the hardware LUT and active when you are in the 'calibration'
preset mode. As a result, this uniformity correction is only available if you
are able to hardware calibrate the screen, so you must have the NCE software and
a compatible calibration tool. You cannot take advantage of the uniformity
corrections in any other preset mode either so in that sense it's a little more
limited than other manufacturers techniques which are available in other modes
(Eizo and NEC for example). However, it is a correction specific to your unit
and based on real-life measurements you make so it should be reliable.
Uniformity of Luminance
(Calibration Mode with Uniformity Correction)
We took our same measurements of the luminance
again across the screen and were pleased to see that the correction process
through NCE had been successful. There was very little deviance at all now, with
a maximum difference of only 5% in the bottom left and top right corners. The
overall uniformity was excellent thanks to the corrections carried out. The good
thing was that these corrections were specific to our sample panel, based on
real-life measurements by the user. As such you can run this again over time to
account for any backlight or panel variations which might arise. Combined with
the hardware calibration you have a pretty powerful control over the internal
LUT.
Backlight Leakage
Above: All black screen in a darkened room. Click for larger version
As usual we also tested the screen with an all
black image and in a darkened room. A camera was used to capture the result. To
the naked eye, there did not appear to be much in the way of backlight leakage
although you could notice the characteristic PLS-glow as you looked at the
black image from different angles. The camera picked out some slight unevenness
and some clouding from the backlight in the right hand side corners. This was
most apparent in the bottom right hand corner but in practice overall there was
nothing too severe. There was no bleeding from the edges which was good to see
as that can become quite distracting during some uses, for instance when
watching a movie with black borders top and bottom.
General and Office Applications
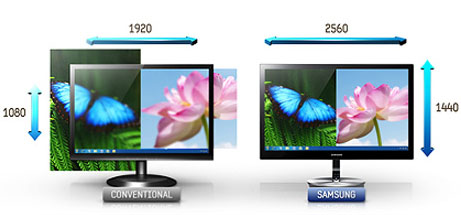
The S27B970D features a massive 2560 x 1440
WQHD resolution which is only just a little bit less vertically than a 30"
screen. The pixel pitch of 0.233mm is very small as a result, and by comparison
a standard 16:10 format 24" model has a pixel pitch of 0.270mm and a 30" model
has 0.250mm. These ultra-high res 27" models offer the tightest pixel pitch and
therefore the smallest text as well. I don't find it too small personally, but
day to day I am used to a 24" screen. Some users may find the small text a
little too small to read comfortably, and I'd advise caution if you are coming
from a 19" or 22" screen for instance where the pixel pitch and text are much
larger. I found a 30" screen to be quite a change with text size when I first
used one, and this is very similar and even a little bit smaller! I still
personally prefer the slightly larger text of a 24" model myself, but I expect I
could happily get used to the added resolution on these models given time.
The massive resolution is really good for office
and general use, giving you a really big screen area to work with. It is a
noticeable upgrade from a 24" 1920 x 1200 resolution, and it's good to see
Samsung
have opted for the high res panel here rather than reverting to a 1920 x
1200 or 1920 x 1080 res panel as you may find in other older 27" models. For
those wanting a high resolution for CAD, design, photo work etc, this is a
really good option. The image was very sharp and crisp and text was very clear.
The glossy screen coating ensured that the white backgrounds of office documents
looked clean and pure, and did not suffer from the grainy and dirty feel of some
IPS panels featuring aggressive AG coating. Being glossy though it did introduce
some reflections which were a bit of a pain sometimes. You will want to ensure
you don't have the screen facing a window or strong light source I would think.
There were no specific presets for office or text
work, but you could easily set up one of the others to your liking. We found
default setup of the standard, high bright and sRGB to be very reliable in terms
of gamma and white point which was great news. The sRGB emulation mode is also
available if you specifically need to work with the slightly smaller colour
space. Be warned though that the native preset mode does crush blacks and
contrast ratio. The brightness control also
allows you to control a decent range of adjustment to the luminance of the screen
which is good. The out of the box default of 100% brightness is of course too
bright for prolonged office use, so you will probably want to change this to
about 30 - 35% to achieve a luminance of ~120
cd/m2. Those wanting
to use the screen in low lighting conditions shouldn't have any issue here
either as the low level adjustment is good, offering a range down to about 61
cd/m2.
Another thing to note while we are talking about the brightness control is that
the screen does not use
Pulse-Width modulation (PWM) to control backlight dimming and so those who
suffer from eye fatigue or headaches associated with flickering backlights
need not worry here.
The stand provided offers a decent enough range of
adjustments as well with a good height and tilt range available. There is no
pivot mode for those who like to work in portrait mode. It should be noted as
well that the screen cannot be wall or arm mounted. The integrated speakers should be adequate for
general office sounds and light music as well and it's useful to see those
included. It might have been good to feature an audio input as well to play
sound from your PC through them, and perhaps a headphone socket. As it is, they only support sound when using
the DisplayPort or HDMI inputs. There are also two USB 2.0 ports available which
are handily positioned on the right hand edge of the base for quick access.
There are no other features like card readers, ambient light sensors or human
motion sensors here though. With DisplayPort and DL-DVI both supporting the full
2560 x 1440 resolution you should have a decent choice for your PC. Image
quality was excellent with very crisp and clear text in office applications.
There is no VGA connection available on this screen.
Above: photo of
text at 2560 x 1440 (top) and 1920 x 1080 (bottom)
The screen is designed to run at its native
resolution of 2560 x 1440 and at 60Hz refresh rate. If you want to you can run
it outside of this and let the image be scaled to fill the screen. At the native
resolution text was very sharp and clear. We ran the screen at 1920 x 1080 which
was the next step down, while still maintaining the screens 16:9 aspect ratio.
Text was actually good and was not blurred too much, although of course you do
take a big hit in terms of resolution. To give you
more desktop real estate and maximum picture quality, the native resolution is
of course recommended where possible.
Responsiveness and Gaming
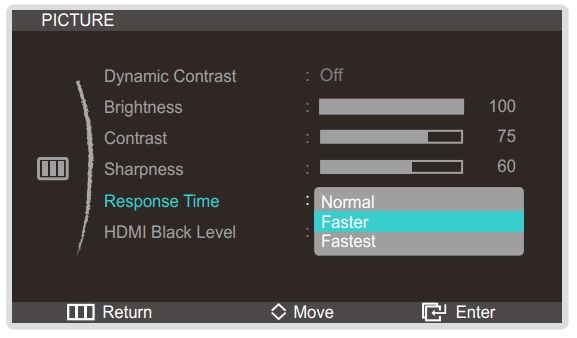
The S27B970D is rated by Samsung as having a
5ms G2G response time which implies the use of
overdrive /
response time compensation (RTC) technology, used to boost pixel
transitions across grey to grey changes and improve responsiveness in practice
and reduce ghosting and blurring. The panel being used is an
Samsung LTM270DL02-201 PLS Panel and it is rated with a 12ms ISO response
time for reference.
Before we get in to the side by side screen
comparisons I want to quickly talk about the
'response time' (overdrive) control available through the screens OSD menu.
It is available within the 'picture' section as shown above. This allows you to
manually control the level of overdrive / RTC impulse being applied to the
pixels, with options of normal, faster and fastest being available. You may wish
to read our
specs section for some further information about overdrive / response time
compensation.
The screen was tested using the chase test in
PixPerAn, a good bit of software for trying to quantify differences in real
terms responsiveness between monitors. As a reminder, a series of pictures are
taken on the highest shutter speed and compared. The images above are the best
case examples from the screen with the 'response time' setting at each level. In
the 'normal' mode the responsiveness of the panel is actually still pretty good.
There is no obvious ghosting to the naked eye although a reasonable degree of
motion blur is detectable. When switching to the 'faster' mode, this blur is
reduced a fair bit and the moving image looks sharper and clearer. This setting
is turning the overdrive impulse up of course and so pixel transitions are being
sped up. This translates into a real life difference in perceived response
times. We saw a very similar performance from the
S27A850D when we tested it.
The 'fastest' setting turns the overdrive impulse
up again another notch. However, in this mode it is turned up too high and is
poorly controlled. As a result a noticeable white halo is introduced behind the
moving car and a dark trail behind the moving speech bubble. Here the overdrive
is causing the pixels to overshoot their required state and unfortunately
introduce this distracting artefact. I wouldn't recommend using this setting
unfortunately as the overshoot is quite pronounced and distracting during use.
The 'faster' setting seems to offer the optimum performance in terms of fast
pixel response times, and also freedom from any obvious overshoot, and I would
recommend using that option. Again we had seen the same from the S27A850D and so
it appears nothing has really been changed in terms of pixel response times or
control thereof.
Display Comparisons
The screen was tested again using the chase test
in PixPerAn for the display comparisons. As a reminder, a series of pictures are
taken on the highest shutter speed and compared, with the best case example
shown on the left, and worst case example on the right. This should only be used
as a rough guide to comparative responsiveness but is handy for a direct
comparison of the impact of this setting:
27" 5ms G2G
Samsung PLS (Response Time = Faster)
27" 5ms G2G
Samsung PLS (Response Time = Faster)
27" 6ms G2G
LG.Display H-IPS
27"
6ms G2G LG.Display H-IPS

27"
6ms G2G LG.Display H-IPS
I have provided a comparison of the S27B970D first of all against some of the
popular 27" IPS and PLS based screens we have tested. As a first comparison
we have included the
S27A850D model which was the first of its kind to feature a PLS panel. It
had impressed us at the time with its decent responsiveness and the S27B970D was
very comparable really. Both are provided here in their "faster" response time
mode which is free from the overshoot artefacts you see if you push the setting
all the way up to "fastest". The Samsung models are actually a little faster
than the 3 IPS based screens shown here. The
Hazro HZ27WC and
DGM IPS-2701WPH are both glossy screens as well and although response times
were good, there was a little more of a pronounced blur to the moving image. The
Dell U2711 remains a popular 27" model and offered good responsiveness and
low levels of blur. Unfortunately a dark overshoot was introduced which was
pretty noticeable, and caused by a poorly controlled and too aggressive
overdrive impulse. Overall the performance of the S27B970D was favourable here
and another decent outing from PLS as a technology.
27" 5ms G2G
Samsung PLS (Response Time = Faster)

27"
7ms G2G LG.Display p-IPS
(response
improve = on)

27" 6ms G2G
LG.Display H-IPS (Overdrive = On)
I have also provided a comparison of the S27B970D
against a couple of competing professional grade monitors. Given the price point
and market position of the S27B970D it is likely that some buyers will want to
compare with the high end NEC and Eizo models in the market. The S27B970D again
performed comparatively very well. The
NEC PA271W and
Eizo SX2762W feature overdriven IPS panels. They did offer pretty low levels
of motion blur and some decent performance really considering they are not gamer
orientated screens, but there were some overshoot issues in some cases,
particularly evident on the Eizo tests.
27" 5ms G2G
Samsung PLS (Response Time = Faster)
27" 12ms G2G
LG.Display H-IPS

27" 4ms G2G AU
Optronics AMVA (AMA = Premium)
27" 6ms G2G AU
Optronics AMVA (SmartResponse = Fastest)

27" 8ms G2G AU
Optronics AMVA (AMA setting = Premium)
If you then compare the S27B970D with 4 other 27" screens we have tested which use
AMVA or IPS panel technology there are more pronounced differences in some
cases. The
Philips 273E3QHSB and
BenQ EW2730V are based on AMVA panel technology and fell behind in these
tests. The generation of AMVA panel being used in those two models was not able
to compete with the responsiveness of modern IPS or PLS displays and there were
quite high levels of blur evident, even with their response time controls turned
up to the optimum levels. Those screens are rated with a 6ms and 8ms G2G
response time respectively which just goes to show you can't always trust a
specification when determining real life performance of a display. The recently
tested
BenQ GW2750HM had offered some improvements, and along with the
HP ZR2740w showed pretty low levels of blur. They were again not as fast as
the S27B970D in practice though.
27" 5ms G2G
Samsung PLS (Response Time = Faster)
24" 6ms G2G
LG.Display e-IPS (Video OverDrive = On)
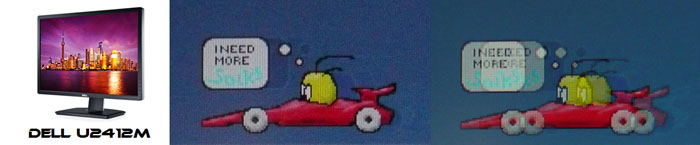
24" 8ms G2G
LG.Display e-IPS

23" 8ms G2G
LG.Display e-IPS (W-LED)

24" 4ms G2G AU
Optronics AMVA (AMA = Premium)
Above is a comparison of the S27B970D against some popular models in smaller
sizes. First are three models using IPS panels, but in smaller sizes of 24" and
23". The
HP ZR2440w had performed very well in these tests and showed a similar
level of motion blur to the S27B970D in practice. There was a very slight dark and
pale halo trail evident in those tests but it was very slight. The
Dell U2412M and
U2312HM again offered low levels of motion blur but a more obvious dark
overshoot trail was introduced. I have also included the results from our recent review of the
BenQ GW2450HM since there had been some big improvements made in AMVA panel
technology in this most recent generation of panel. Thankfully the
responsiveness was much better than we'd seen from the
Philips 273E3QHSB and
BenQ EW2730V we showed you above and was on par in practice with these IPS
screens.
27" 5ms G2G
Samsung PLS (Response Time = Faster)
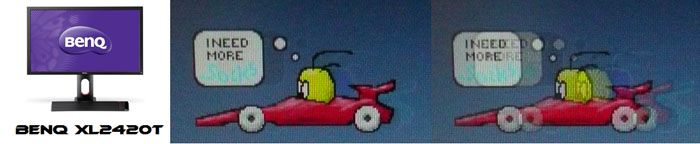
24" 2ms G2G AU
Optronics TN Film + 120Hz (AMA = On)
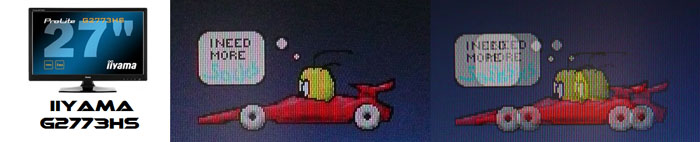
27" 1ms G2G Chi
Mei Innolux TN Film + 120Hz (Over Drive = 0)

22" 3ms G2G Samsung TN Film + 120Hz
I've also included a comparison above against
three very fast 120Hz compatible screens we have tested. In all cases these
other screens are using TN Film panels and are aimed primarily at gamers.
Firstly there is a direct comparison against
BenQ's XL2420T. This showed very low levels of motion blur, but some dark
overshoot was introduced as a side-effect. The recently tested
Iiyama G2773HS was very responsive and even has a quoted 1ms G2G response
time. This showed very low levels of blur and had minimal issue with overshoot.
The
Samsung SM2233RZ performed very well in these tests and showed very low
levels of motion blur. When 120Hz mode was enabled the overdrive artefacts
evident in 60Hz mode were almost completely eliminated, which is something we
have seen here with the BenQ XL2420T as well.
There is something else going on here though as
well which can't be picked out by the camera. All of these TN Film models are
running at 120Hz refresh rates, which allows for improved 120fps frame rates and
the support of
3D stereoscopic content as well. This can really help improve smoothness and
the overall gaming experience so these screens still have the edge when it comes
to fast gaming. From a pixel response point of view the S27B970D performed very
well, but there are some other areas you still need to think about when it comes
to high end gaming. It couldn't keep up with the very fast TN Film models with
120Hz support.
The responsiveness of the S27B970D was pleasing
and pretty much remained the same as the older S27A850D. It offered no
obvious ghosting and only low levels of motion blur in the 'faster' response
time mode. Unfortunately the 'fastest' setting was too aggressive and introduced
some overshoot so I would recommend sticking with the 'faster' setting. The
screen could compete easily
with the popular 27" IPS models we had tested and showed a sharp moving image,
free of any noticeable overshoot artefacts which had affected some of its
competitors. The screen should be perfectly capable of handling fast paced
games, although you may want to consider the type of graphics card required to
run games with high settings at such a high resolution. Thankfully we'd also
seen good image interpolation at lower resolutions and so gaming with an input
resolution of 1920 x 1080 (for instance) is also very viable.
Additional Gaming Features
Above: aspect ratio options in PC
mode. Below: Aspect ratio options in AV mode
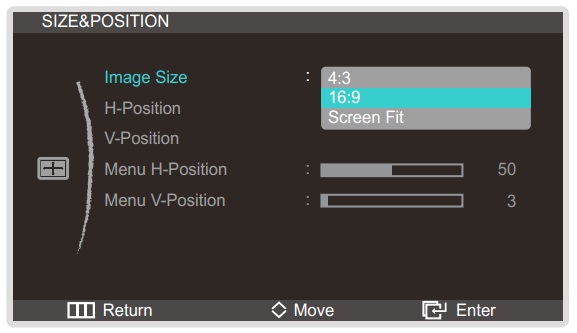
Aspect Ratio Control - The screen offers
several options within the OSD menu for hardware level
aspect ratio control. There are actually different options available
depending on whether you are in PC or AV mode in the OSD menu, and so you may
have different options available depending on your connection option and the
input device. In the PC mode there are options for Auto (maintaining the source
aspect ratio whatever it is) and wide (fill the screen completely regardless of
the source aspect ratio). In AV mode you instead have options to maintain 4:3 or
16:9 aspect ratios, or 'screen fit' which displays the input without truncating
the original picture according to the manual.
Preset Modes - There is no specific game
preset available from the screen so you will have to set up one of the other
modes to your liking. This is probably only because its not really a screen
aimed at gamers.
Input Lag
It is important to understand fully what
input lag is and also the various measurement techniques which are used to
evaluate this aspect of a display in the industry. As a result of our studies,
we have improved our testing methodology by adopting the SMTT 2.0 tool which is
used to generate the results below. Please see our full
input lag testing article for all the details.
Input Lag Classification
To help in this section we will also introduce a broader classification system
for these results to help categorise each screen as one of the following levels:
-
Class 1)
Less than 16ms / 1 frame lag - should be fine for gamers, even at high levels
-
Class
2)
A lag of 16 -
32ms / One to two frames - moderate lag but should be fine for many gamers.
Caution advised for serious gaming and FPS
-
Class
3)
A lag of more
than 32ms / more than 2 frames - Some noticeable lag in daily usage, not
suitable for high end gaming
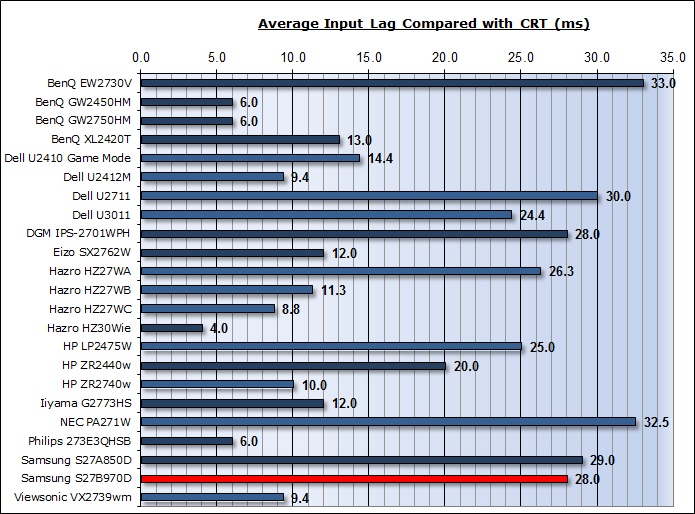
For the full reviews of the models compared here and the dates they were written
(and when screens were approximately released to the market), please see our
full
reviews index.
Our tests here are based on the new format using
SMTT 2.0. We have provided a comparison above against other models we have
tested to give an indication between screens. However, please note that many of
the other screens tested here were using older stopwatch methods and not the
SMTT 2.0 tool. For reference, those shown as darker blue lines were tested using
SMTT 2.0.
The Samsung S27B970D showed a pretty much
identical input lag as its predecessor, the S27A850D (also tested at the time
using SMTT 2.0). The average lag was 28ms, with a maximum of 31ms shown. Note
that the input lag measurement here is based on the overall "display lag" as
seen by the user, which would take into account raw signal processing delay + an
element of the pixel response time for the relevant transitions. It should also
be noted here that the input lag tests were conducted when in the "faster"
response time setting as we had
already identified that to be the optimum setting for gaming experience,
being free from the overshoot issue when using the "fastest" setting. Of course
the response time setting has an impact on the overall display lag of the screen
in these tests. We conducted the same measurements when in the "fastest" setting
for reference and the overall image lag was reduced a little to 24.4ms.
The lag of this screen has been
categorised as CLASS 2 as detailed above and the lag is a little less
than 2
frames. As such it may not be suitable for very high end gaming or fast first
person shooters, but then again, this isn't really a gamer-orientated screen
anyway.
Movies and Video

The following summarises the screens performance
in video applications:
-
27"
screen size makes it a pretty good option for an all-in-one multimedia screen
and comparable to smaller LCD TV's in size. A screen this big really does help
lend itself to video viewing.
-
16:9
aspect ratio is more suited to videos than a 16:10 format screen, as it leaves
smaller borders on DVD's and wide screen content.
-
Native
2560 x 1440 resolution can easily support true 1080 HD content (1920 x 1080
resolution)
-
Digital
DL-DVI, DisplayPort and HDMI interfaces support HDCP for any encrypted and
protected content
-
Good to
see DisplayPort and HDMI provided for connection of additional devices, both
of which are very popular for external DVD and Blu-ray players
-
Glossy
screen coating can look attractive but may cause issues with reflections
depending on room conditions and light sources. Perhaps not as suitable as an
anti-glare coating for this purpose.
-
Contrast
ratio was ok in some modes, and High Bright mode did seem to return the
optimum contrast ratio in practice. Darker detail should not be lost in movies
-
Dynamic
contrast ratio is available and works to a reasonable level in practice, up to
around 3560:1. Might be useful for those who like the technology although
transitions are very fast
-
There is
a 'Cinema' preset mode available in the OSD if you want to set up a
mode specifically for your movie viewing
-
Very good
pixel responsiveness for movies and video which should be able to handle fast
moving scenes without issue. I would recommend a response time setting of
"faster" in the OSD menu
-
Wide
viewing angles thanks to PLS panel technology meaning several people could
view the screen at once comfortable and from a whole host of different angles.
The PLS glow from an angle might present a problem on darker content depending
on your line or sight and distance from the screen
-
Good
ergonomic adjustments available from the stand with a good range of height and
tilt available
-
No
obvious backlight leakage from the edges which is good. This type of leakage
may prove an issue when watching movies where black borders are present but it
is not a problem here. Some slight clouding in the right hand corners which might become
evident in darkened room conditions sometimes.
-
Integrated stereo speakers available if you want. Might be useful for the
occasional video where needed
-
There
is no headphone socket provided unfortunately for private audio. There is also
no audio input to connect sound from a PC into the integrated speakers
-
No
picture in picture (PiP) or picture by picture (PbP) modes available on this
model.
-
HDMI
black level control via the OSD for optimising and controlling contrast from
HDMI sources
-
For
PAL sources, we have tested the screen and confirmed it will support a
resolution of 1920 x 1080 at 50Hz refresh rate, but not the native 2560 x 1440
resolution of the panel.
|
|
This review had been made available to
download and save
in PDF format (.pdf) allowing you to:
-
Save a copy for personal use and
archiving
-
Save and read our reviews offline
-
Read our reviews on your eBook
reader (e.g. Kindle, iPad and other tablets)
Please
visit our Store
for more information and to download a copy. A small fee will contribute
towards the running of TFTCentral and allow us to continue to make high
quality and detailed reviews in the future. |
Conclusion
The Samsung S27B970D was a very enjoyable screen
to test really, a whole range of new features and aspects to test from this
relatively new panel technology. Our first impressions of the screen remain even
after many hours of use, those being that it is one of the most attractive
screens we have had the pleasure to test. The design is sleek and clean, the
materials of a very high standard and the glossy coating really gives it a
premium feel. The thin profile and tidy appearance from behind also help with
the overall aesthetics of the screen. Samsung have provided some other nice
features for a model in this price bracket, including integrated stereo
speakers, touch sensitive OSD controls, a good range of ergonomic adjustment
options and a good range of interface connections.
From a performance point of view we were impressed
by the default setup of the screen and factory calibration, and the gamma and
white point settings were very reliable. There was a useable sRGB emulation mode
as well which was good, but did unfortunately crush the contrast ratio which was
one drawback. Calibration results were excellent from software profiling and
we'd achieved a decent contrast ratio in the High Bright preset as well.
Hardware calibration was relatively easy although support for colorimeters was
limited and reporting functionality was brief. We achieved good results when
calibrating to the monitors native gamut, but when using sRGB we could not
achieve correct colours for some reason - although contrast ratio was thankfully
improved over the screens native sRGB emulation preset. This hardware
calibration was not as thorough as we would have perhaps have liked. We were
pleased also with the lack of PWM for backlight dimming and the uniformity of
the panels brightness. The uniformity correction feature was also successful and
a nice extra feature. Pixel response times were also very good although for very
high end gaming the input lag might be a little too high.
Samsung have gone a different route with the
S27B970D than many other professional grade screens from the likes of NEC and
Eizo. They have stuck with a standard gamut backlight for a start and a standard
8-bit panel. This might be more suited to many users but you do need to realise
it won't offer wide gamut or "10-bit" support like some competing models. The
move to a standard gamut backlight through the use of a W-LED unit does mean the
screen offers a much thinner and sleeker design than the often very bulky and
heavy pro-grade models we've seen before. The glossy screen coating is also an
interesting choice. It does help with the overall appearance of the screen and
you certainly get sharper and cleaner picture quality compared with the grainy
appearance of some IPS AG panels. It's not to everyone's taste though and you do
need to be mindful of reflections and finger prints.
The S27B970D is very new and so not available
widely yet. In the UK it retails for £799.99 (inc VAT) which makes it a little
cheaper than some competing IPS based models, like the NEC PA271W (~£910) and
Eizo SX2762W (~£950) for example. You do miss out on a few features as already
mentioned but as a high end screen its a very interesting choice. Of course with
the added extras and premium features it is more expensive than popular
mainstream models like the Dell U2711 for instance (~£550) and certainly a lot
more than low end 27" IPS models like the DGM IPS-2701WPH (£380) and Hazro
HZ27WC (£420). However, if you're looking for something more, and want something
with a lot of style and some great all round performance then the Samsung
S27B970D is definitely worth looking at. Another pleasing outing from PLS
technology.
|
Pros |
Cons |
|
Very attractive premium design
and aesthetics |
Limited hardware calibration
features and support |
|
Good factory calibration and
reliable OSD presets and settings |
Difficult to achieve accurate
sRGB coverage without crushing contrast ratios or affecting colour
accuracy |
|
Excellent all round
performance from PLS panel |
High price point relative to
mainstream models |
|
 |
If you have enjoyed
this review and found it useful, please consider making a
small
donation to the site. |


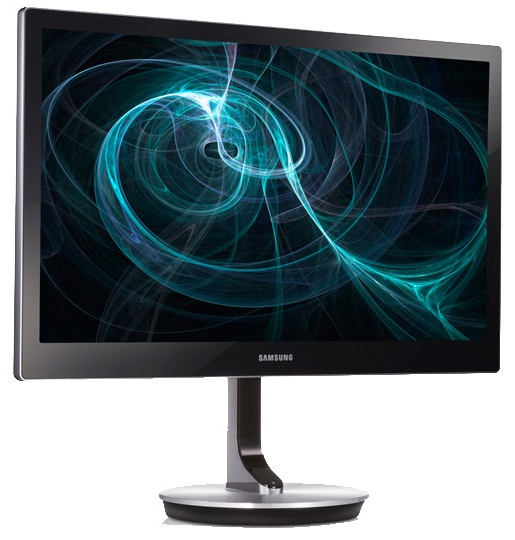
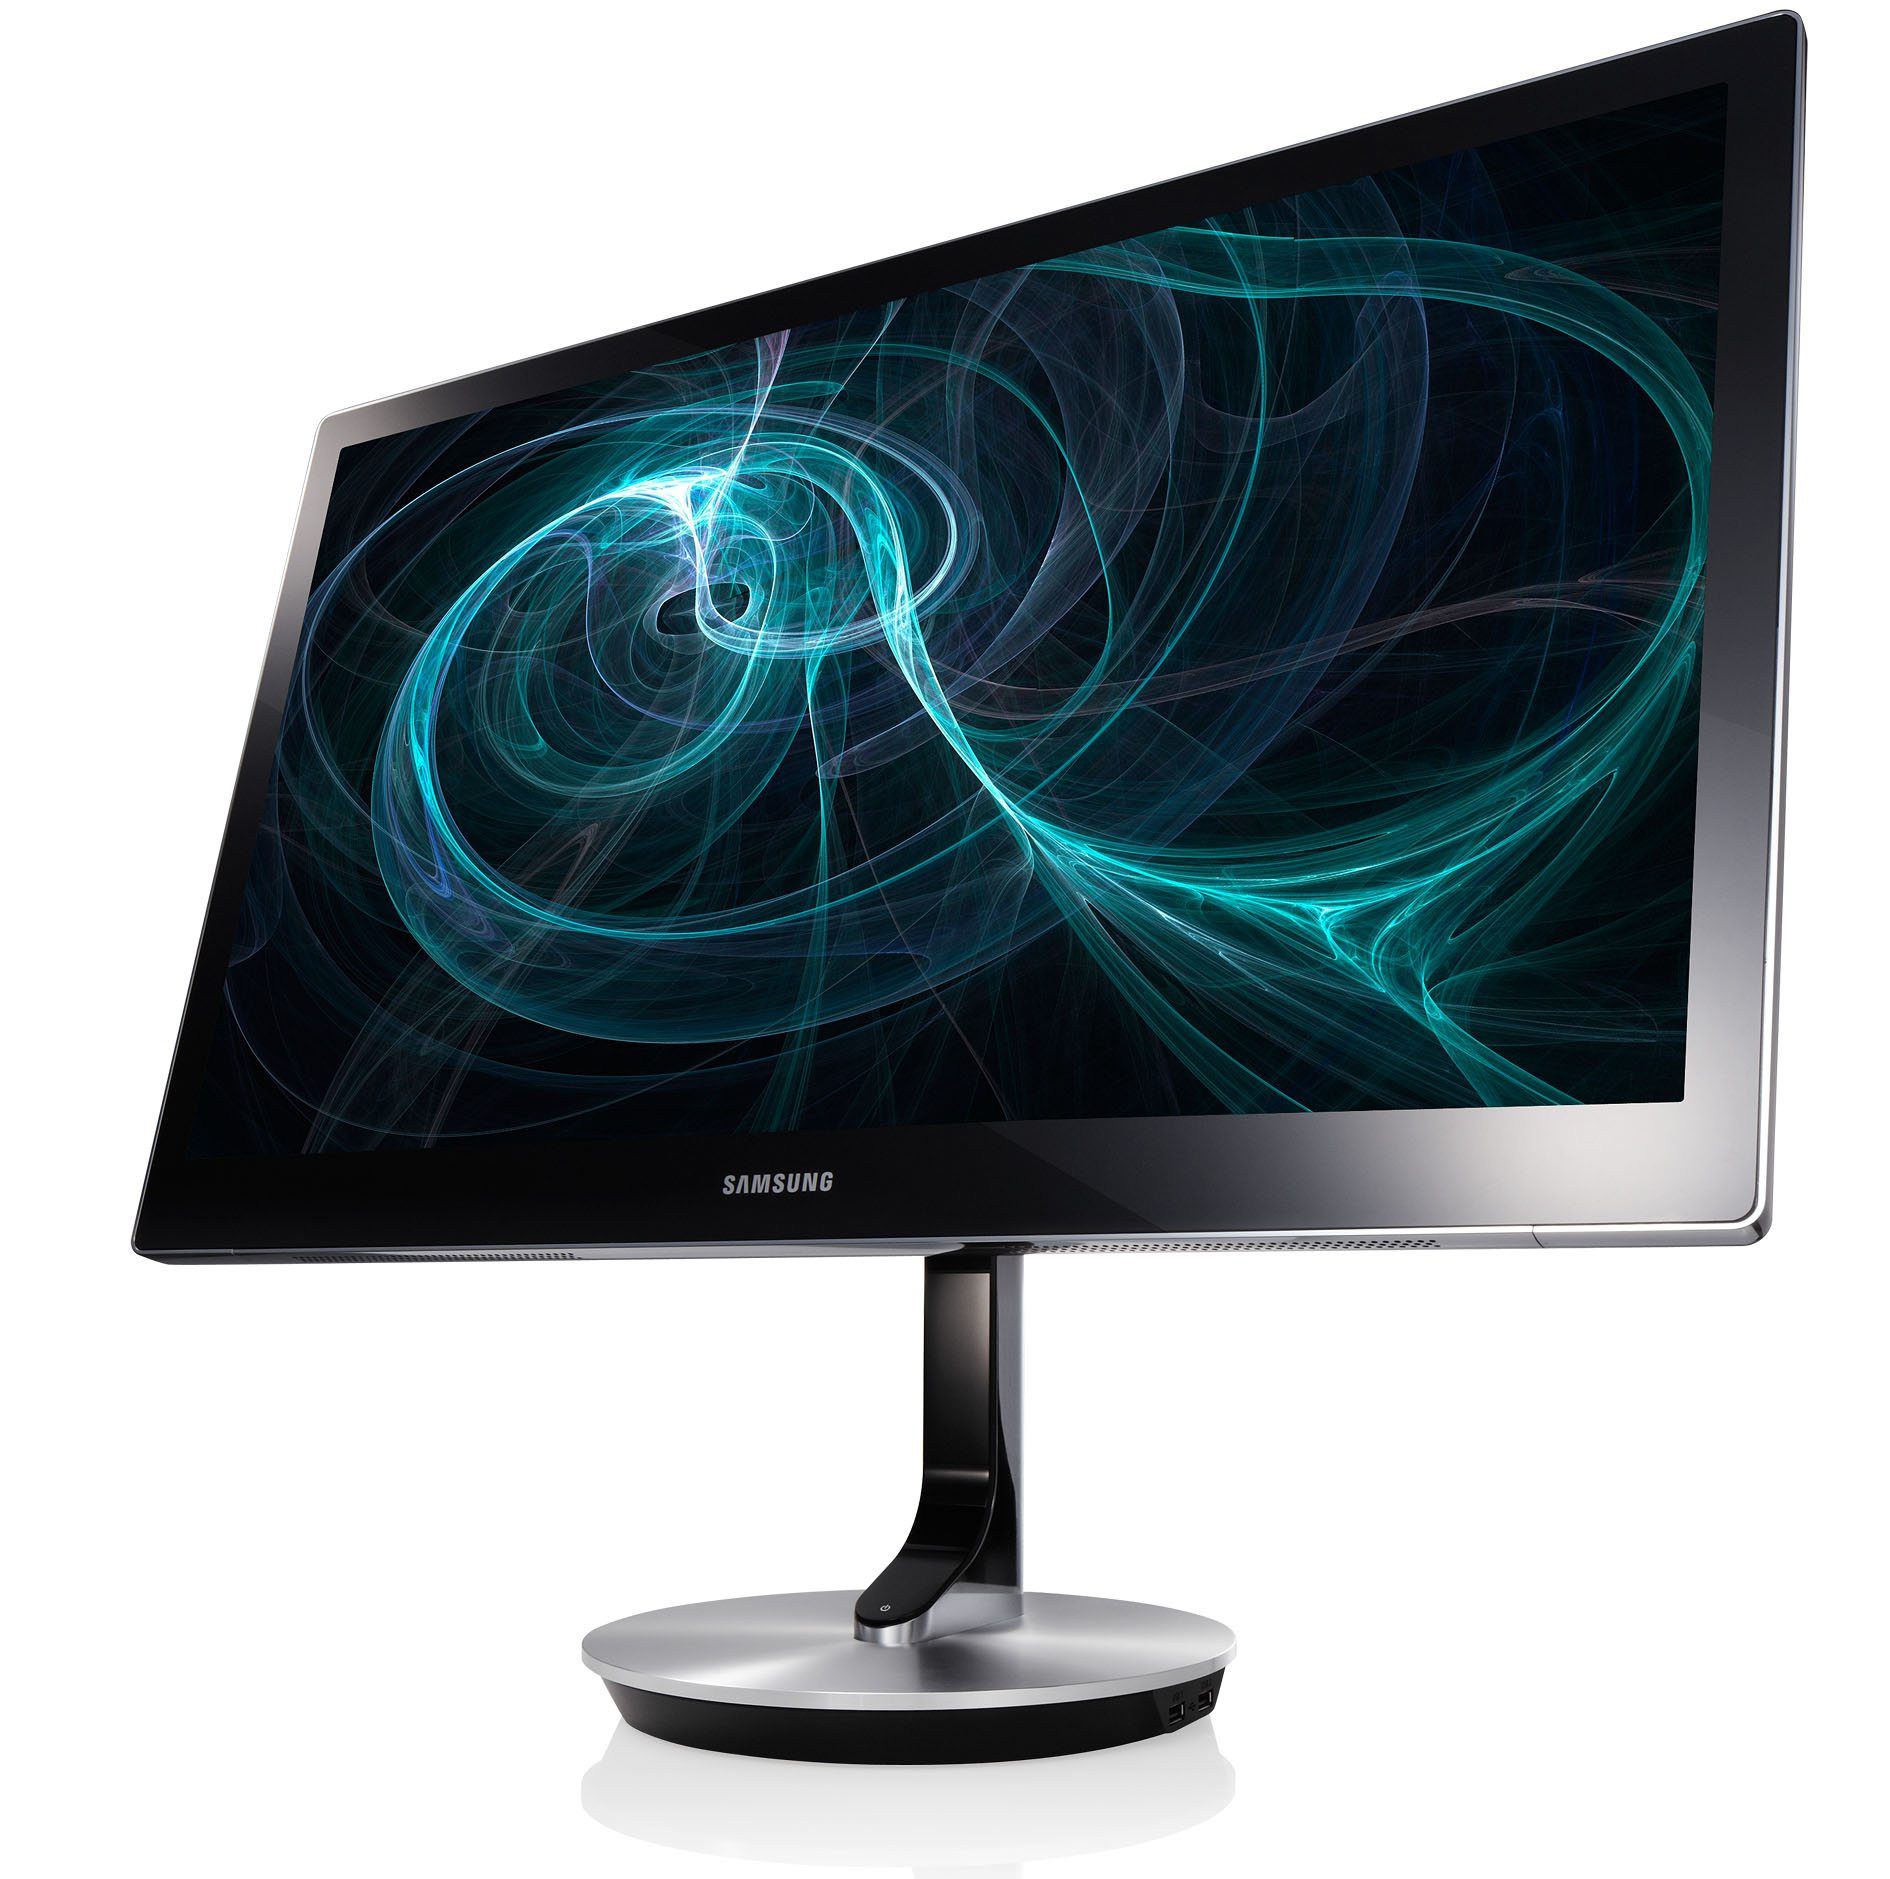
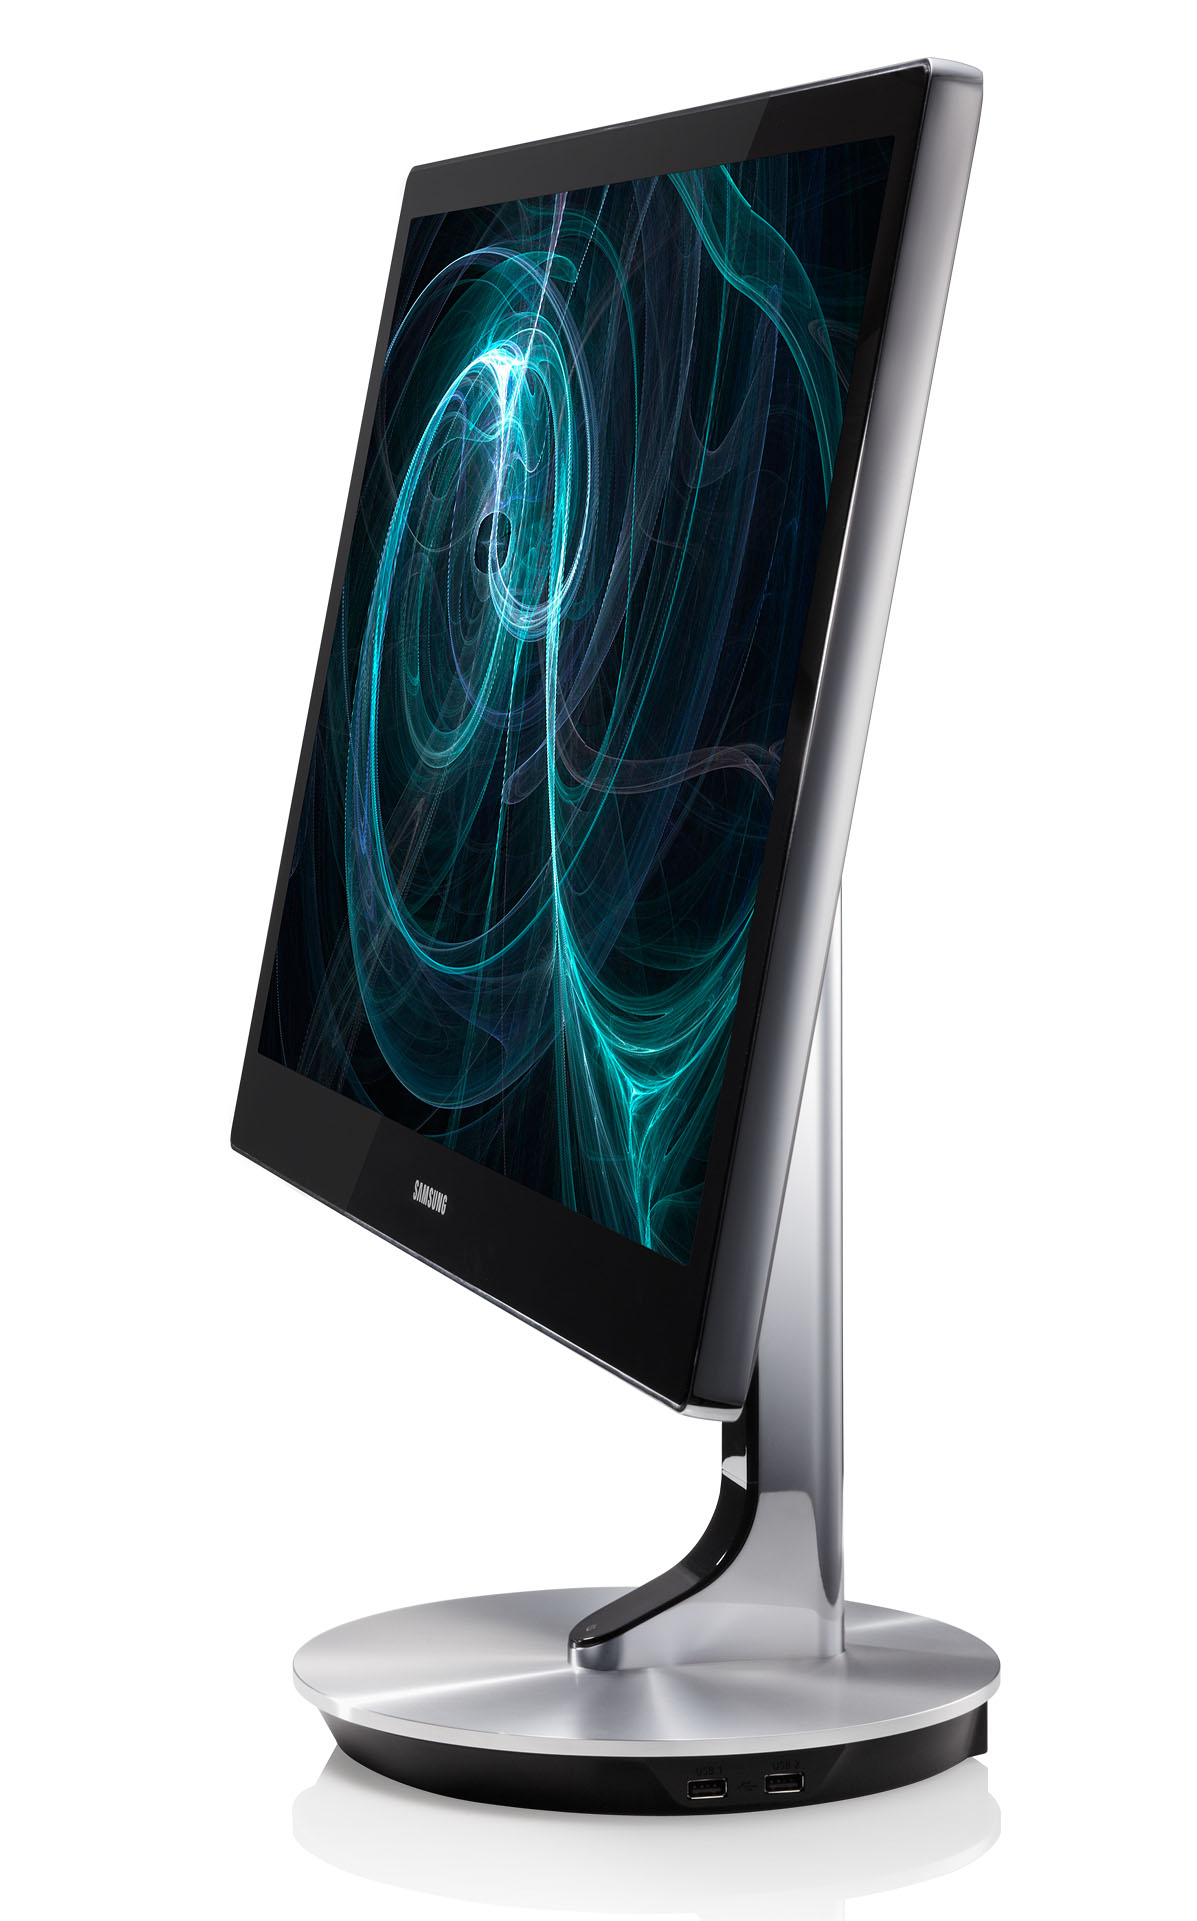
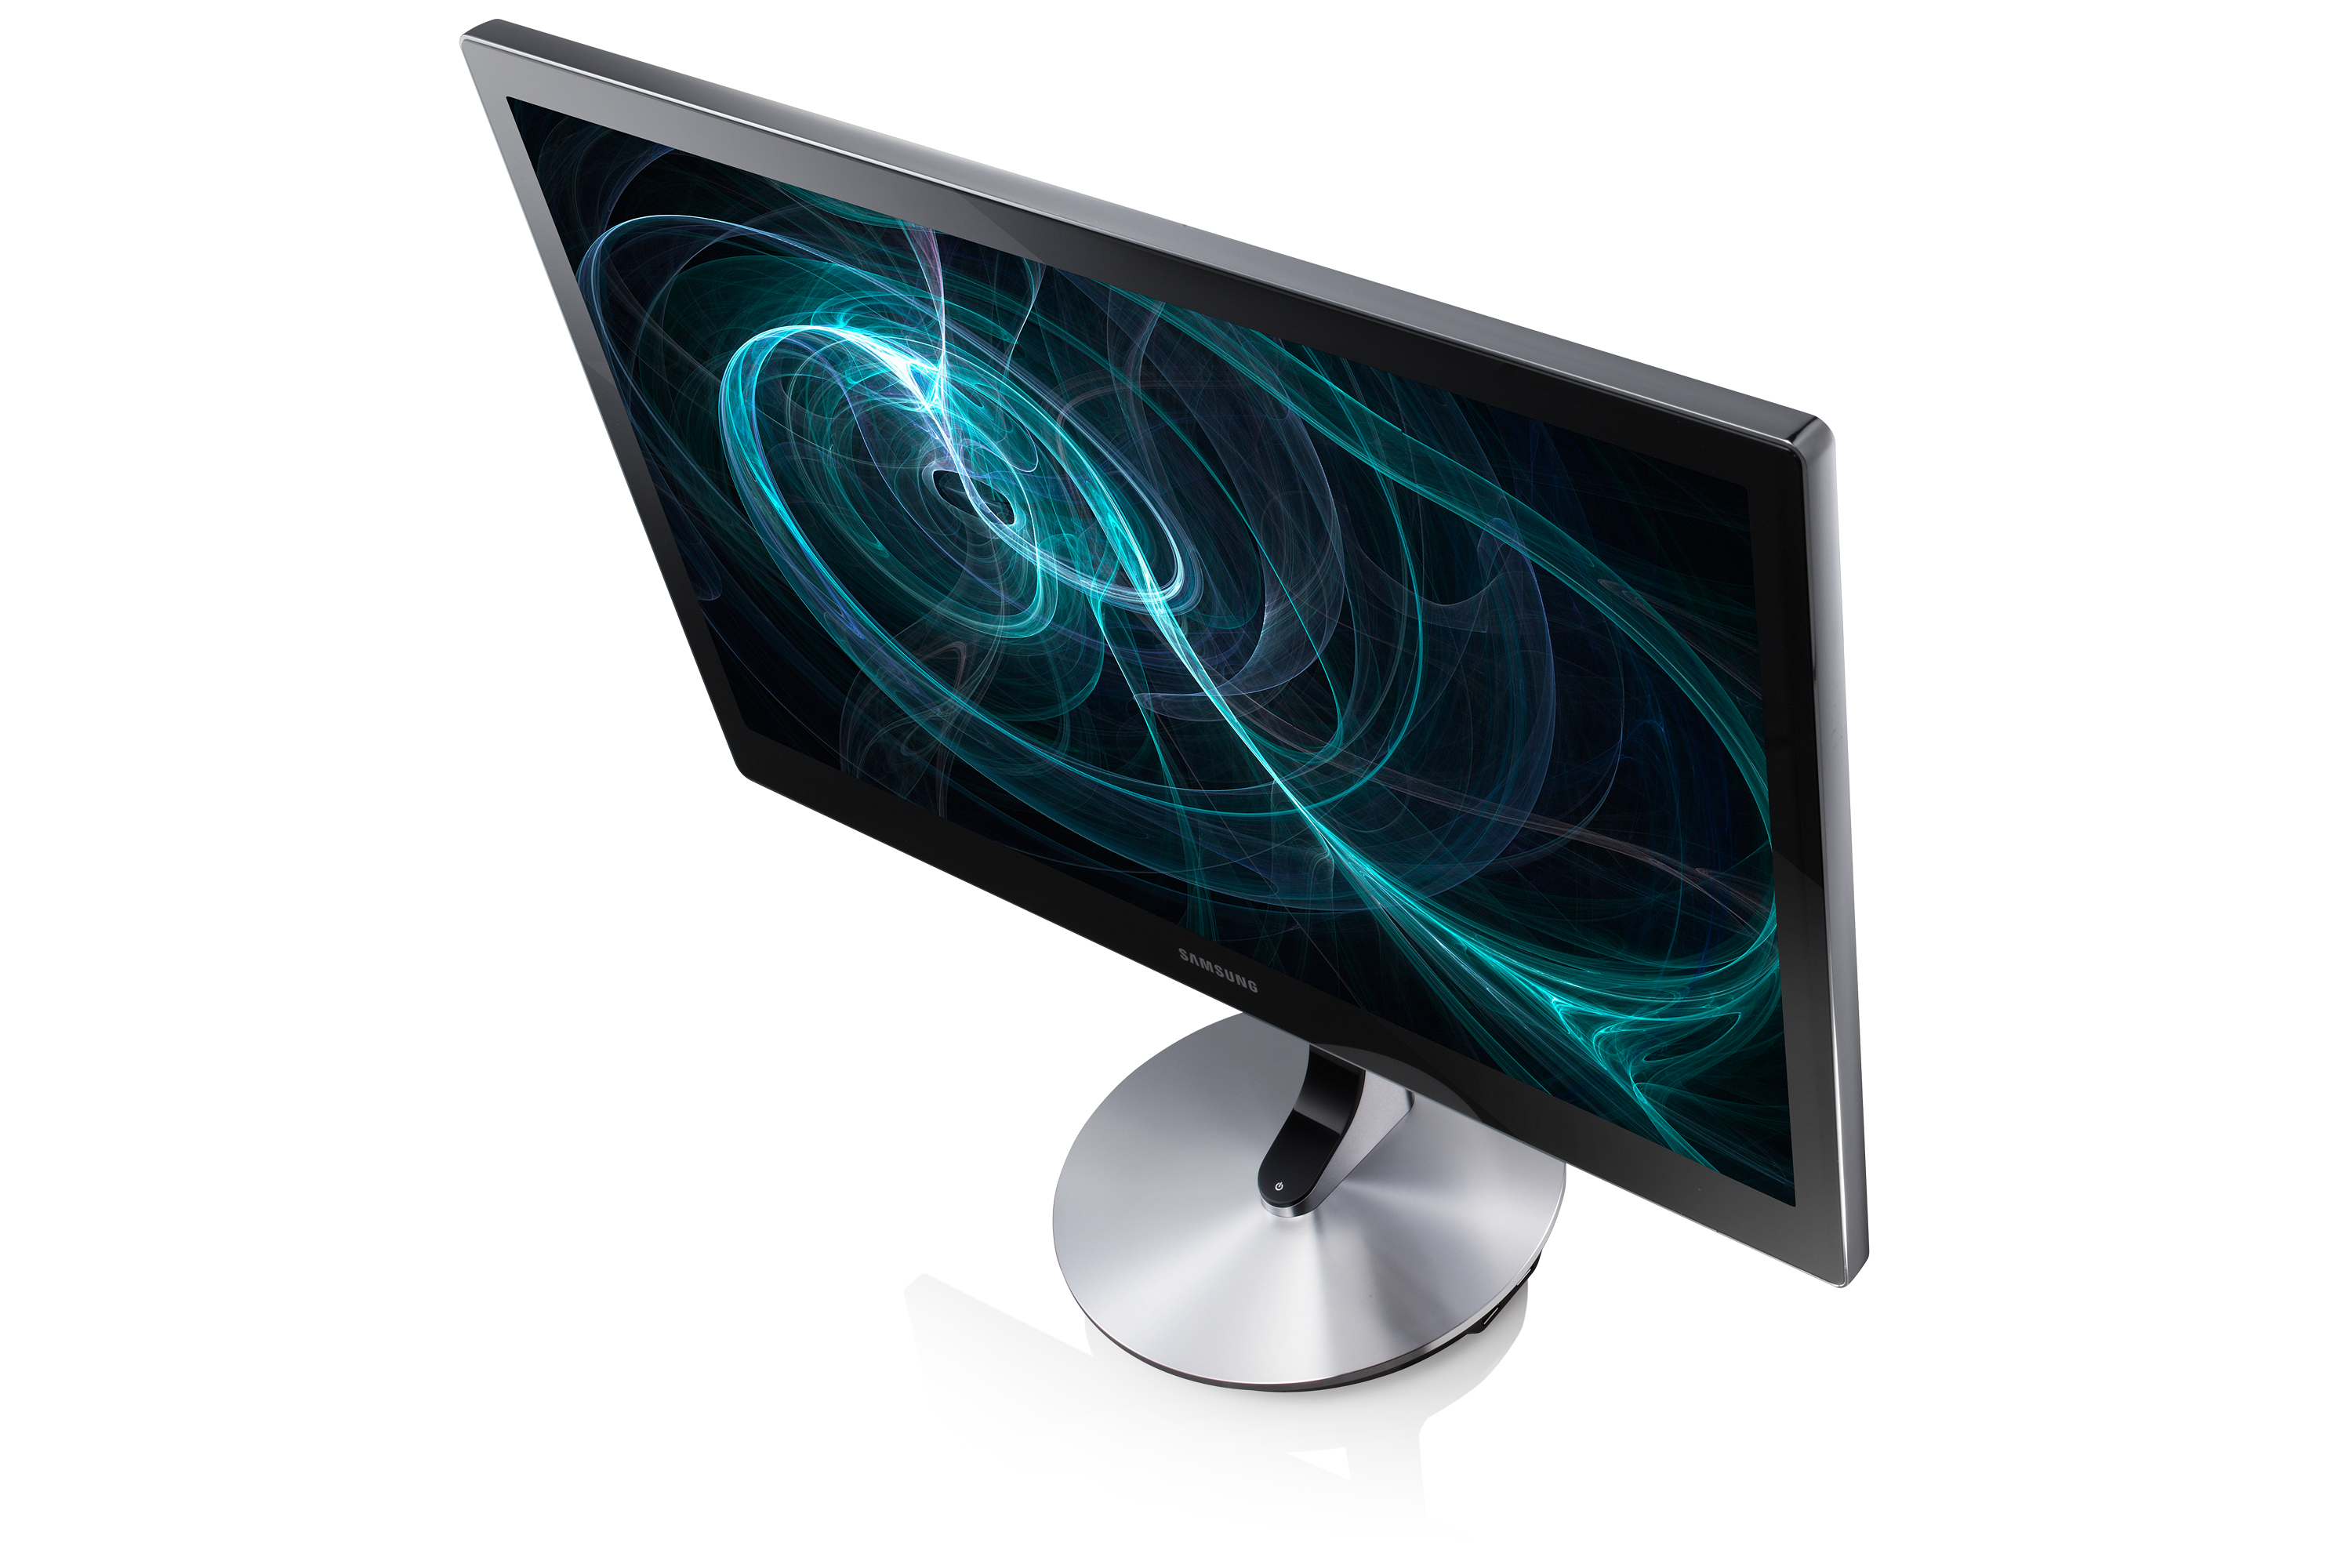
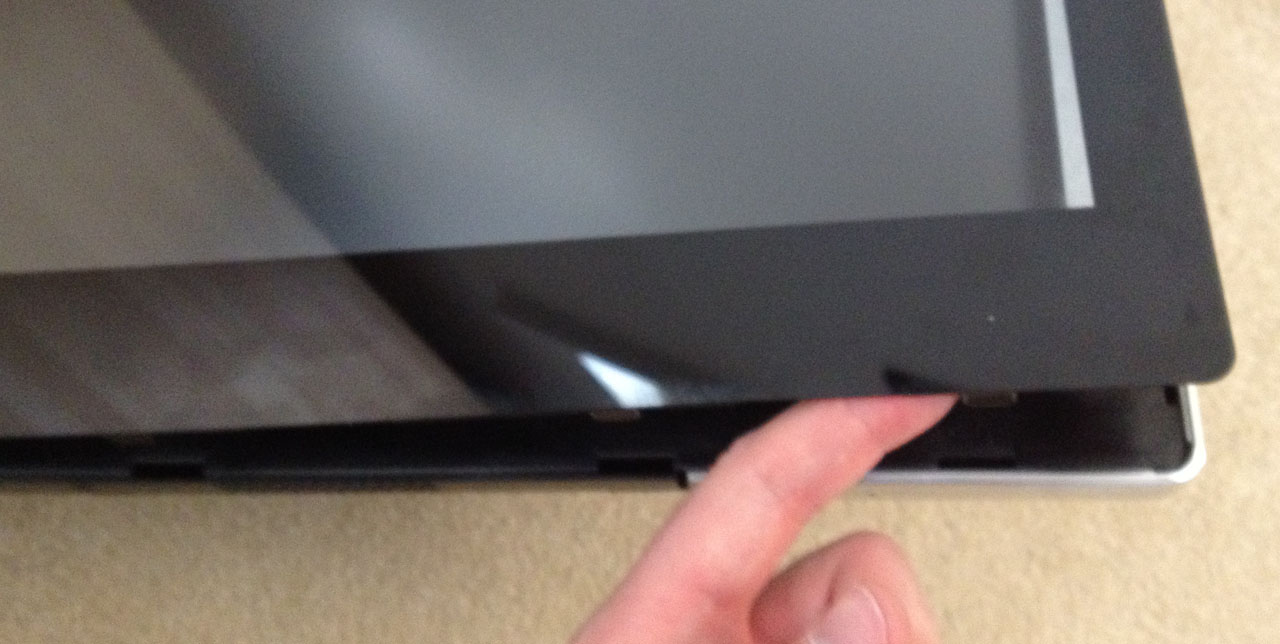
.jpg)
.jpg)
.jpg)
.jpg)
.jpg)
.jpg)
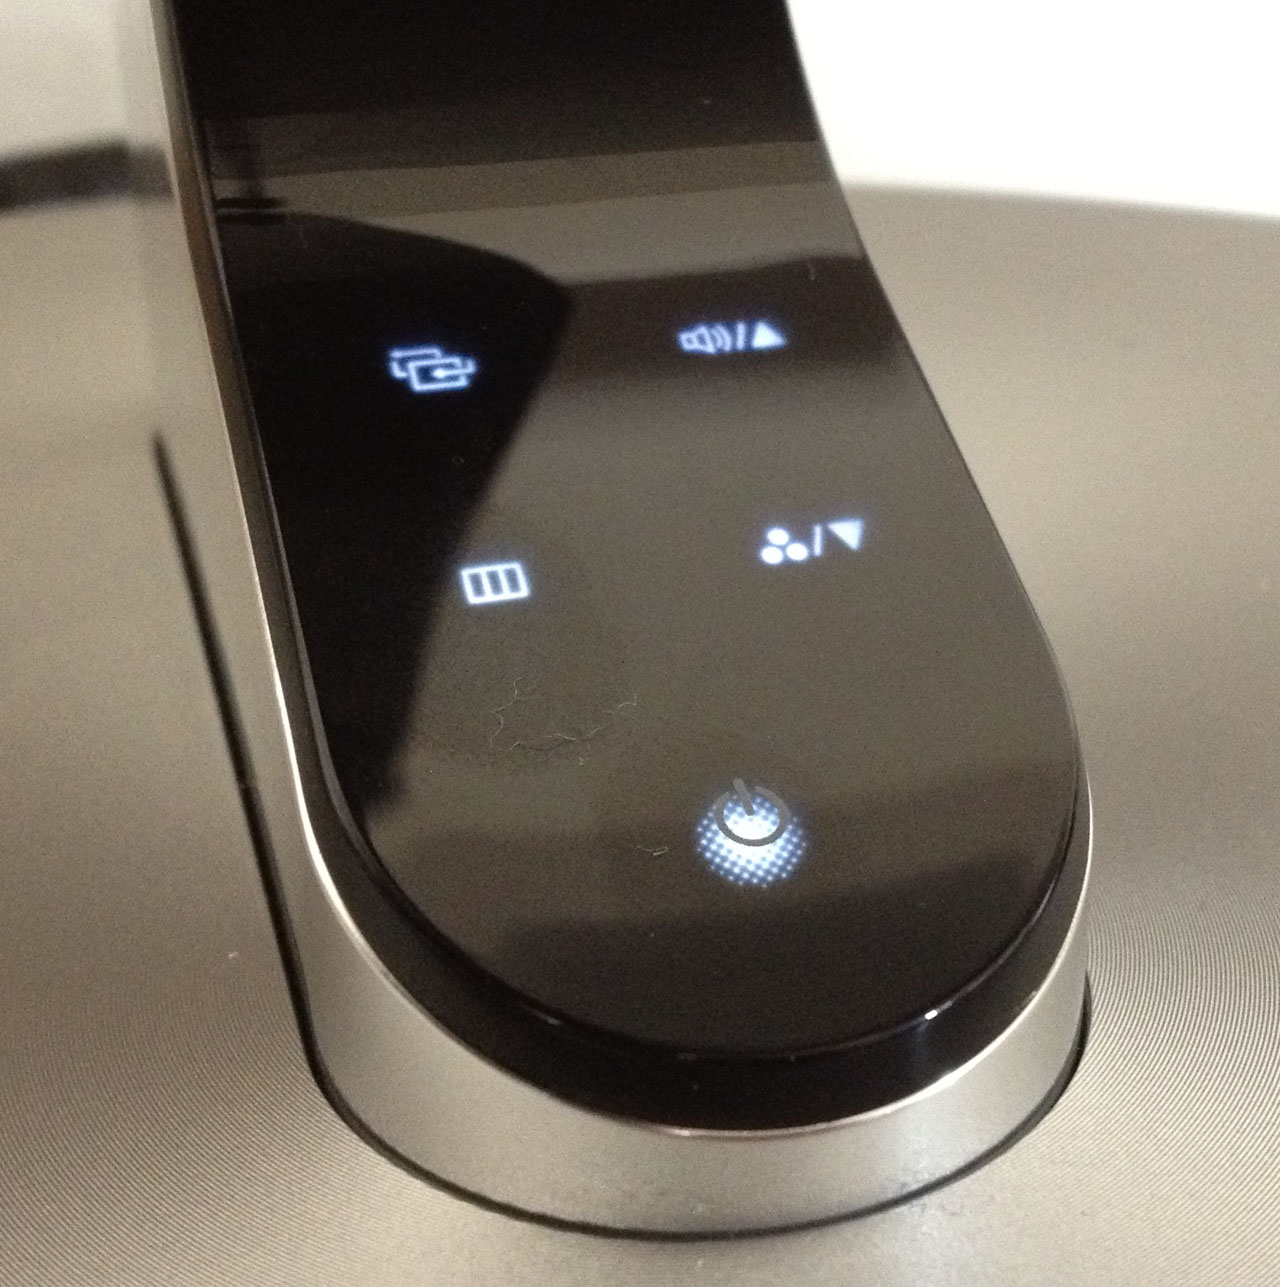
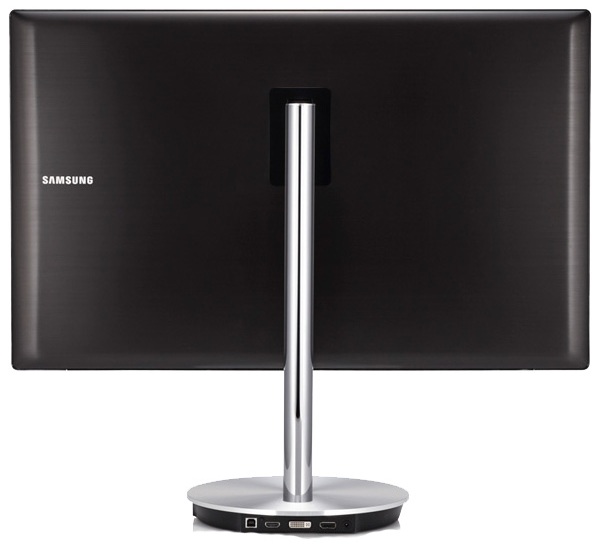
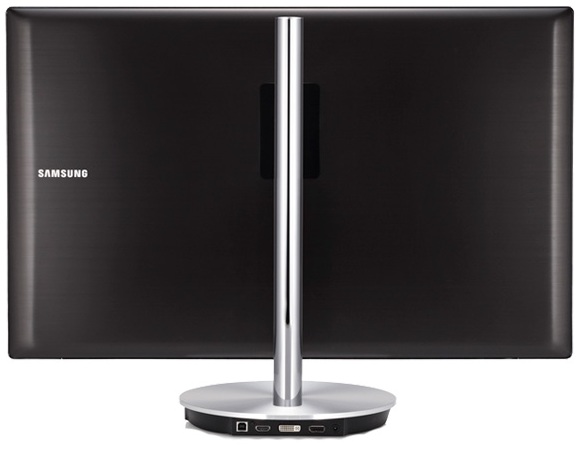
.jpg)
.jpg)
.jpg)
.jpg)
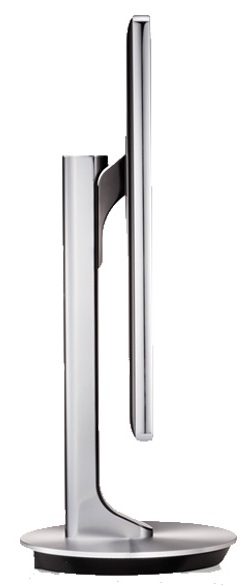
.jpg)
.jpg)
.jpg)
.jpg)
.jpg)
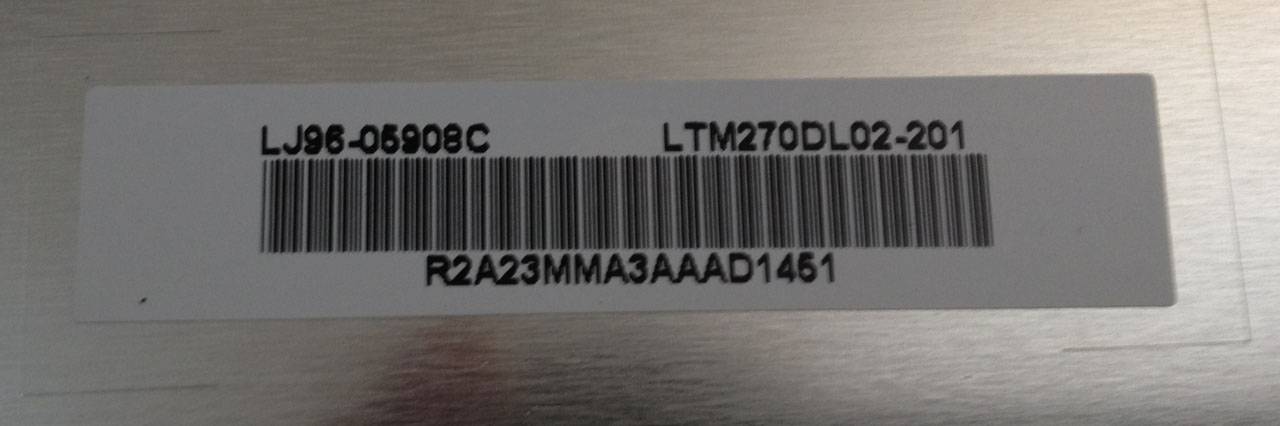
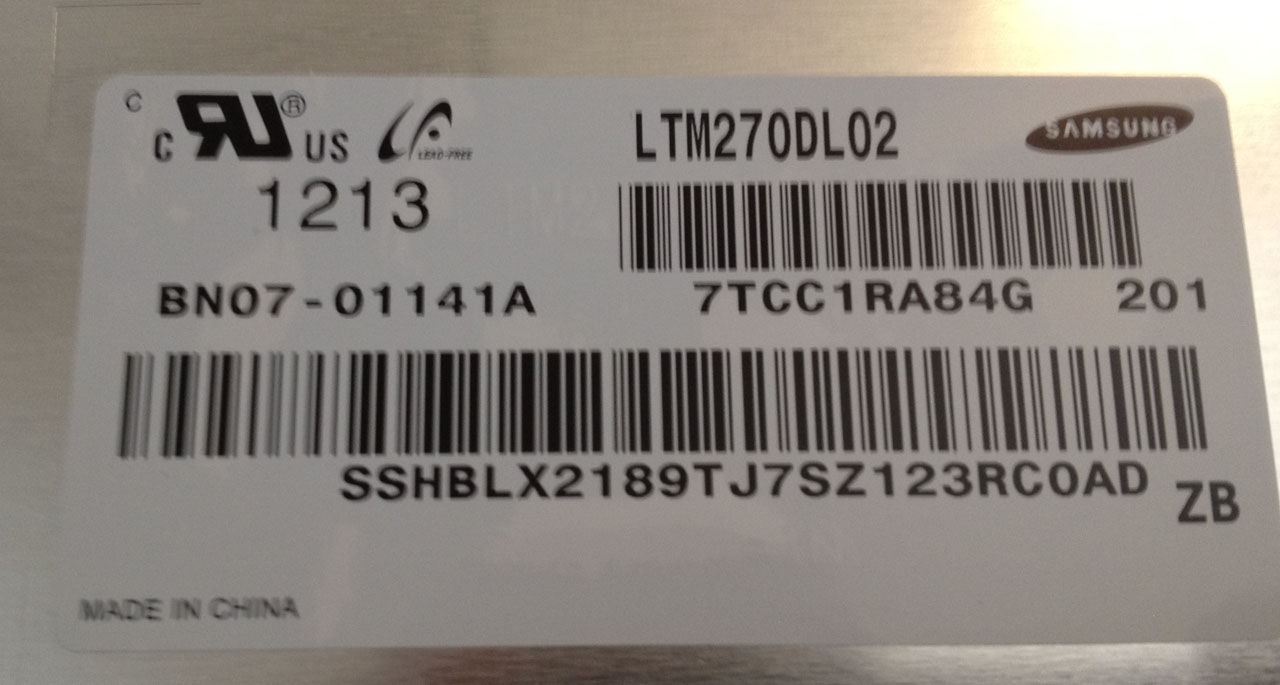

.jpg)
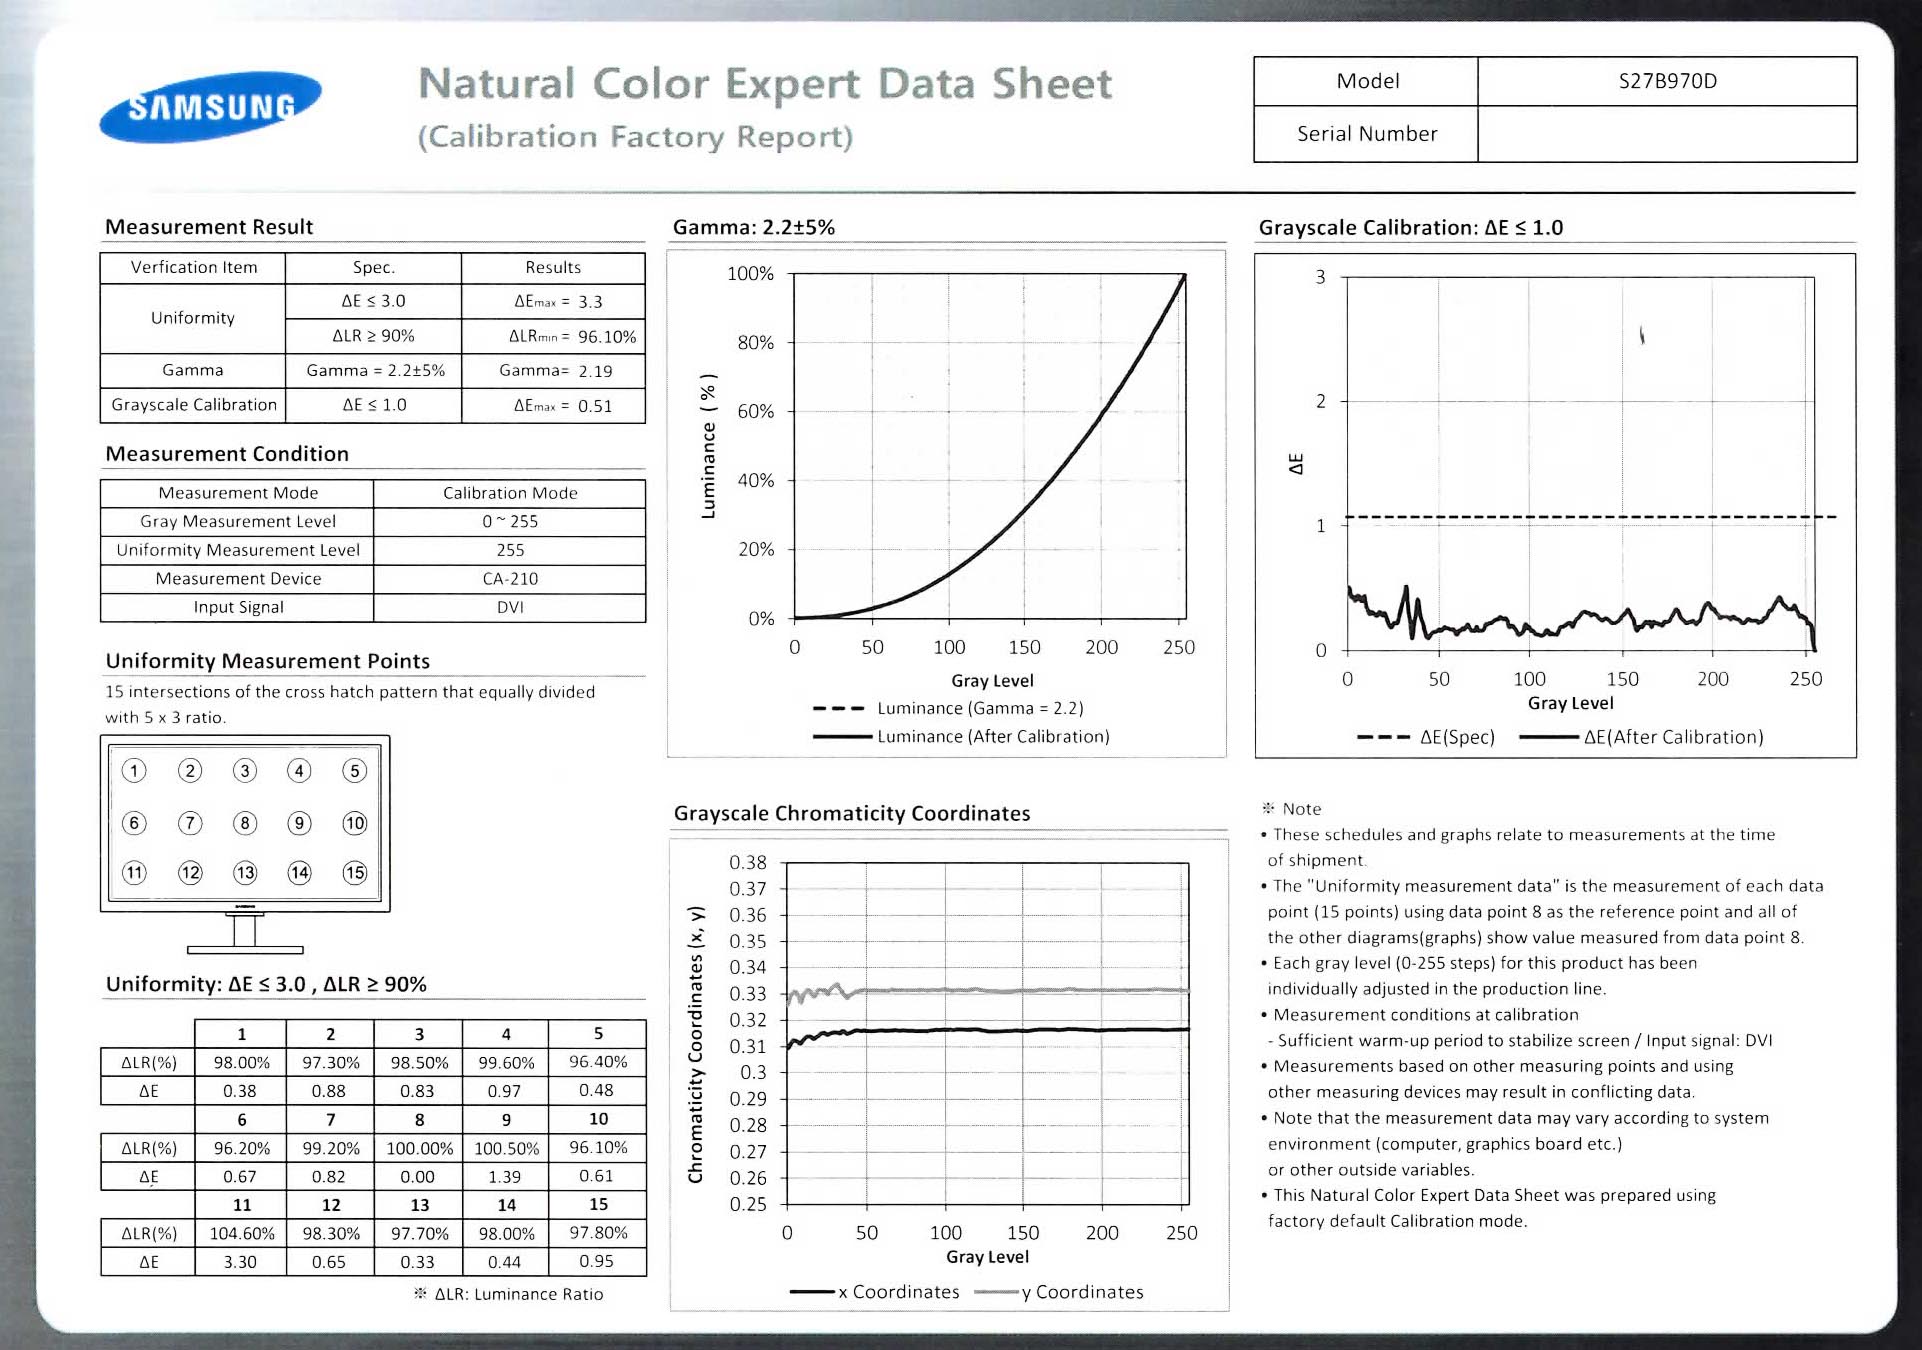
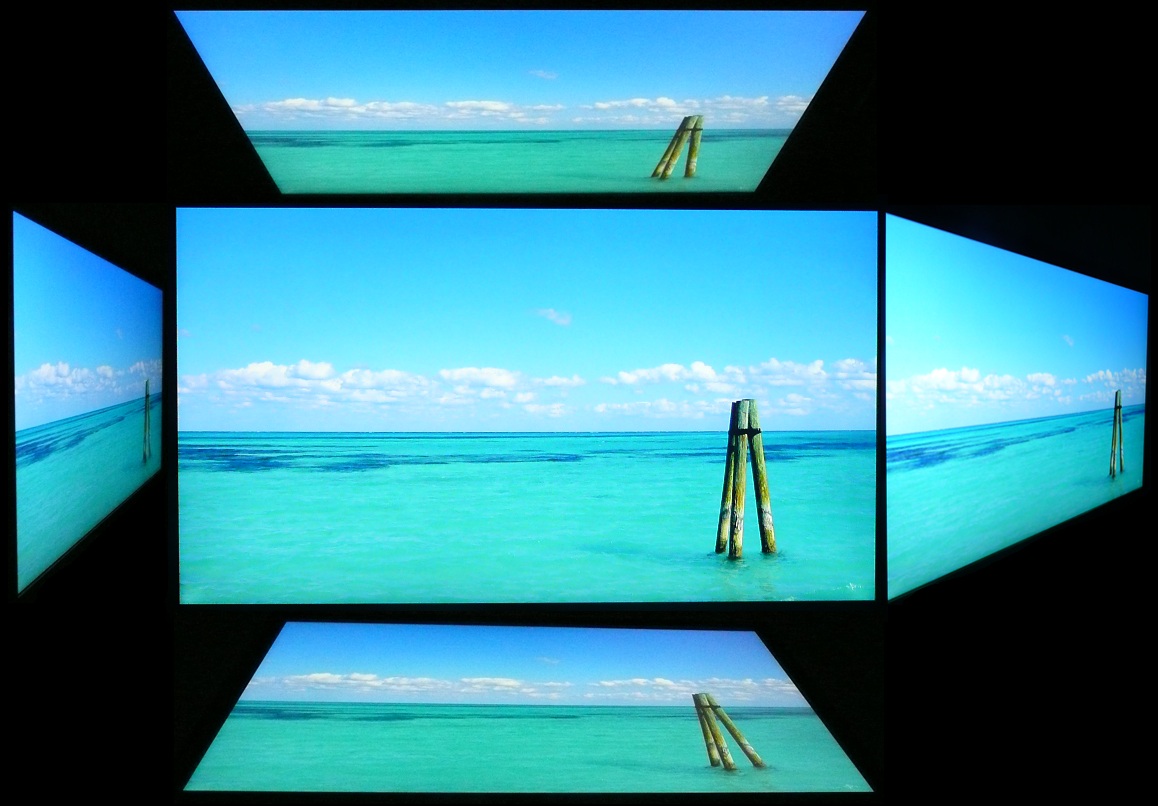


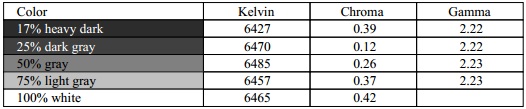