Introduction
We've featured reviews in the past of some of
NEC's professional grade screens like the 24"
PA241W, the 27"
PA271W and the 27"
SpectraView Reference 271. All these models offer a very wide range of
features and extras which make them very attractive to professional users and
those wanting a screen for colour critical work. These are high end models with
a lot of high end features you just wouldn't find on most main stream displays,
but do attract a high price point as a result.
We recently brought you news of a new 24" model
being added to NEC's professional grade range of screens. This new model is the
P241W. It is a 24" screen which at first glance might appear very similar to the
PA241W which was released some time ago. In fact the name is very similar which
could lead to some confusion. However, there are some differences between this
new model and the PA241W which separate the two. Both screens are built around
the highly regarded IPS panel technology, but the most significant difference
here is that the P241W features a backlighting unit offering a standard (sRGB)
colour gamut, whereas the PA241W was a wide gamut model. Many users prefer a
standard gamut display to match their workflow and so this fits into the market
nicely as a new 24" IPS standard gamut offering. In fact from that point of view
it has perhaps more in common with the popular
LCD2490WUXi which at the time was one of the only 24" IPS / standard gamut
offerings in the market. Technically this was replaced by the LCD2490WUXi v2 of
course which retains this combination (although other aspects changed). However
the P241W does make an welcome addition to the P series of screens and it
will be interesting to see how it performs.
The P241W is also priced at a lower point than the
other P series screens and tries to fill a gap between regular consumer grade
screens and the very pricey, top of the range professional options. The screen is
marketed on NEC's website as follows:
"Meet the next generation
of MultiSync P Series desktop monitors. The P241W is a 24” widescreen monitor
that is ideal for web graphics and photography applications. This model utilizes
an e-IPS panel for great imaging performance. Offering 96.7% coverage of sRGB
colour gamut and 71.4% of NTSC, the P241W provides professional-grade benefits,
such as an internal 14-bit 3D programmable lookup tables (LUT's), DisplayPort
connectivity and built-in USB hub, at a budget-friendly price."
Specifications and Features
The following table gives detailed information
about the specs of the screen:
|
Monitor
Specifications |
|
Size |
24.1"WS (61.1 cm) |
Colour Depth |
16.7m (8-bit) |
|
Aspect Ratio |
16:10 |
Colour Gamut |
Standard gamut = 71.4% NTSC, 75% Adobe RGB, 96.7% sRGB |
|
Resolution |
1920 x 1200 |
Panel Coating |
Anti-glare (matte) |
|
Pixel Pitch |
0.2700 mm |
Interfaces |
2x DVI-D (HDCP), 1x D-sub, 1x DisplayPort |
|
Response Time |
8ms G2G
16ms ISO |
Design
colour |
Matte black bezel and stand. Silver /white
version also available |
|
Static Contrast Ratio |
1000:1 |
Ergonomics |
-5° / +30° Tilt,
-170 to +170 swivel, 110mm height, 90° pivot |
|
Dynamic Contrast Ratio |
n/a |
Special
Features |
3x USB 2.0 ports, ColorComp uniformity correction, hardware calibration with
14-bit 3D LUT's, Ambient light sensor |
|
Brightness |
360 |
VESA Compatible |
Yes,
100mm |
|
Viewing Angles |
178/178 |
Physical Dimensions |
(WxHxD with stand)
556.8 x 378 - 528 x 227.6 mm |
|
Panel Technology |
e-IPS |
Weight |
With stand:
10.6 Kg
Without stand: 7.4 kg |
|
Backlight Technology |
CCFL |
Accessories |
DVI cable,
VGA cable, DisplayPort cable, Power cord |
The P241W offers a decent array of features in
keeping with NEC's other professional grade screens. The screen offers full
hardware calibration via the internal 14-bit 3D LUT's which is very important
for those wanting to set up the screen at a very high level, and want to use the
screen for colour critical work. The ColorComp digital uniformity correction
technology has also been retained which helps provide a stable and even
luminance across the whole of the screen.
Connection wise there are 2x DVI-D (HDCP
supported), 1x D-sub and 1x DisplayPort interfaces which offer you a decent
range of options for PC's and external devices. An HDMI interface is missed
however. There are 3x USB 2.0 ports integrated as well and the screen supports
NEC's 'DisplaySync Pro' technology which allows you to control two computers with
only one keyboard and mouse connected to the monitor. Their 'AmbiBright' ambient
light sensor automatically adjusts the displays brightness based on lighting
conditions as well which is a useful feature in my opinion. There is no card
reader on this model which features on some competing Dell models (U2410 for
instance). There is no dynamic contrast ratio available on this monitor although
I don't miss it really given the poor effectiveness of these features on most
screens.
The stand also offers a full range of adjustments
as detailed in the spec above. This includes tilt, height, pivot and rotate
adjustments.
Below is a summary of the features and connections of
the screen:
|
Feature |
Yes / No |
Feature |
Yes / No |
|
Tilt adjust |
 |
DVI |
|
|
Height adjust |
|
HDMI |
 |
|
Swivel adjust |
|
D-sub |
|
|
Rotate adjust |
|
DisplayPort |
|
|
VESA compatible |
|
Component |
|
|
USB Ports |
|
Composite |
|
|
Card Reader |
|
Audio connection |
|
|
Ambient Light Sensor |
|
HDCP Support |
|
|
Touch Screen |
|
Integrated Speakers |
|
|
Hardware Calibration |
|
Uniformity Correction |
|
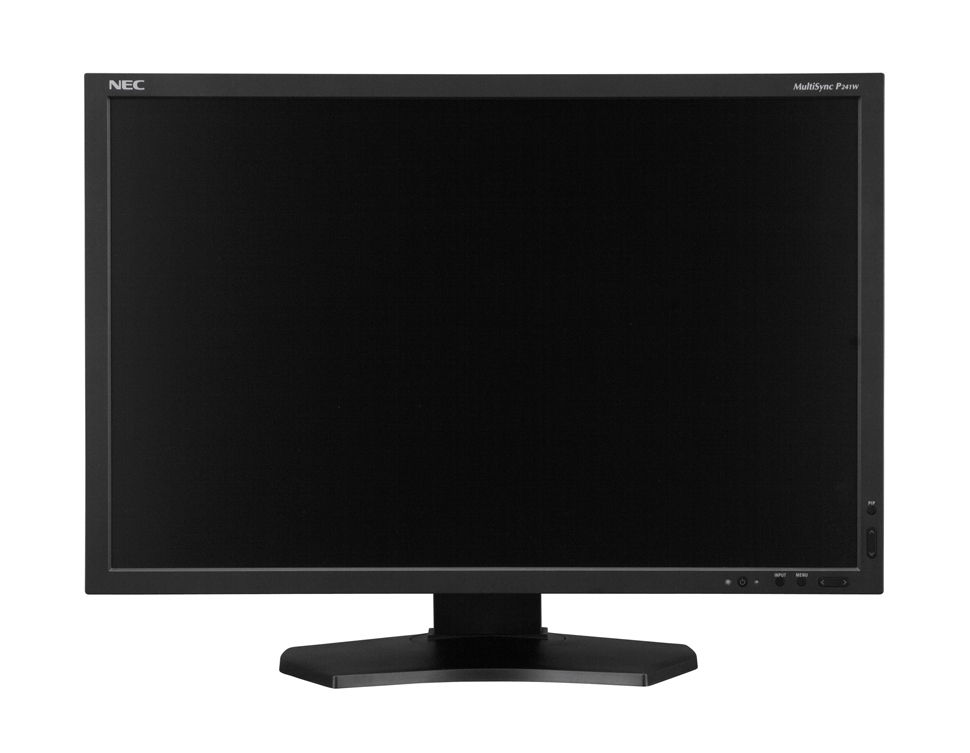
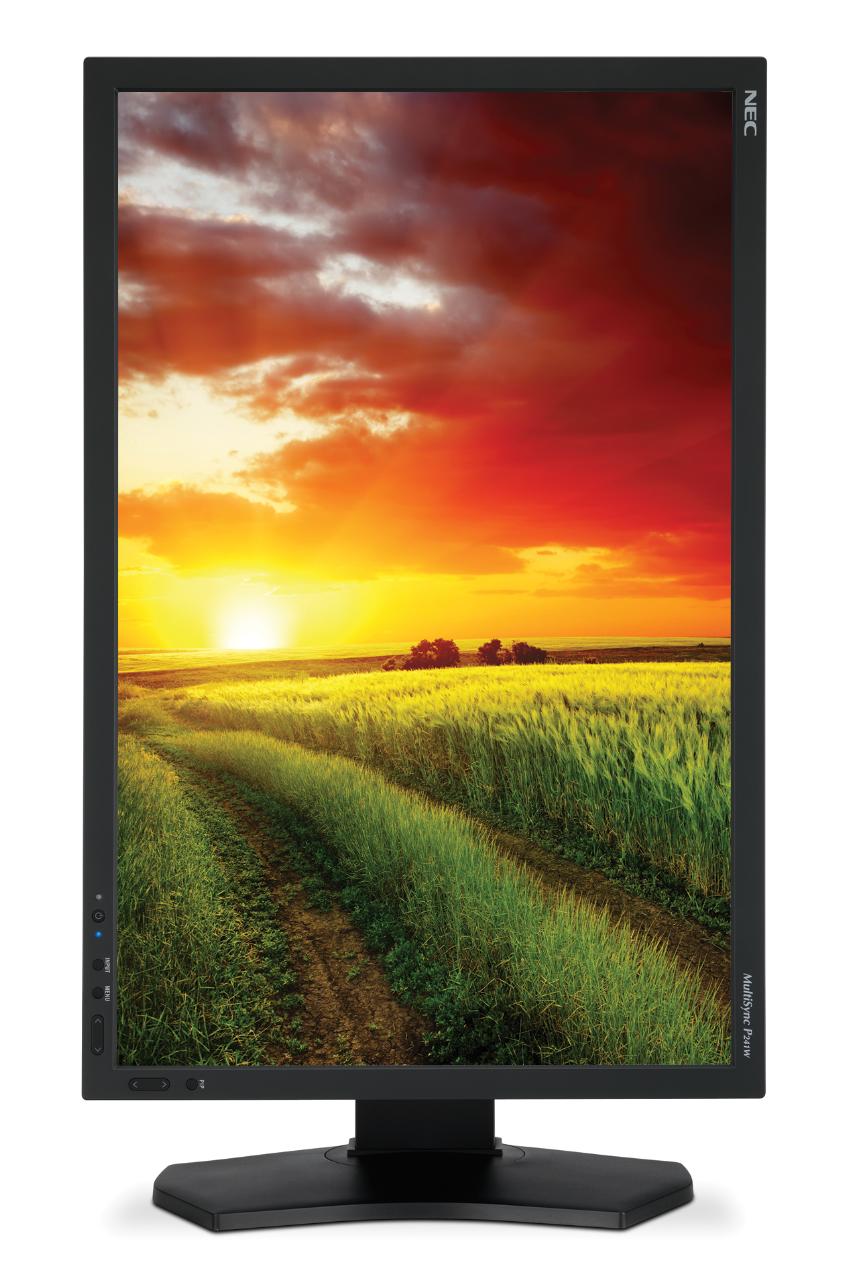
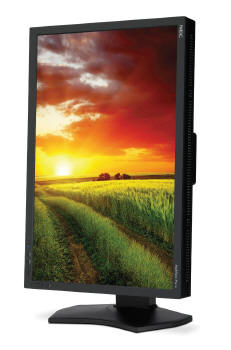
Design and Ergonomics
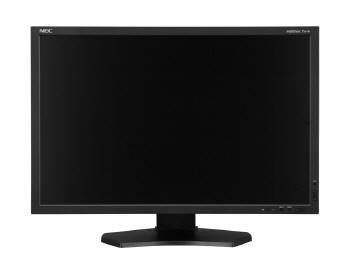
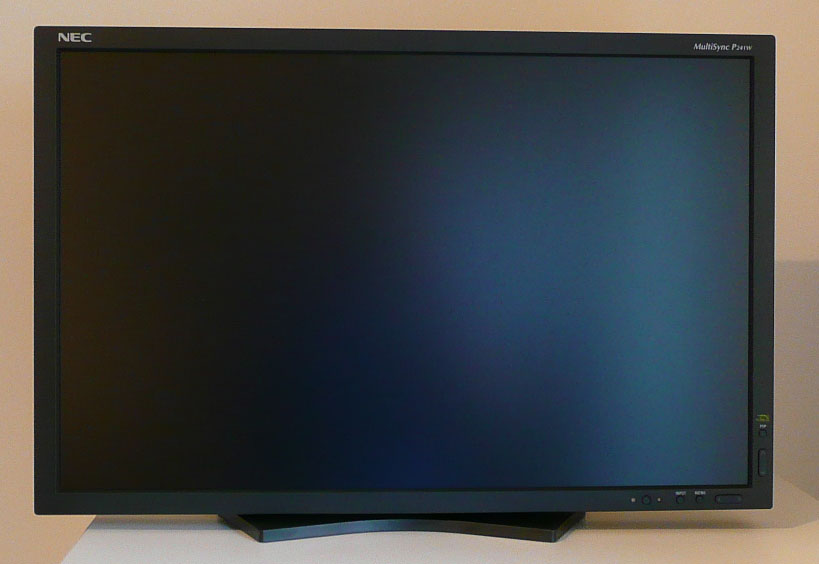
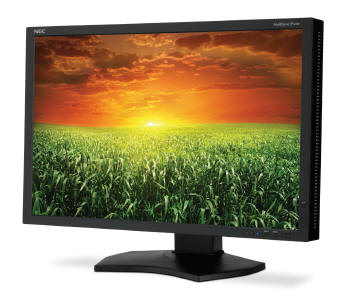
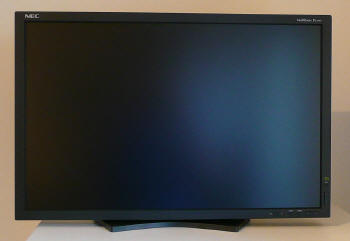
Above:
front view of the screen. Click for larger versions
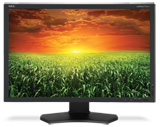
The PA241W comes in the same design and style as the PA series of screens. The
edges are square and straight and finished in a matte black plastic. A white
version of the screen is also available as pictured below. There is a thin
bezel on this screen measuring ~16mm all the way around. There is an NEC logo
in the top left hand corner and a 'MultiSync P241W' logo in the top right
corner in a light grey font which are unobtrusive.
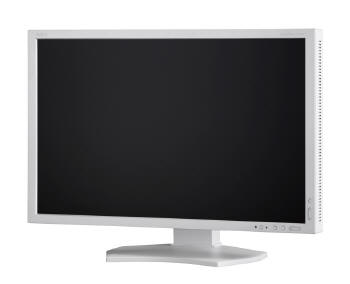
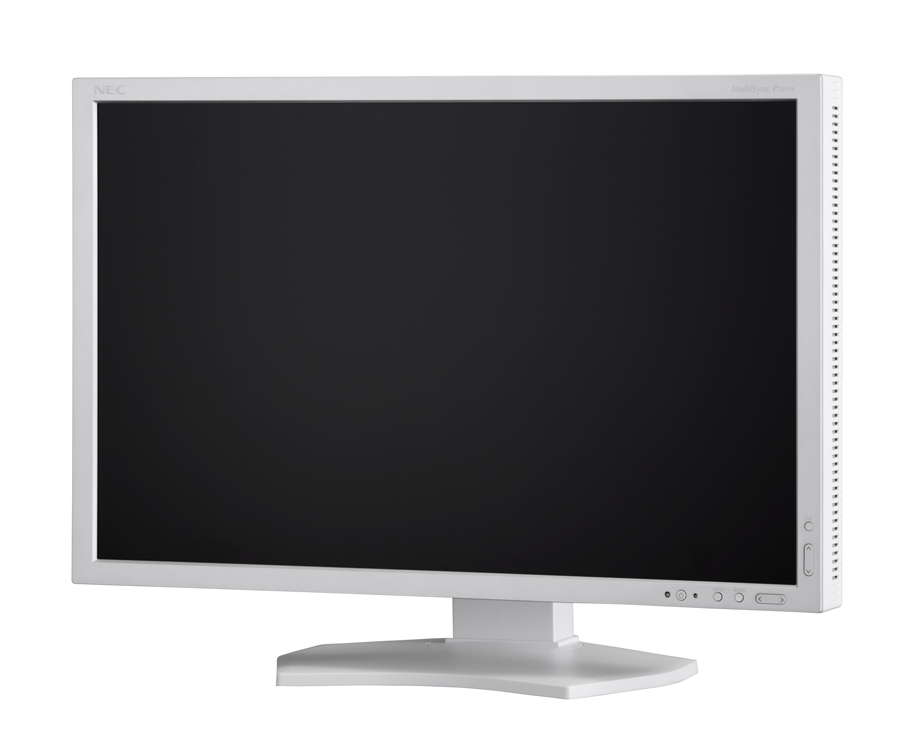
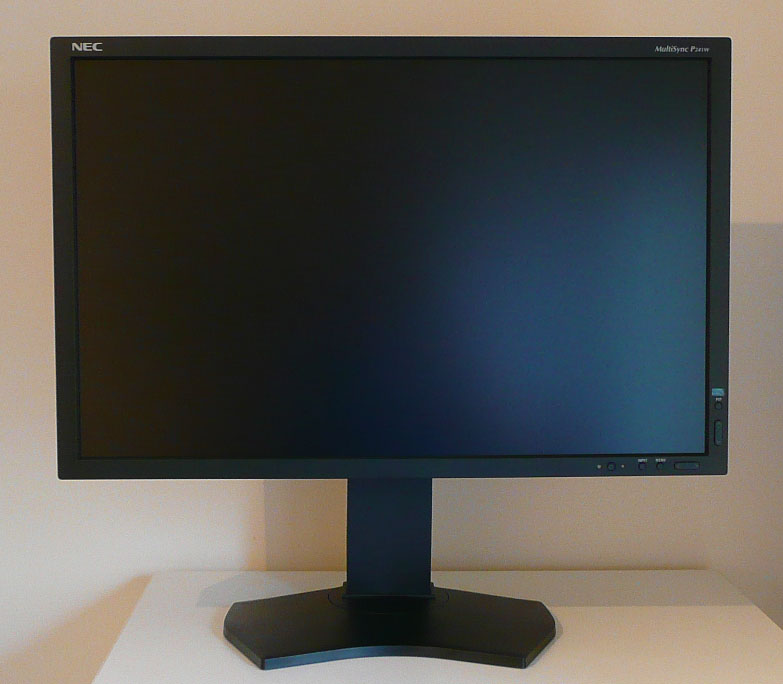
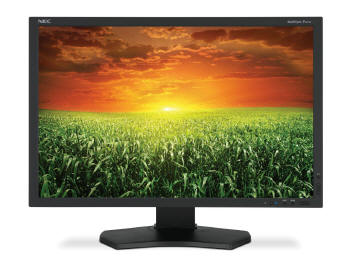
Above:
front view of the white version of the screen. Click for larger version
The P241W also comes in a white version if you prefer. The panel coating is a
standard matte anti-glare (AG) coating. Some users complain about modern IPS
panels having an overly aggressive coating. The coating is similar to that of
the PA series and does show a 'graininess' to it. I personally don't find it
too bad but it's down to preference. It won't feel the same as some of the
glossy or semi-glossy screens of course.
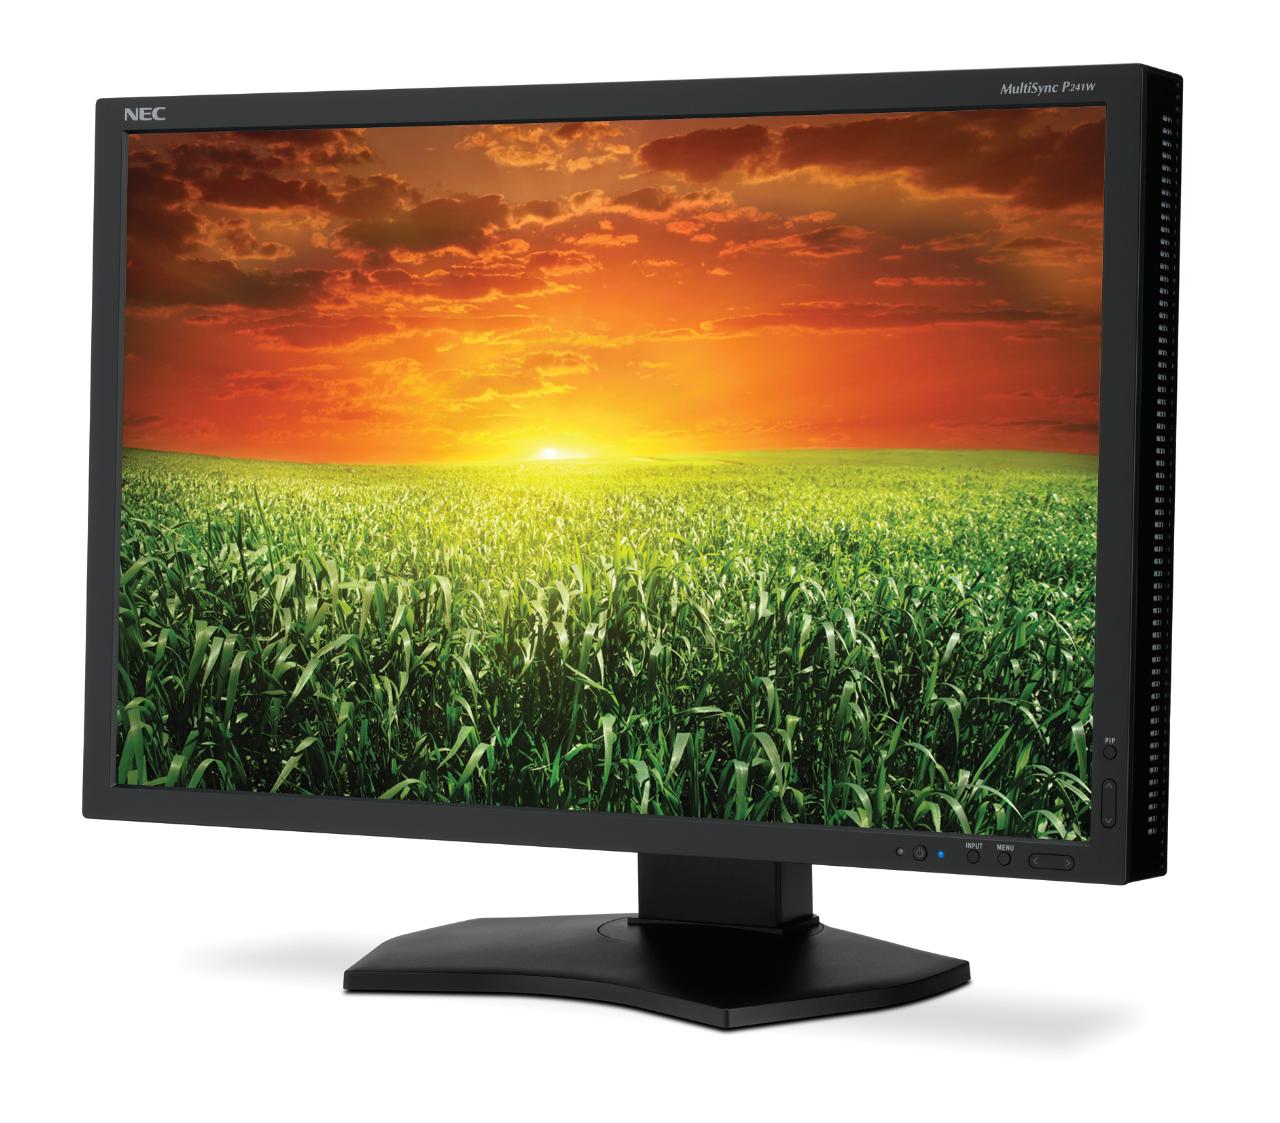
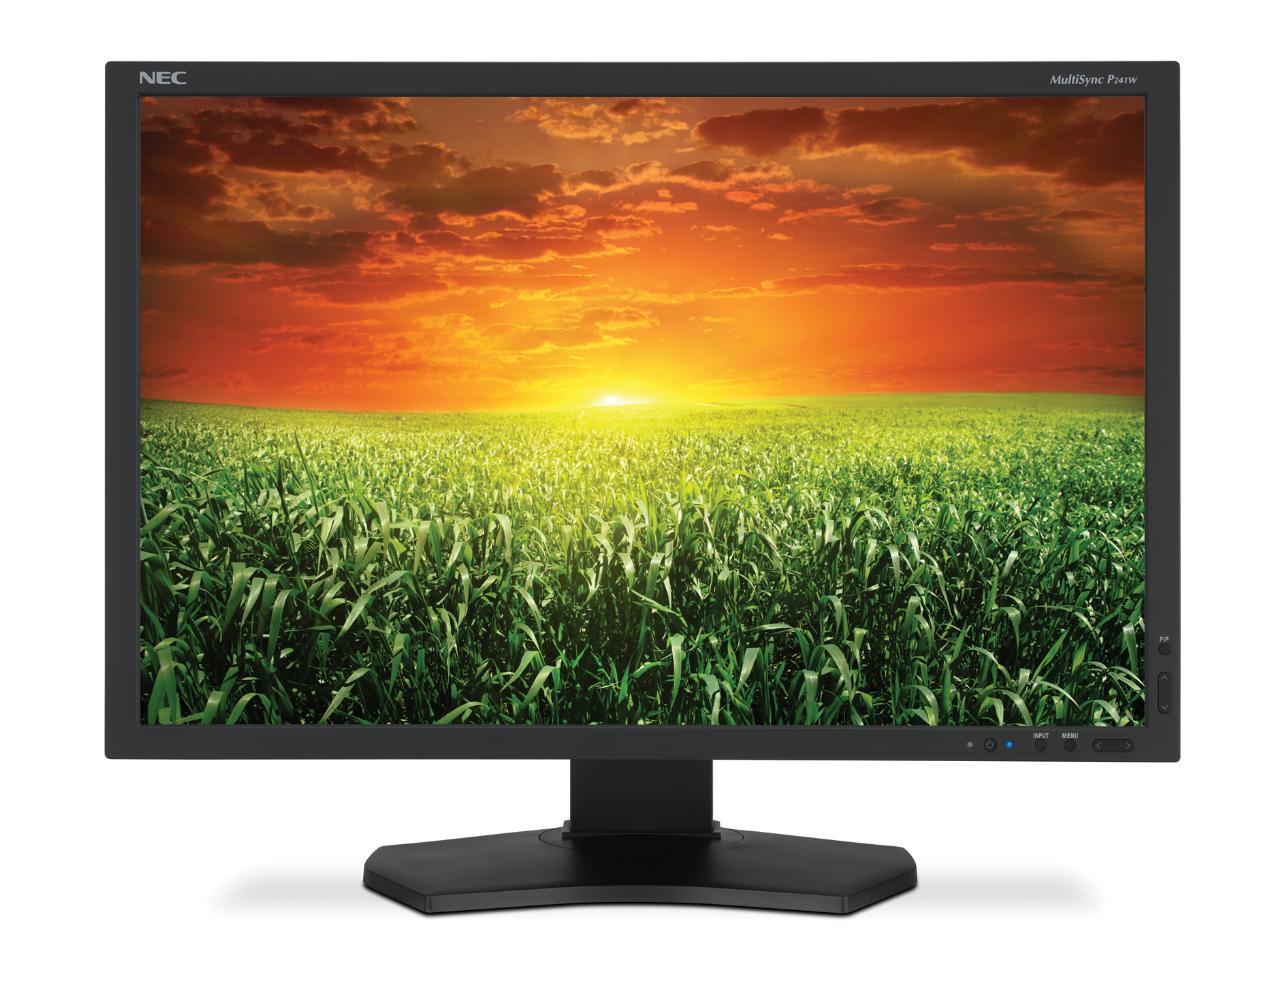
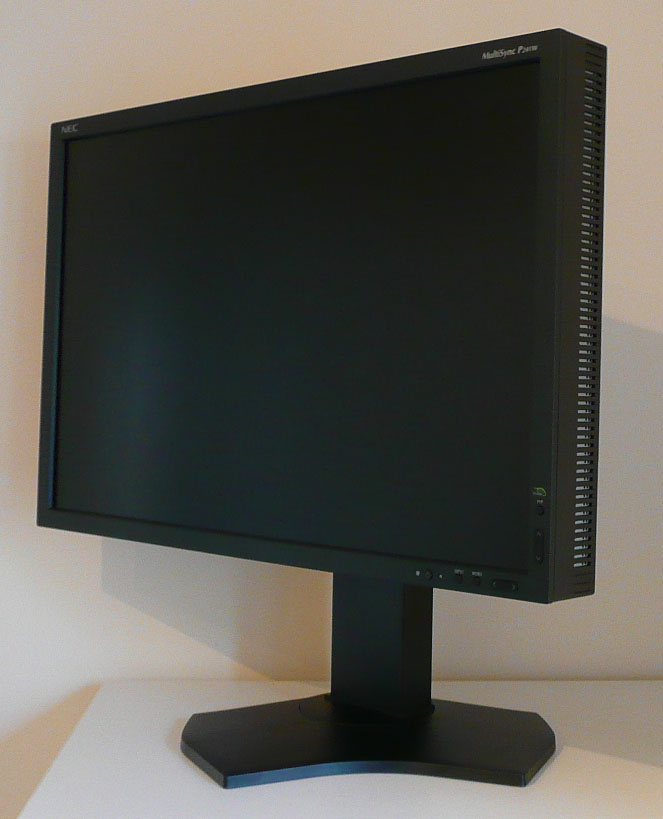
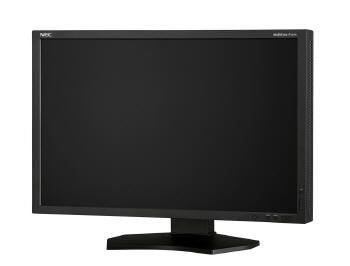
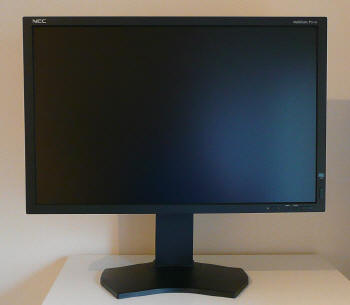
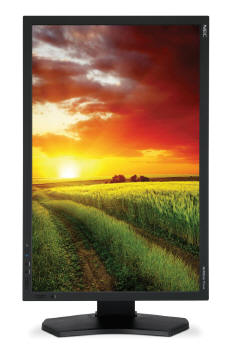
Above:
More high res front view of the screen. Click for larger versions
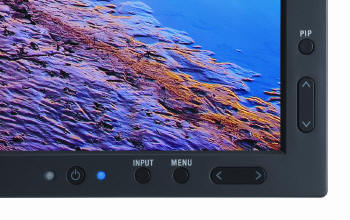
Above: OSD
operational buttons. Click for larger version
The OSD operational buttons are located in the bottom right hand corner and
are labelled with a subtle grey font. There are shortcut buttons for input
selection and Picture In Picture (PiP) as you can see. The left/right arrows
also act as a quick access to the brightness control, and the up/down arrows
as quick access to the preset modes. There is also the ambient light sensor
situated here on the left hand side of the power button. The power LED glows a
bright blue colour during operation although its brightness can be controlled
via the OSD menu. In standby the power LED glows amber.

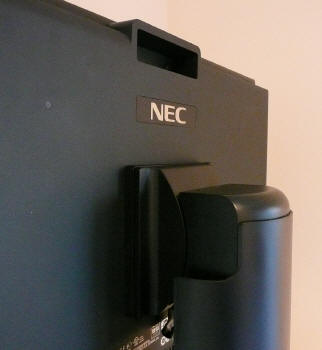
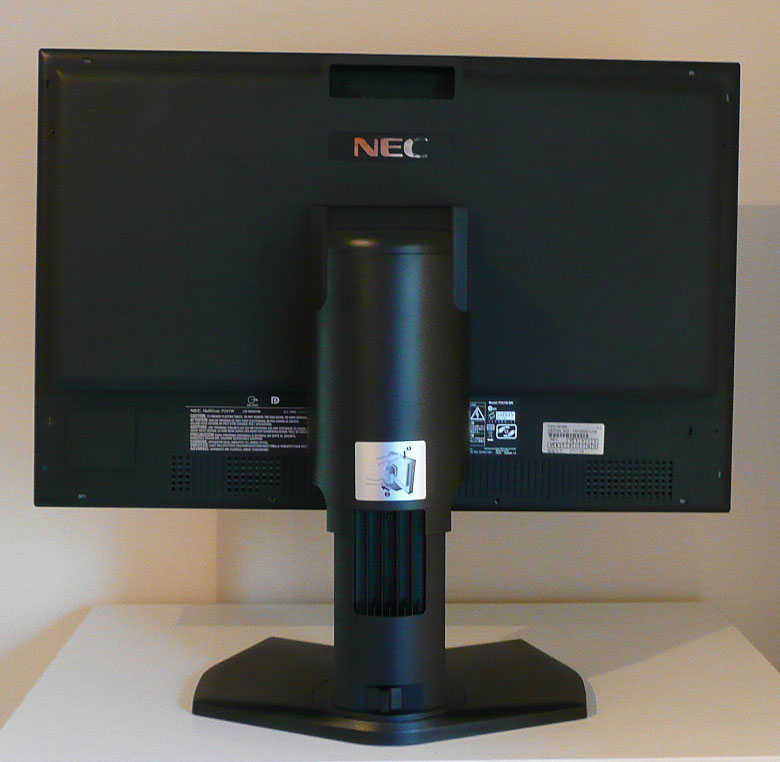
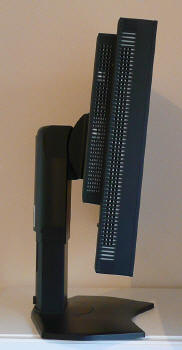
Above:
Back views of the screen including the carry handle. Click for larger versions
The back of the screen is again a black colour with a larger NEC logo near the
top. There is a useful carry handle at the top as well which is good since
this is a very heavy screen. It's not one you want to be moving around much.
The stand is big and sturdy and clips into place easily. The panel is also
VESA 100 compliant if you wanted to wall/arm mount it, although again the
weight might present a problem with some options.
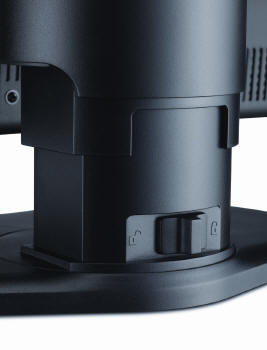

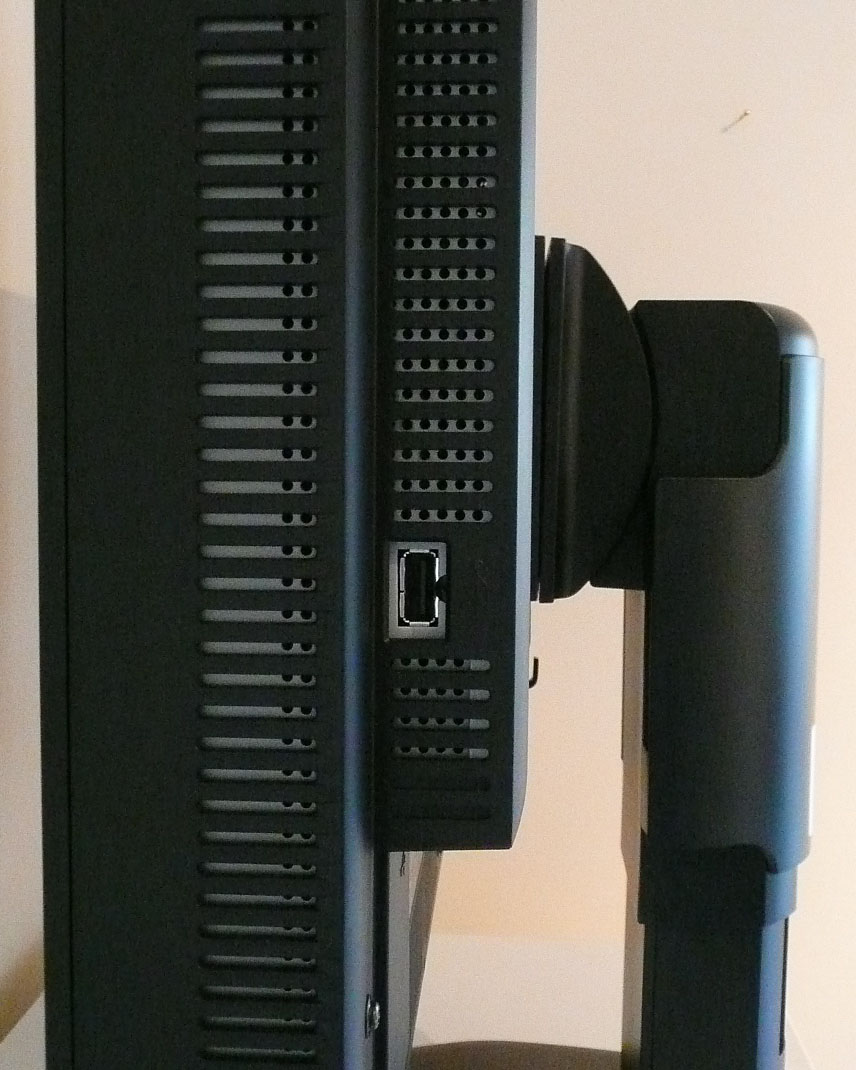
Above:
Back view of the stand and side view showing USB port. Click for larger versions
The stand has a lock function to hold the screen in place at its lowest height
setting which can be useful for when packaging the screen or moving it around.
The right hand side of the panel also offers 1x USB port for easy access and
connection of external devices like cameras etc. Since they've gone to the
trouble of adding a port here, it might have been good to offer another one as
well.
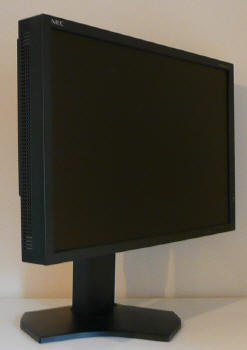
Above:
front view of the screen showing minimum and maximum height adjustment. Click for larger versions
The height adjustment is smooth but quite stiff
in both directions. There is a 110mm range of adjustment and at its lowest
point the screen sits very close to the desk if you want, as shown above.
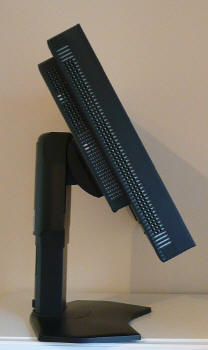
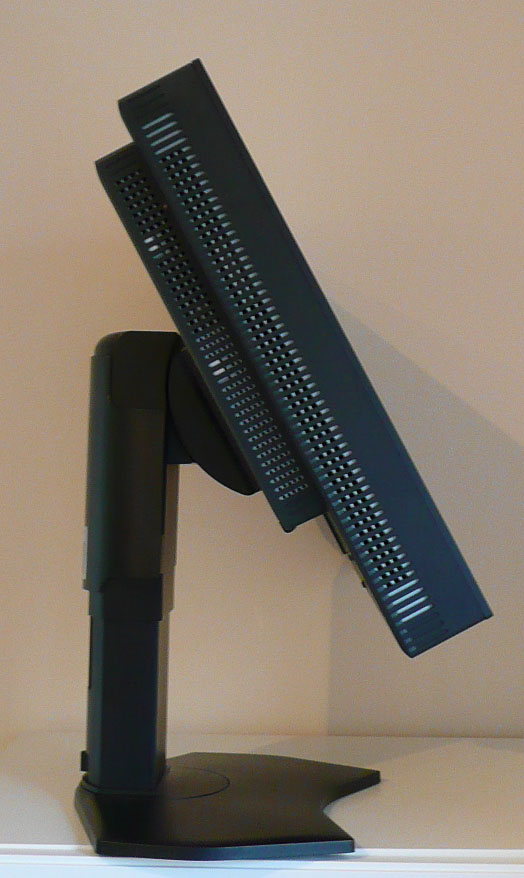
Above:
front view of the screen showing maximum tilt adjustments. Click for larger versions
The tilt range of the screen is very wide and the movement is smooth. Moving
the screen downwards is a little stiffer than moving it upwards but the
screen does remain very sturdy throughout this adjustment. As you can see the
side profile of the screen is very thick which accounts for the heavy weight
of the P241W.
Above:
front view of the screen rotated to portrait mode. Click for larger versions
The rotation function is smooth and again quite stiff but offers that option
for those who might want to change the screen between portrait and landscape
orientations.

Above:
front view of the screen showing left and right hand side pivot range. Click for larger versions
The same can be said for the side to side pivot.
The stand does remain in a fixed position on the desk while the screen pivots
from side to side which is good.
A summary of the screens ergonomic adjustments
is shown below:
|
Function |
Range |
Smoothness |
Ease of Use |
|
Tilt |
-5°
to 30° |
Smooth |
Easy |
|
Height |
110mm |
Stiff |
Moderate |
|
Swivel |
170°
+/- |
Quite stiff |
Moderate |
|
Rotate |
90° |
Stiff |
Moderate |
|
Overall |
Good range of adjustments and mostly easy to
use. Very sturdy design and feel. |
The screen materials are of a good quality and the design is
more office-like than 'home multimedia'. There is
no audible noise from the screen, even if you listen very closely. The top
does get quite hot during operation though, certainly more than modern W-LED
backlit models.
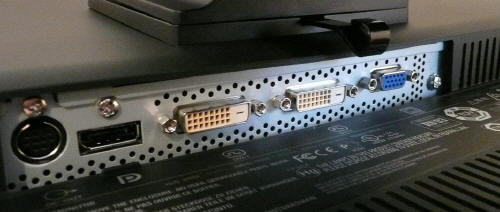
Above:
view of interface connections. Click for larger version.
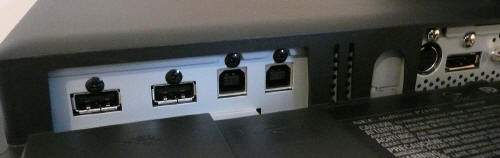
Above:
view of USB connections. Click for larger version.
The back of the screen features a decent range
of interface connections including DisplayPort, 2x DVI-D and D-sub. There are
also 2 downstream USB ports and two upstream USB connections. You can connect
these upstream ports to two different PC's and the OSD menu allows you to
switch between which is active. By doing this you can have a range of devices
connected to the screens downstream ports (of which there are three, two on
the back and one on the side) and have them available to both PC's depending
on how you switch between them from the monitor.
OSD Menu
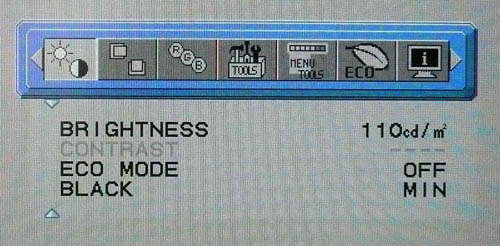
The OSD menu offers a massive range of options and
selections as we have become accustomed to from NEC's professional series of
screens. Entering the OSD via the 'menu' button first presents you with options
for brightness and contrast as you might expect. You may notice that the
brightness setting is labelled in
cd/m2 as
opposed to percentage as we have seen on their PA series as well. You can also
define the black point of the screen (if you want) and set the power saving ECO
modes between off, 1 and 2. You can scroll easily within this menu using the
up/down arrows and making selections using the left/right arrows. When you're
highlighted on the top area you can select using the left/right arrows between
each sub-menu easily and quickly.
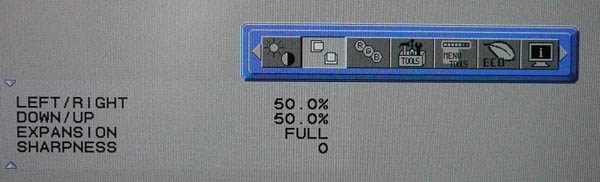
The second sub-menu offers some image adjustment
options. Of note is the 'expansion' mode offering various levels of aspect ratio
control which we will look at a
little later on.
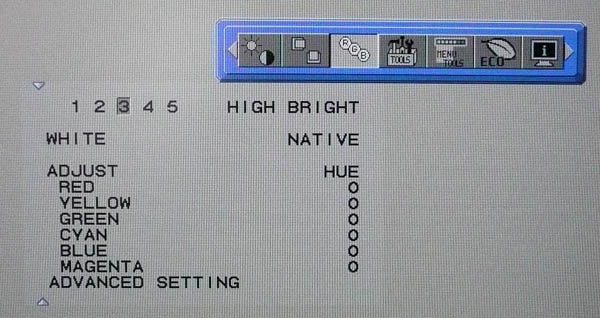
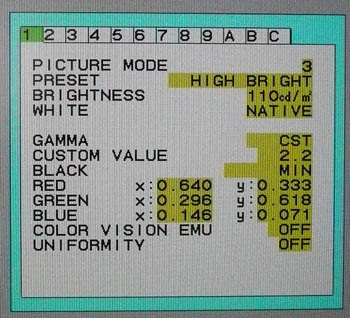
The RGB sub-menu offers you control over the
preset modes. There are presets for (from 1 to 5) REC-Bt709, sRGB, High Bright,
Full and programmable. See NEC's documentation and manual for more
information if you need it. You can also define the white point and adjust the
colour channels to various levels. You also have access to the advanced menu at
the bottom here which we will look at in a moment.
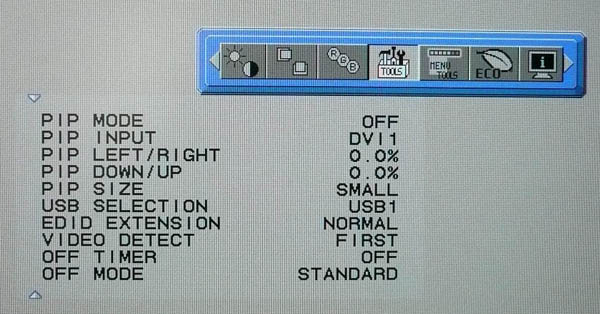
The tools menu offers you various options relating
to PiP and video detection as shown above.
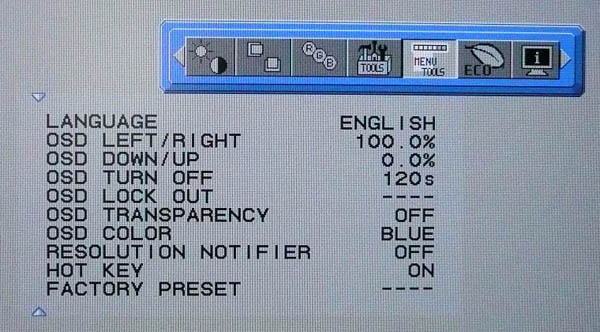
The 'menu/tools' sub-menu has options relating to
the on screen display itself and a couple of other options.
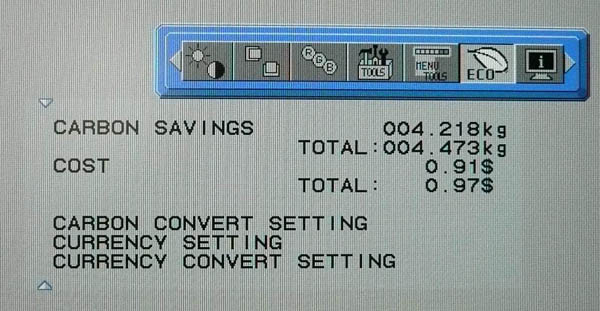
The ECO sub-menu tells you about your carbon
savings and costs of the display as shown above.
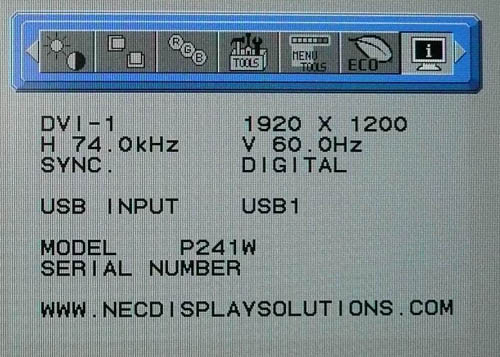
The last sub-menu is the 'information' section as
shown above which confirms your resolution and vertical refresh rate.

I won't go into too much detail about the advanced
menu as there's lots and lots of options in there. I'll pick out a few of the
interesting and useful options though here. When you enter the advanced menu you
are given a wider array of adjustments for some of the settings featured in the
normal menu. You can also control the level of uniformity correction from NEC's
ColorComp feature, which we
will test a little later on in the review. In the second section you can
control the response improve feature which is used to boost response times.
Again we will test this later on.
The auto brightness setting can also be enabled here if you want to make use of
NEC's ambient light sensor.
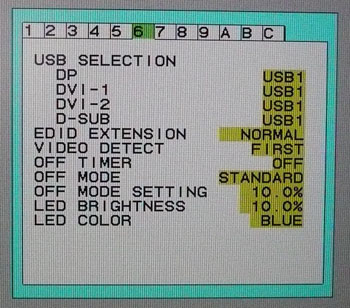
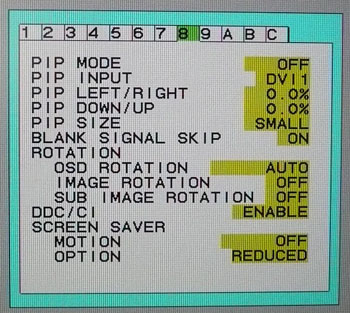
You can control the power LED brightness and
colour in section 6, and options relating to PiP and image rotation in section
8.
Overall the OSD menu was very intuitive to use and
operated well. There was a massive range of options and adjustments you can make
which should satisfy even the most demanding users and tweakers.
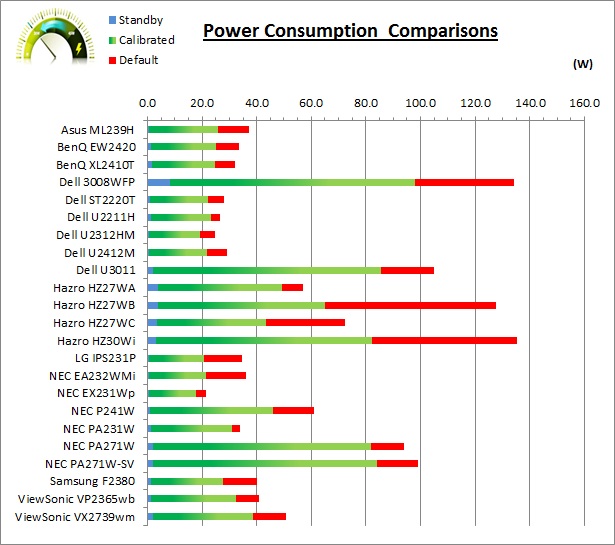
Power Consumption
In terms of power consumption the manufacturers spec states
typical
usage of 56W in ECO Mode 1 operation and 95W maximum. They do not list a standby
power consumption in their spec.
|
 |
|
State and Brightness
Setting |
Power Usage
(W) |
|
Factory Default (250) |
61.0 |
|
Calibrated (hardware) |
46.1 |
|
Maximum Brightness (400) |
84.3 |
|
Minimum Brightness (130) |
41.0 |
|
Standby |
1.1 |
|
We tested this ourselves and found that out of the
box the screen used 61.0W of power while at its default 250 brightness setting. After calibration, where we
had allowed full hardware correction to reach our target of 120
cd/m2, the
power consumption
was reduced to 46.1W. In standby the screen uses 1.1W of power. This was
higher than a lot of modern W-LED backlit screens but remained lower than some
other power hungry CCFL based models we have tested. I have plotted the
results of these measurements on the graph below:
Colour Accuracy, Black
Depth and Contrast
The Panel and Backlighting Unit
The NEC P241W utilises an LG.Display
LM240WU7-SLA1
e-IPS panel which is
capable of producing 16.7 million colours. The panel itself is a true 8-bit
module which is contrary to many other model e-IPS panels which are often using
6-bit + AFRC colour depth instead.
Again unlike many other modern screens this model
sticks to traditional CCFL backlighting rather than switching to W-LED which has
become very popular with manufacturers. This CCFL backlighting is standard gamut
and offers a colour space coverage of 71.4% NTSC, 75% Adobe RGB and 96.7% sRGB.
This is a standard gamut model (sRGB) unlike the PA241W which offered an
extended gamut covering ~102% of the NTSC colour space along with modes to
emulate smaller colour spaces like Adobe RGB and sRGB.
14-bit Programmable 3D LUT
Simple LCD monitors
work with internal signal processing with 8-bit accuracy (256 steps per primary
colour). Depending on the desired white point the intensity of one or more
channels must be reduced considerably. This can result in a considerable loss in
the amount of steps in the colours that have been reduced and this in a loss of
display quality. The result is posterization. Highlights and shadows can also be
affected.
The P241W offers a
programmable 14-bit 3D LUT to help offer smooth gradients and provide
clarity in subtle detail. As well as being 14-bits per channel, the LUT is
described here as being 3D. Whereas a typical 1D LUT adjusts colour on separate
tables for each red, green, and blue, a 3D LUT accomplishes this on a single,
mixed-colour cubic table. A 3D LUT improves the monitor's additive colour mixture
(combination of RGB), a key factor in its ability to display neutral grey tones.
As with the other P series screens NEC do not
advertise this model as being hardware programmable in the UK. They normally
restrict this function via the firmware so that they can sell their more
expensive and advanced "SpectraView" or "reference" versions of the screen later
on. In fact when you load up NEC's UK SpectraView profiler software there is no
option for hardware level calibration or even the combined soft- and hardware
calibration on this model. Using third party calibration software such as
LaCie's Blue Eye Pro also does not allow hardware level calibration which we had
achieved when testing the
NEC SpectraView Reference 271 screen (which did not have the firmware
restriction). The screens OSD menu does offer a
'programmable' preset and all is not lost since you can hardware calibrate this
display using NEC's USA version of the software, the SpectraView II package. We
will look at this a little later on.
Testing Methodology
An
important thing to consider for most users is how a screen will perform out of
the box and with some basic manual adjustments. Since most users won't have
access to hardware colorimeter tools, it is important to understand how the
screen is going to perform in terms of colour accuracy for the average user.
I
restored my graphics card to default settings and disabled any previously active
ICC profiles and gamma corrections. The screen was tested at default factory settings using the DVI interface, and analysed using
an
X-rite i1
Pro spectrophotometer combined with
LaCie's Blue Eye Pro software suite. An NEC branded and customised X-rite i1 Display 2 colorimeter was
also used to verify the black point and contrast ratio since the i1 Pro is less
reliable at the darker end.
Targets for these tests are as follows:
-
CIE Diagram - validates the colour space
covered by the monitors backlighting with the black triangle representing the
display
-
Gamma - we aim for 2.2 which is the default
for computer monitors
-
Colour temperature / white point - we aim
for 6500k which is the temperature of daylight
-
Luminance - we aim for 120
cd/m2, which is
the recommended luminance for LCD monitors in normal lighting conditions
-
Black depth - we aim
for as low as possible to maximise shadow detail and to offer us the best
contrast ratio
-
Contrast ratio - we aim
for as high as possible. Any dynamic contrast ratio controls are turned off here
if present
-
dE average / maximum -
as low as possible.
If DeltaE >3, the color displayed is significantly different from the
theoretical one, meaning that the difference will be perceptible to the
viewer.
If DeltaE <2, LaCie considers the calibration a success; there remains a
slight difference, but it is barely undetectable.
If DeltaE < 1, the color fidelity is excellent.
It should be noted that the
ColorComp uniformity adjustment and Metamerism settings were off by default
which is how I left them for these tests. When testing the other preset modes I
also disabled these features if they became active by default.
Default settings of the screen were as follows:
NEC P241W - Default Factory Settings (High Bright mode)
|
Monitor OSD Option |
Default Settings |
|
Brightness |
250 |
|
Contrast |
--- |
|
Preset Mode |
High Bright |
|
White Mode |
Native |

|
|
Default Settings,
High Bright mode |
|
luminance (cd/m2) |
252 |
|
Black Point (cd/m2) |
0.27 |
|
Contrast Ratio |
929:1 |
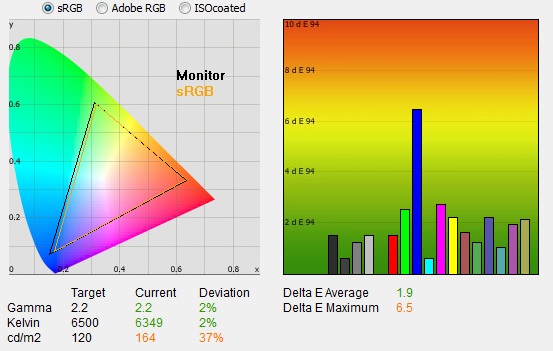
Out of the box the screen is set in the 'High
Bright' mode, with options for ColorComp uniformity correction and metamerism
disabled.
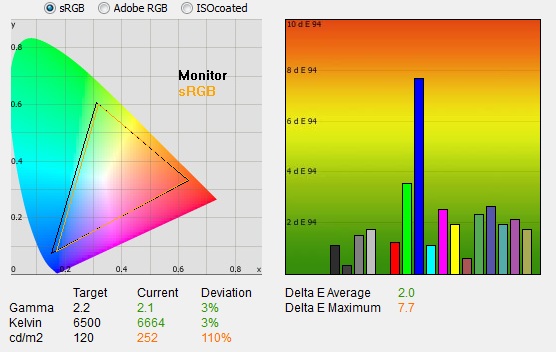
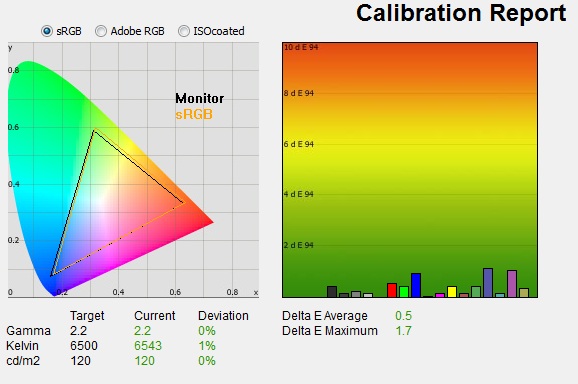
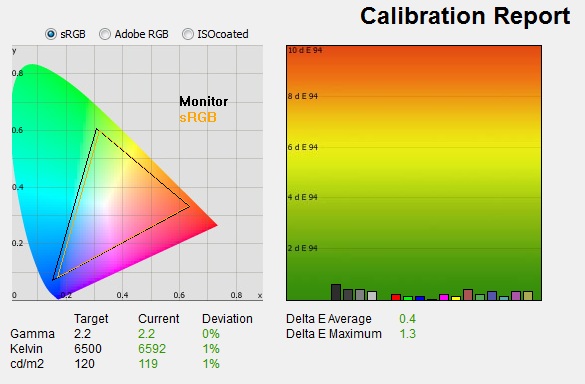
The
CIE diagram on the left confirms that the monitors colour gamut (black
triangle) very closely matches the sRGB colour space (orange triangle). It
extends a little past the sRGB space in greens and blues in this 2D view of
gamut but does confirm that this is indeed a standard gamut backlight unit.
The brightness control is set at 250
cd/m2 at
default in the OSD menu which means that the screen is overly bright and
uncomfortable for prolonged use. The i1 Pro recorded the luminance of the screen
as 252 cd/m2 in this test showing that the OSD setting is actually
very close to what the user will experience. Black depth was recorded at a
very good 0.27 cd/m2, leaving us with a high static contrast ratio of
929:1 which was excellent for an IPS panel.
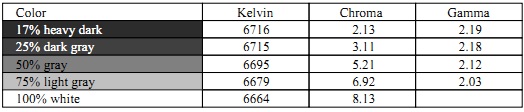
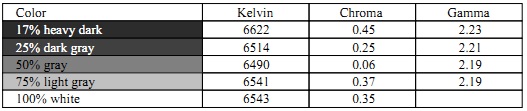
The default colour
temperature was recorded at 6664k which left it only 3% out from the target of
6500k. Default gamma was recorded at 2.1
average. In the darker tones it was actually much closer to the 2.2 target, but
this did drop down to as low as 2.03 in lighter grey tones. Overall on average
this left us with 3% deviance from the target of 2.2.
Default colour accuracy was not bad overall with
an average dE of 2.0. This would have been even better if the screen hadn't
shown a poor accuracy in blues which reached as high as 7.7 dE. Apart from the
overly high brightness this default mode should be ok for most average users. Of
course this P241W is aimed more at professional users so you would hope they
would have access to proper calibration devices to get the most out of the
display. We will test calibration later on in the review.
NEC P241W - Default Factory Settings (Full mode)
|
Monitor OSD Option |
Settings |
|
Brightness |
160 |
|
Contrast |
--- |
|
Preset Mode |
Full |
|
White Mode |
6500k |
|
|
Default Settings,
Full mode |
|
luminance (cd/m2) |
164 |
|
Black Point (cd/m2) |
0.20 |
|
Contrast Ratio |
820:1 |
The 'Full' mode performed very similarly to the
High Bright mode in nearly all areas. Luminance was a lower, and more
comfortable, 164
cd/m2, and
contrast ratio was not quite as high as before being recorded at 820:1. The rest of the performance was very
comparable in this preset.
NEC P241W - Default Factory Settings (sRGB mode)
|
Monitor OSD Option |
Settings |
|
Brightness |
80 |
|
Contrast |
--- |
|
Preset Mode |
sRGB |
|
White Mode |
6500k |

|
|
Default Settings,
sRGB mode |
|
luminance (cd/m2) |
86 |
|
Black Point (cd/m2) |
0.12 |
|
Contrast Ratio |
717:1 |
Changing the screen to the sRGB mode had an
obvious impact on the screens luminance. The OSD brightness control was reduced
to 80 which was also into the digital white level adjustments. We will talk
about this later on in the
contrast stability
section. At this setting the luminance of the screen was a much lower 86
cd/m2, again
being very close to the specified OSD setting. This was however too low compared
with our target luminance. Black depth was recorded at 0.12 cd/m2,
but because we had entered into the digital white level adjustments to the
luminance of the screen, the contrast ratio was a much lower 717:1. We had
reached the minimum black depth of the panel but made further changes to the
white level / luminance at the cost of contrast in this mode.
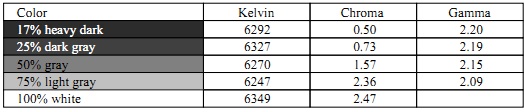
Gamma was a bit closer with an
average of 2.2 and a 1% deviance. The lighter shades showed a more accurate
gamma setup here with the deviance coming in the darker tones. Colour
temperature was similar to the default 'High bright' mode at 6207k, leaving us
5% out from the target. Colour accuracy was a little better than High bright in
fact with average dE of 1.2. The blue shades were still causing us problems with
a 6.1 dE maximum recorded.
Software Calibration Results
I wanted to calibrate the screen in each of the
main preset modes to determine what was possible with optimum settings and
profiling. I used the
X-rite i1 Pro spectrophotometer combined with the LaCie Blue Eye Pro
software package to achieve these results and reports. An NEC customised X-rite i1 Display 2
was used to validate the black depth and contrast ratios due to lower end
limitations of the i1 Pro device.
Please remember that these are all software based
graphics card profiling "calibrations" as opposed to hardware level true
calibration which we will come onto shortly. These are the normal calibration
methods we use for our monitor reviews which creates a profile which is
activated at a software level for the graphics card. This is more than adequate
for most users and is all you really need for nearly all the mainstream monitors
anyway. In fact, most don't even have the option for hardware level calibration,
so you have to make do with software profiling only. For professional use and
high end colour work these kind of profiles, although good, are not acceptable.
You need full hardware calibration which can make adjustments at a hardware
level and to the monitors extended internal LUT. This is what the high end
professional market need and want from a screen. The P241W offers the hardware capabilities
to do this form of calibration as well, which we will come on to shortly.
NEC P241W - Calibrated Settings - High Bright mode
|
Monitor OSD Option |
Adjusted Setting |
|
Brightness |
132 |
|
Contrast |
--- |
|
Preset Mode |
High Bright |
|
White Mode |
Native |
|
|
Calibrated Settings, High
Bright Mode |
|
luminance (cd/m2) |
120 |
|
Black Point (cd/m2) |
0.15 |
|
Contrast Ratio |
807:1 |

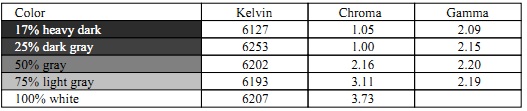
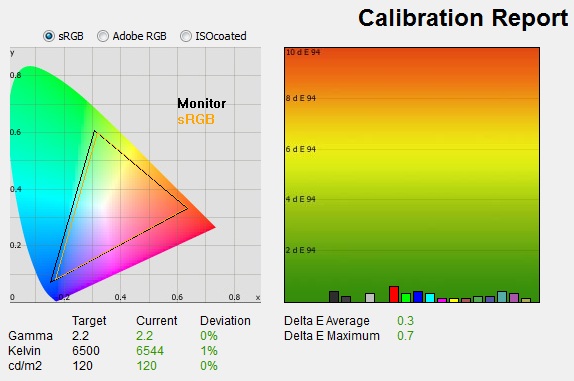
Calibration in the High Bright mode through
software profiling produced some pleasing results. Gamma, colour temperature and
luminance were now all pretty much spot on with the small variances corrected as
compared with the out of the box set-up. Colour accuracy had also been improved
significantly with the offset in blues being corrected well. The average dE was
now 0.3 with a maximum of 0.7. This mode offered a black depth of 0.15
cd/m2
and a calibrated static contrast of 807:1 which
was good for an IPS panel. This was a little lower than default of course
(929:1) but further corrections had been made to the gamma curve and grey scale
here to improve performance in other areas and achieve optimum setup.
You can use our settings and
try our calibrated ICC profile if you wish, which are available in
our ICC profile database. Keep in mind that results will vary from one
screen to another and from one computer / graphics card to another.
NEC P241W - Calibrated Settings -
sRGB mode
|
Monitor OSD Option |
Adjusted Setting |
|
Brightness |
120 |
|
Contrast |
--- |
|
Preset Mode |
sRGB |
|
White Mode |
6500k |
|
|
Calibrated Settings, sRGB Mode |
|
luminance (cd/m2) |
120 |
|
Black Point (cd/m2) |
0.15 |
|
Contrast Ratio |
803:1 |
I calibrated the screen in the sRGB preset mode as
well. The gamma, colour temperature and luminance targets were met almost spot
on in all cases. This process had improved the default luminance of 86
cd/m2 through
the adjustment of the OSD brightness control to 120 which was better and at the
target we had wanted. Because we were now at an OSD setting outside of the
digital white level adjustments (see
contrast stability
section for more detail), contrast ratio was better than the default 86 cd/m2
setting which had been measured at 717:1. We now had a contrast ratio of 803:1
which was on par with the high bright calibrated mode. Colour accuracy had again
been improved with dE average of 0.5, maximum of 1.7. Again, ICC profile available if you want it in
our ICC profile database.
I tested the screen using various colour gradients
in all of these preset modes which showed smooth transitions and no apparent
banding. There was some slightly noticeable gradation in darker tones which is
normal for most screens but was very slight here.
Hardware Calibration Results
As with the other P series screens NEC do not
advertise this model as being hardware programmable in the UK. They normally
restrict this function via the firmware so that they can sell their more
expensive and advanced "SpectraView" or "reference" versions of the screen later
on.
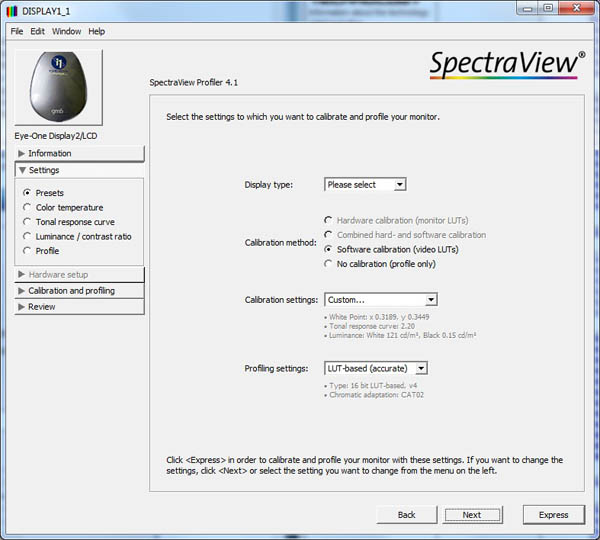
In fact when you load up NEC's SpectraView
profiler software there is no option for hardware level calibration or even the
combined soft- and hardware calibration on this model and they are greyed out as
shown above (version 4.1.28 of the software). Using third party calibration software such as
LaCie's Blue Eye Pro also does not allow hardware level calibration which we had
achieved when testing the
NEC SpectraView Reference 271 screen without the firmware restriction. The screens OSD menu does offer a
'programmable' preset and all is not lost since you can hardware calibrate this
display using NEC's USA version of the software, the SpectraView II package.

We won't go into a lot of detail about the
software itself since we have looked at it in detail in our
NEC PA271W and
SpectraView Reference 271 reviews. We updated the software to the latest
version available from
NEC's website which was v1.1.08.

However after installation following the option
for "check for updates" showed us that there was in fact a new v1.1.09 available
which we then installed. Interestingly with this new version, released 1st
October, it states that it now supports
X-rites new i1 Display Pro colorimeter.
I know third party software support for this device has been limited so far and
so it's pleasing to see this now included in SV II. Their readme says:
X-Rite iOneDisplay Pro:
-
This
version includes support for the X-Rite iOneDisplay Pro color sensor.
-
The
X-Rite ColorMunki Display device introduced in mid-2011 is not
supported.
-
The
NEC SpectraSensor Pro is based on the X-Rite iOneDisplay Pro sensor and is
supported. Note that this sensor may not be supported by non-NEC software.


Loading the software up detected the P241W
automatically. We defined out usual calibration targets as shown above and set
the software to the highest level of calibration steps (52) for highest quality.
We entered the 'programmable' preset from the OSD which enabled ColorComp
uniformity correction by default at its highest level. You are able to turn this
off via the 'monitor settings' menu if you need to which we will have to use in
a moment.
The process controlled all aspects of the
calibration automatically including adjustments to the monitors brightness,
contrast and RGB levels. It then made adjustments to the internal 14-bit 3D LUT
for absolute accuracy and full hardware level correction. The preset mode
labelled in the OSD menu as 'programmable' was changed as well and now read 'SpectraViewII'.
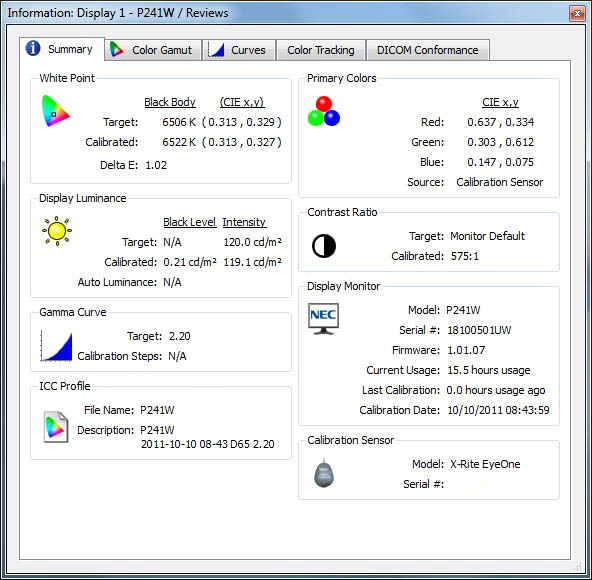
The calibration provided the above results summary
after the process has completed. You can see that the white point was reached
nicely with a 6522k measurement made once calibration. Luminance had been met
within 1
cd/m2 at 119.1
cd/m2. The black depth was measured at 0.21 cd/m2 here and
the static contrast ratio was recorded at 575:1. However as we've said, this
process automatically turns the ColorComp feature on.
Within the OSD it is then not possible to change
the ColorComp setting and so we entered the SV II settings to disable this to
allow us to make a fair measurement of the black depth and contrast ratio. Using
the NEC i1 Display 2 to verify (thanks to its better low level accuracy) we
recorded a calibrated contrast ratio of 789:1 and a black depth of 0.15
cd/m2. This was
more in keeping with the
software calibrated results we had achieved (~807:1).
ColorComp can be re-enabled later on via this same
SV II menu.
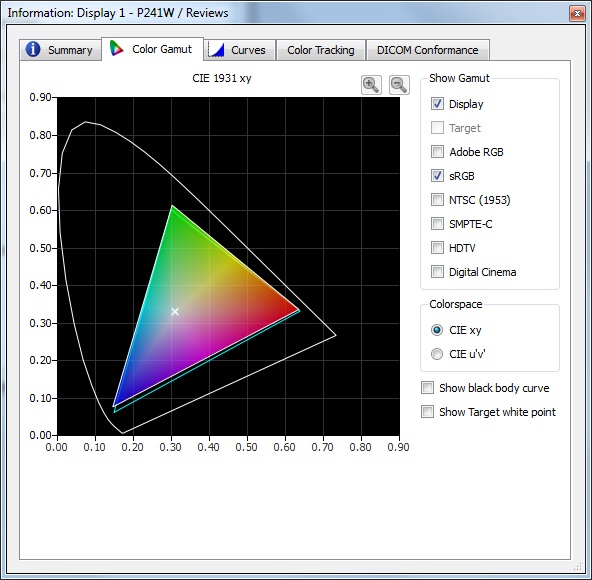
The gamut tab verifies that the screens colour
space very closely matches that of the sRGB reference.
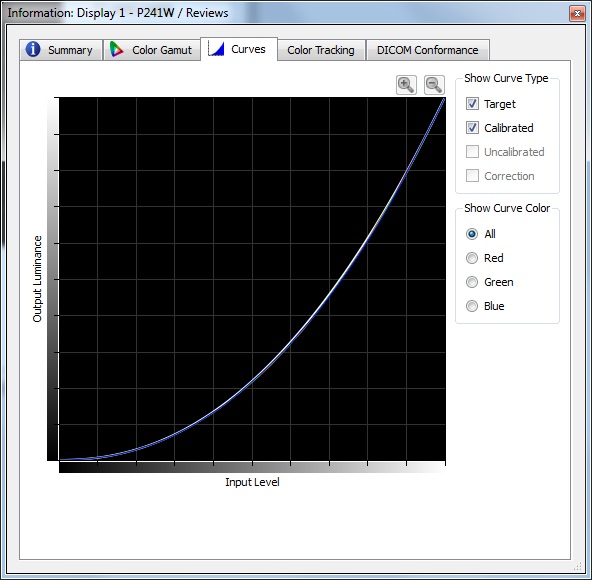
The gamma curves have been calibrated very
accurately as well.
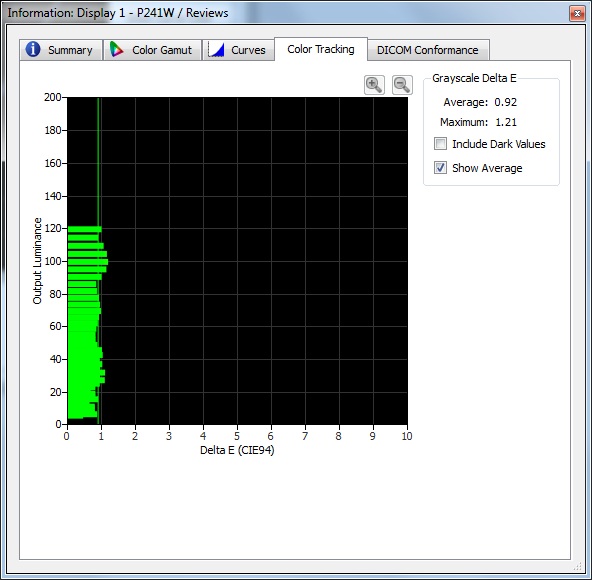
The 'color tracking' tab confirms the dE
measurements with an average of 0.92 being recorded here, and a maximum of 1.21.
The calibration was a great success overall and this process was easy to follow.
It was good to see that this SV II software can be used on the P241W (UK
version) to hardware calibrate the display and make the most of its potential.
NEC P241W - Calibrated Settings -
Hardware Calibration, SpectraView II
|
Monitor OSD Option |
Adjusted Setting |
|
Brightness |
Auto |
|
Contrast |
Auto |
|
Preset Mode |
SpectraView II |
|
White Mode |
n/a |

|
|
Calibrated Settings,
SpectraView II |
|
luminance (cd/m2) |
119 |
|
Black Point (cd/m2) |
0.15 |
|
Contrast Ratio |
789:1 |
I also ran LaCie's test and report feature to
verify the calibration results from their point of view. As you can see, the
LaCie report confirms that the calibration was very successful with targets
being met very nicely. The dE measurements were 0.4 average and 1.3 maximum
which is slightly better than we had achieved through software profiling in
fact.
Calibration
Performance Comparisons
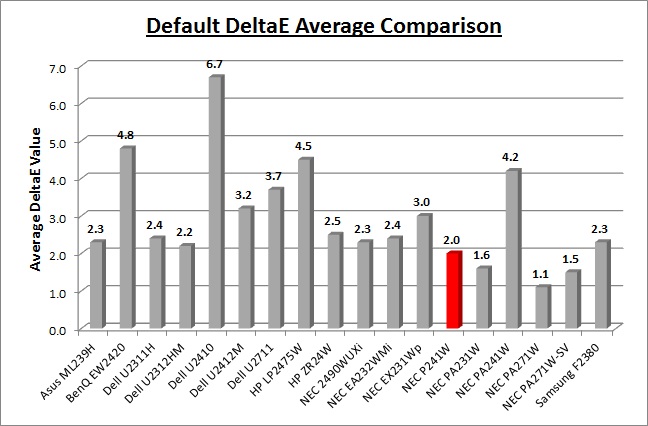
I've provided a comparison above of the P241W
against some of the other screens we have tested in a similar size range. Out of
the box average dE was 2.0 on the P241W which was very good. The default colour accuracy of the
P241W was quite comparable to some of the
23 - 24"
IPS models we have tested including the
Dell U2312HM (2.2),
HP ZR24W (2.5) and the
NEC EA232WMi (2.4). It was also very similar to the
NEC
LCD2490WUXi (2.3) but not quite as good as the
NEC PA231W (1.6) and
PA271W
(1.1). Overall it was a good performance though as you would hope from a high
end screen aimed at professional and graphics users. You would obviously want to
calibrate a screen of this nature anyway to get the most out of it, preferably
at a hardware level.
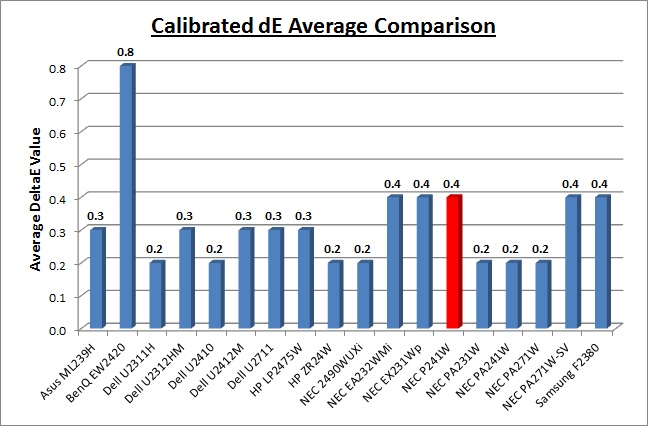
Once calibrated (at a hardware LUT level) the dE average was reduced to 0.4.
This would be classified as excellent colour fidelity by LaCie. It was not quite
as low as some of the other screens here which reached down to 0.2 average, but
in practice you would not notice any difference here. Professional grade
monitors like the P241W and the NEC PA series offer other high end features which
separate them from some of the more mainstream consumer models here, including extended internal
processing, 3D LUT's and hardware calibration. These comparisons are based on a
small selection of tests, so it should be remembered that other factors do come
into play when you start talking about professional use.
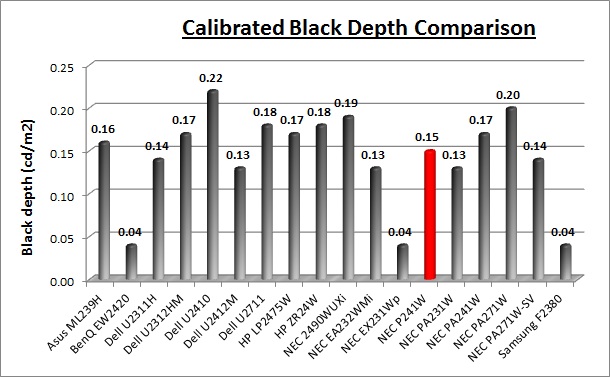
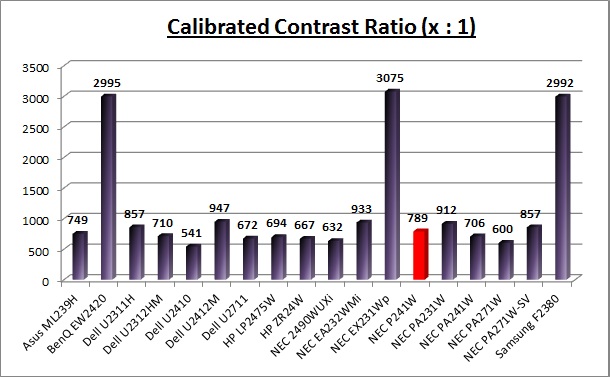
The calibrated black depth and contrast ratio of the P241W
were fairly good for an IPS panel with a 0.15 black depth and 789:1 static contrast ratio measured. It was not quite as good as some other modern
IPS based screens we have tested like the
Dell U2412M (947:1) for instance. However, it was an improvement over the
632:1 we achieved in our
NEC LCD2490WUXi review and better than the
PA241W (706:1) as well which was good. A fairly decent performance really
compared with many other IPS panels.
The
BenQ EW2420,
NEC EX231Wp and
Samsung F2380 with their AMVA
and cPVA panels offered some fantastic contrast ratios of ~3000:1
which IPS cannot compete with at the moment however.
Contrast
Stability
I wanted to see how much variance there was in the screens contrast as we
adjusted the monitor setting for brightness.
In theory, brightness and contrast are two independent parameters, and good
contrast is a requirement regardless of the brightness adjustment.
Unfortunately, such is not always the case in practice. We recorded the
screens luminance and black depth at various OSD brightness settings, and
calculated the contrast ratio from there. Graphics card settings were left at
default with no ICC profile or calibration active. Tests were made using an
NEC branded and customised
X-rite i1 Display 2 colorimeter. It should be noted that we used the
BasICColor calibration software here to record these, and so luminance at
default settings may vary a little from the LaCie Blue Eye Pro report.
ColorComp and any other
features like metamerism were disabled to carry out these measurements.
|
OSD Brightness |
Luminance
(cd/m2) |
Black Point (cd/m2) |
Contrast Ratio
( x:1) |
|
400 |
397.8 |
0.42 |
947 |
|
350 |
348.3 |
0.37 |
941 |
|
300 |
299.1 |
0.32 |
935 |
|
250 |
250.2 |
0.27 |
927 |
|
200 |
200.6 |
0.21 |
955 |
|
150 |
152.0 |
0.16 |
950 |
|
130 |
133.5 |
0.14 |
954 |
|
120 |
123.1 |
0.13 |
947 |
|
110 |
113.9 |
0.12 |
949 |
|
100 |
105.7 |
0.12 |
881 |
|
90 |
96.8 |
0.12 |
807 |
|
70 |
77.2 |
0.12 |
644 |
|
40 |
44.8 |
0.12 |
373 |
|
Luminance Adjustment Range = 353 cd/m2
Black
Point Adjustment Range = 0.30 cd/m2
Average
Contrast Ratio = 939:1
|
The luminance range of the screen was very wide
with an overall adjustment range of 353
cd/m2 available
from the brightness control. At the top end the maximum brightness setting of
400 returned us a luminance of 397.8 which was very close to the 400 cd/m2
specified by the OSD menu. In fact all of the adjustments of the brightness were
pretty close to the desired luminance which was pleasing. You should be able to
use these OSD settings as a good guideline of the luminance you actually want to
aim for. The maximum luminance of 397.8 cd/m2 was also a little over
the specified maximum brightness of 360 cd/m2.
At the lower end the
brightness control ranged down initially to a setting of 100 which returned us a
recorded luminance of 105.7
cd/m2. After
this you will note that the settings and measurements are in red. After a
setting of 100 you are actually no longer controlling the backlight intensity,
but instead you begin to make adjustments to the digital white level.
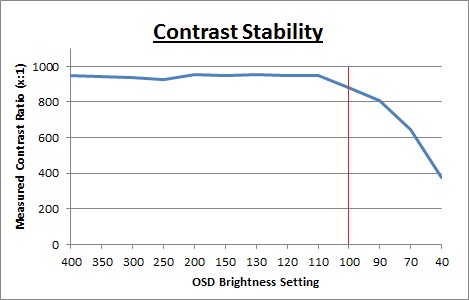
Between the range of 400
and 100 the contrast ratio remains stable since you are only controlling the
backlight intensity and CR is not affected. After this you can lower the
brightness control down between 100 and 40. This will have the effect of
lowering the white luminance of the screen and we reached as low as 44.8 cd/m2
at the lowest setting. However, because the backlight had already reached its
lowest setting at the 100 point, the digital white level adjustments are
impacting the contrast ratio quite a lot. As a result, the CR takes a fall and
reaches as low as 373:1 at the 40 setting. This added digital level adjustment
range might be useful for those wanting to reach lower luminance settings but it
will be at the sacrifice of CR after a certain point. Between 400 and 100 the
screen performs as it should with a stable CR of around 939:1 average.
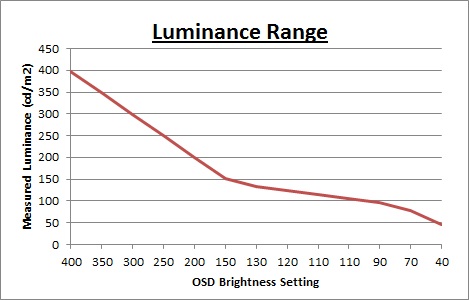
We have plotted the luminance trend on the
graph above. The screen behaves as it should, with a reduction in the backlight
intensity controlled by the reduction in the OSD brightness setting. This
adjustment is steeper between 400 and 150 settings.
Viewing Angles
Above: Viewing
angles shown from front and side, and from above and below. Click for
larger image
Viewing angles of the NEC P241W are very good,
as you would expect from a screen based on an e-IPS panel. Horizontally there
are very wide fields of view with a contrast shift only really becoming
noticeable from a fairly wide angle of about 45°. At more extreme angles the
image goes a little darker. Vertically, the contrast shift
was a little more pronounced but the fields of view were still good.
The
panel is free from any off-centre contrast shift which you see from VA matrices,
and this is why IPS technology is so highly regarded in the colour enthusiast
and professional space. It is also free of the very noticeable contrast and
colour tone shifts you see from TN Film panels vertically.

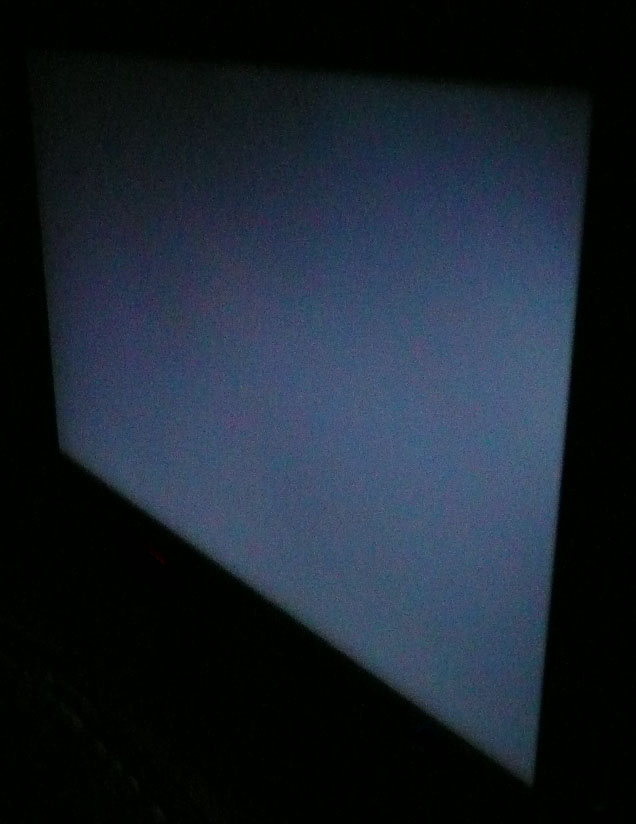
Above: View of an
all black screen from the side. Click for larger version
On a black image there is a characteristics IPS
white glow, but in normal lighting conditions this shouldn't present much
problem. The above image was taken in a darkened room to demonstrate the white
wide angle glow. There is no A-TW polarizer on this panel which is rarely used
now in the market but was implemented on some older screens to improve the off
centre black viewing.
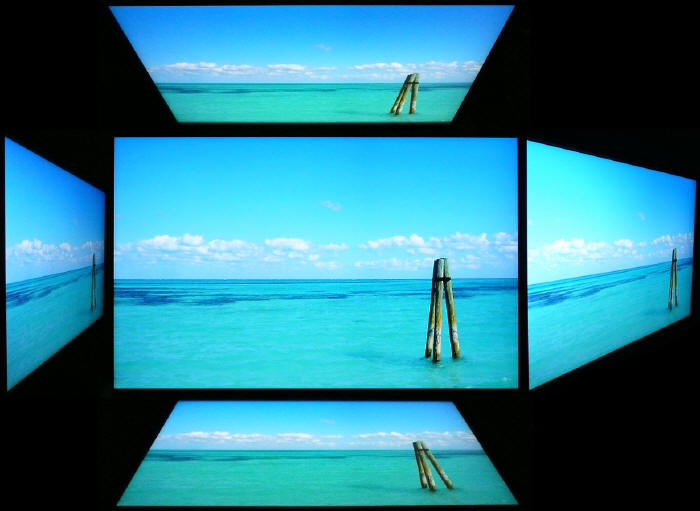
Panel Uniformity
Measurements of the screens luminance were taken
at 35 points across the panel on a pure white background. The measurements were
taken using BasICColor's calibration software package, combined with the NEC
customised X-rite
i1 Display 2 colorimeter. The above uniformity diagram shows the difference, as
a percentage, between the luminance recorded at each point on the screen, as
compared with the reference point of a calibrated 120 cd/m2. This is
the desired level of luminance for an LCD screen in normal lighting conditions,
and the below shows the variance in the luminance across the screen
compared with this point. It is worth noting that panel uniformity can vary from
one screen to another, and can depend on manufacturing lines, screen transport
and other local factors. This is only a guide of the uniformity of the sample
screen we have for review.
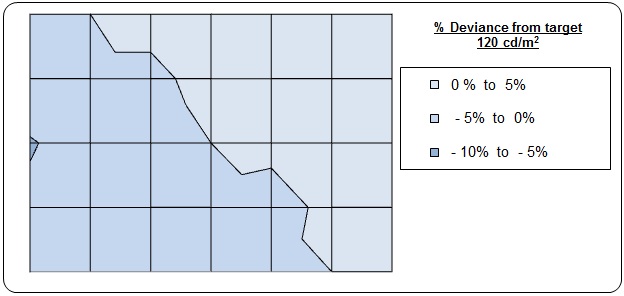
Uniformity of Luminance (ColorComp Off)
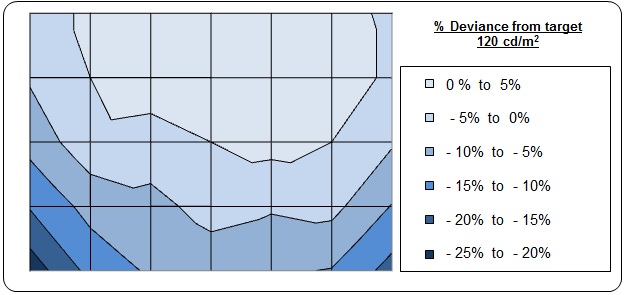
The above results were recorded using the
screen with the 'uniformity' mode disabled. We will look at that
technology in a moment. The results of this test were good.
Luminance did drop down by around -23% in the lower left hand area of the
screen, down to a minimum of 98
cd/m2 in the
corner area and was a little darker in the bottom left hand region in
general. The
bottom right hand corner was also a little darker than the centre of the
screen ranging down to around 103 cd/m2 with a -17% deviance. In the
top middle region the luminance reached up to 125 cd/m2 with
a +4% deviation. On the whole
though 80% of the screen area was less than 10% out from the target luminance
which was very good.
Uniformity Mode - ColorComp
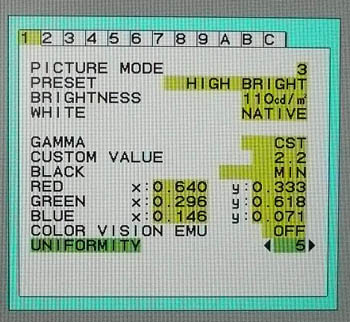
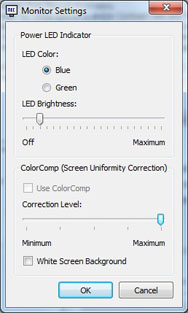

Uniformity mode is accessible via the advanced
OSD menu as shown in the image above as well as via the SpectraView II
software settings.
NEC's documentation explains what this function does
quite well: "This function electronically compensates for the slight variations in the white
uniformity
level as well as for deviations in colour that may occur throughout the display
area of
the screen. These variations are characteristic of LCD panel technology. This
function
improves the colour and evens out the luminance uniformity of the display. Note
that using the 'Uniformity' feature does reduce the overall peak luminance of the
display. If greater luminance is desired over the uniform performance of the
display, then this option should be turned off. A higher number produces a better effect,
but
may also reduce contrast ratio."
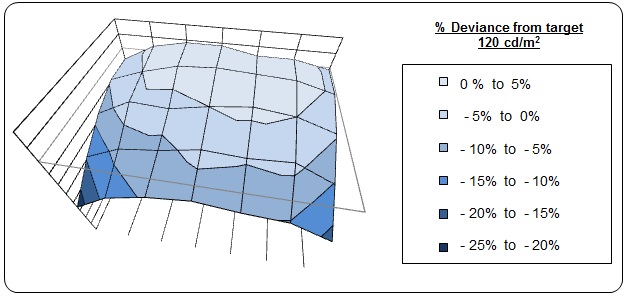
Uniformity of Luminance (ColorComp Level 5)
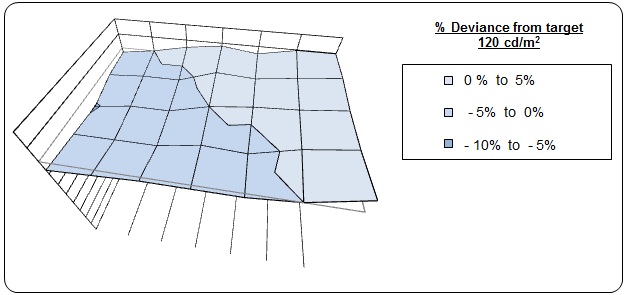
I tested this feature set at level '5' to see
whether it worked well or not. I had tested the feature on the
PA241W,
PA271W and
SpectraView Reference 271 as well which had returned excellent results. The outcome was
similar with the P241W pleasingly. Uniformity was improved very nicely
across the whole screen with a maximum deviance of ~5% along the left hand
edge. 100% of the screen was within 6% deviance which was brilliant. The
right half of the screen was slightly brighter than the left portion, but only by about 10
cd/m2
maximum. This
technology did a good job and is an excellent feature to include for those
who worry about uniformity of images and colour.
Uniformity Mode - Impact on Contrast
We discussed this a little during our
calibration sections, but thought it might be useful to take a few
measurements as well. When you enable the ColorComp mode, either via the OSD
menu or the SV II software, it does help improve panel uniformity very well.
However, it can have an impact on contrast ratio of the screen. I took
measurements of luminance, black depth and contrast ratio at each of the 5
ColorComp settings. These were taken while in the High Bright preset mode
after software calibration.
|
ColorComp Setting |
Luminance (cd/m2) |
Black
Point (cd/m2) |
Contrast Ratio
(x:1) |
|
Off |
119.8 |
0.15 |
807 |
|
1 |
115.7 |
0.15 |
771 |
|
2 |
115.1 |
0.16 |
719 |
|
3 |
115.7 |
0.17 |
681 |
|
4 |
116.2 |
0.18 |
646 |
|
5 |
116.8 |
0.20 |
584 |
As you can see, the luminance reading of our
calibrated profile was rounded to 120
cd/m2 at each setting and the ColorComp
does a good job of stabilising this value across the screen to within about
5 cd/m2. However, black
depth was impacted to varying degrees and as a result, contrast ratio ranged
from 807:1 when set to off, down to 584:1 at setting 5.
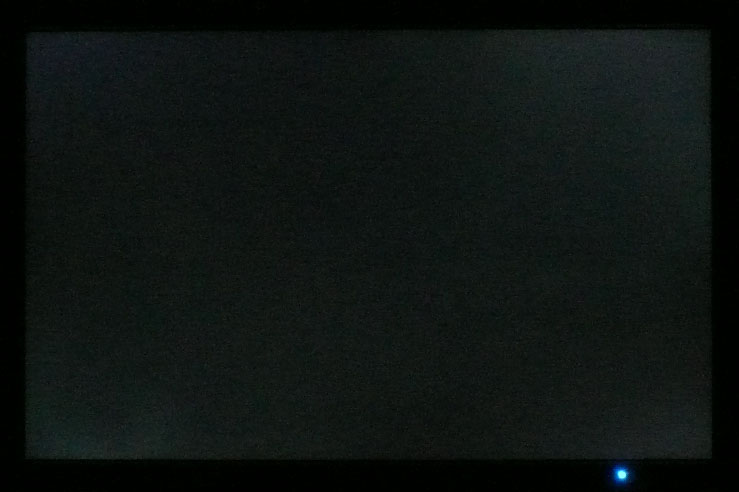
Backlight Leakage
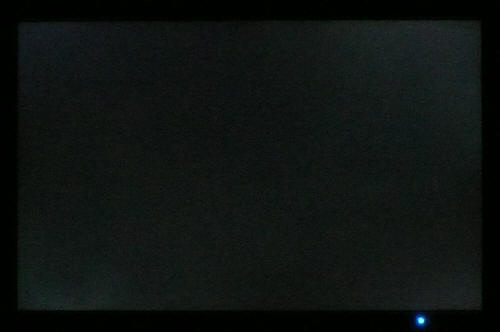
Above: All black screen in a darkened room. Click for larger version
As usual we also tested the screen with an all
black image and in a darkened room. A camera was used to capture the result. The
backlight uniformity in this test was moderate, with some slight leakage coming
from all four corners. There was some more noticeable clouding picked up in the
top right hand corner. In all cases it was not too severe and was quite hard to
pick out with the naked eye to be honest. It shouldn't present any problem in
normal use but may be noticeable in darker working conditions.
General and Office Applications
The P241W offers a good solution for general
office and internet applications. The 1920 x 1200 resolution and 24" screen size
offer a good screen real estate to work with, and side by side splitting of the
screen is perfectly useable. The slightly increased vertical resolution (1200
pixels) compared with a 16:9 format screen (1080 pixels vertically) means you do
gain a bit of height which is good. I personally prefer a 1920 x 1200 screen for
office work so this was a welcome break for the common 16:9 aspect ratio screens
in the market.
The 0.2700mm pixel pitch offers a comfortable text
size for day to day use, a little bigger than some of the modern ultra-high
resolution models like the 2560 x 1440 resolution 27" models for instance. Default
luminance of the screen was recorded at 252
cd/m2
which is too high for prolonged office use. You will want to turn the screen
down to about 110 - 130 brightness to achieve a luminance of around 120 cd/m2.
In doing so you also reduce the power consumption of the screen which is a
positive thing, especially in an office environment with multiple screens set
up. You may also want to use the ambient light sensor to automatically alter the
brightness of the screen depending on your ambient lighting conditions. A useful
feature I think personally.
I tested the
screen using both the analogue D-sub and digital DVI-D interfaces. The DVI
offered a sharper image and better picture quality, and the D-sub was a
little blurry I found. Text was still readable of course, but some clarity was
lost. I would definitely recommend using the digital interface wherever
possible.
The ergonomics of
the screen offered a great range of adjustments. It was good to see a full
range of height, tilt, pivot and swivel available and all were fairly
easy to use although a bit stiff. At least you should be able to position the screen at a
comfortable setting for your individual preferences. It was also good to see some USB ports available
although there are no further extra features like card readers which are often useful in office environments.
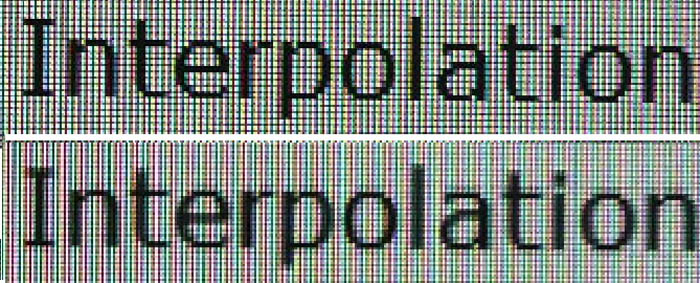
Above: photo of
text at 1920 x 1200 (top) and 1680 x 1050 (bottom)
The screen is designed to run at its native
resolution of 1920 x 1200 and at a 60Hz recommended refresh rate. However, if
you want you are able to run the screen outside of this resolution. We tested
the screen at a lower 1680 x 1050 resolution to see how the screen handles the
interpolation of the resolution. At native resolution the text was sharp as
you can see from the top photograph. When you switch to a lower resolution the
text is quite considerably more blurry. There is some obvious overlapping
of the text across sub-pixels as you can see in the photo which results in this
blurring. Native resolution is recommended where possible.
Responsiveness and Gaming
Response Time Control
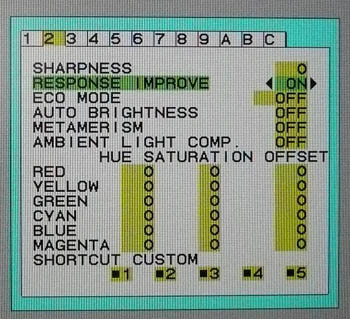

Before we get in to the get into the side by side
screen comparisons I want to quickly talk about the
overdrive control available
through the screens advanced menu. It is available under the 'response improve'
option as shown above and is known as NEC's 'Rapid Response' technology. This allows you to manually control the overdrive /
RTC impulse being applied to the pixels, with a setting of on and off available.
Overdrive is designed to help improve pixel responsiveness and reduce motion
blur and ghosting in practice by speeding up the transitions the pixels make to change from one colour to another. You may wish to read our
specs section for some further information about overdrive / response time
compensation.

The screen was tested using the chase
test in PixPerAn, a good bit of software for trying to quantify differences in
real terms responsiveness between monitors. As a reminder, a series of pictures
are taken on the highest shutter speed and compared. The images above are the
best case examples from the screen with the 'response improve' function off and
then on. To be honest the results of both seemed to be very good. With the
setting off there was a slightly more pronounced motion blur behind the moving
car, but it was not too bad at all. When you enabled the response improve
feature you can spot that the blur is reduced and the moving image becomes
sharper. Thankfully there is no 'overshoot' introduced which can be caused where
these overdrive impulses are too aggressive or poorly controlled. They can
result in dark or pale artefacts and halos behind the moving object in severe
cases, but there was no sign of anything like that here. The overdrive impulse
seemed to work very well and didn't come with any nasty side-effects. For
optimum performance in games and with fast moving images I would recommend
'response improve' is turned on.
Display Comparisons
The screen was tested again using the chase test
in PixPerAn for the display comparisons. As a reminder, a series of pictures
are taken on the highest shutter speed and compared, with the best case example
shown on the left, and worst case example on the right. This should
only be used as a rough guide to comparative responsiveness but is handy for a
direct comparison of the impact of this setting:

24" 8ms G2G
LG.Display e-IPS (Response Improve On)

24" 8ms G2G
LG.Display e-IPS (W-LED)

24" 6ms
G2G LG.Display H-IPS

24" 5ms G2G LG.Display e-IPS (Overdrive Off - see review for why)
The P241W is rated by NEC as having an 8ms G2G response time which implies the use of
overdrive /
response time compensation (RTC) technology, used to boost pixel transitions
across grey to grey changes. We know this to be true as we have already looked
at the 'response improve' function available in the factory menu. NEC also quote
the traditional ISO black > white response time figure in their documentation
which is 16ms.
I have provided a comparison of the P241W first
of all above
against 3 other competing 24" screens we have tested which use IPS panel technology. The
P241W shows a very low level of motion blur in practice and a sharp image. It
behaves quite similarly to the Dell U2410 and HP ZR24W in fact
with a response time somewhere between the two in these tests. All three offer
very low levels of motion blur which is pleasing. The Dell U2412M has a low
level of blur but does introduce a dark trail behind the moving image due to a
poorly controlled and overly aggressive overdrive impulse. It is not too severe,
but is certainly noticeable. The P241W doesn't show any negative artefacts like
this thankfully.
24" 8ms G2G
LG.Display e-IPS (Response Improve On)

23"
14ms LG.Display e-IPS (W-LED)

24"
8ms G2G LG.Display p-IPS (Response improve = on)

23"
8ms G2G LG.Display e-IPS (Response improve = on)
I have provided a comparison of the P241W against
some other models in NEC's monitor range. The P241W performs better than the
EA232WMi which offered a 14ms ISO response time spec and did not feature any
form of overdrive to boost pixel response times. The PA241W had an 8ms G2G spec
like the P241W, but in practice did show some more noticeable motion blur. That
model is quite a bit older than the new P241W and so some improvements have
certainly been made with the overdrive circuitry by the look of things. They are
also using two different panels of course, and the version used in the P241W
does seem to be more responsive in practice. The performance of the 23" PA231W
was very comparable to the P241W which had impressed us when we tested it.
24" 8ms G2G
LG.Display e-IPS (Response Improve On)

23" 8ms G2G
LG.Display e-IPS (W-LED)

23"
8ms G2G LG.Display e-IPS (CCFL)

23"
5ms G2G LG.Display e-IPS (W-LED - Trace Free setting 40)
I've also included a comparison against three
popular and fast IPS monitors in the 23" sector. As you can see, the P241W holds
its own here with a very similar performance to the Asus ML239H. The Dell
U2312HM showed very low levels of motion blur but the dark overshoot we had seen
on the U2412M was also present here. A sign again of an overly aggressive RTC
impulse sadly. The Dell U2311H is also a very well regarded IPS monitor in terms
of responsiveness and shows slightly less motion blur, but a slight pale halo
behind the moving image due to some RTC overshoot again. Overall the P241W was
impressive for an IPS screen, especially considering it is aimed primarily at
other uses.
24" 8ms G2G
LG.Display e-IPS (Response Improve On)

24"
8ms G2G AU Optronics AMVA (W-LED)

23"
8ms G2G Samsung cPVA (Response Time setting = Fastest)

23" 25ms
Samsung cPVA (W-LED)
I have also provided a comparison of the P241W
against other competing 23" - 24" models which are using AMVA and cPVA panel
technology instead. As you can see the performance of the P241W's IPS panel is
superior to that of the other models, which show a more obvious motion blur. In
the case of NEC's own EX231Wp 'Office cool' monitor there was no overdrive
applied and so responsiveness was quite slow as you would expect.
24" 8ms G2G
LG.Display e-IPS (Response Improve On)

23.6" 2ms G2G CMO TN Film (120Hz)

22" 3ms G2G Samsung TN Film + 120Hz
I've also included a comparison above against two
gamer-orientated screens, both featuring heavily overdriven TN Film panels, and
120Hz technology. The pixel responsiveness of both of these is ahead
of the P241W, and the 120Hz frequency allows for
improved 120fps frame rates and the support of 3D content as well. The BenQ
XL2410T does show some even more obvious RTC overshoot in the form of very dark
trails behind the moving image (speech bubble and head) which is unfortunate,
and a sign that the RTC impulse is too aggressive. The Samsung 2233RZ remains
our champion in this test.
Overall this was a very good performance from the
P241W and frankly not something you'd really expect from what is primarily a
professional high end screen not aimed at gamers. It can certainly handle some
high level of gaming though in the IPS market.
Additional Gaming Features
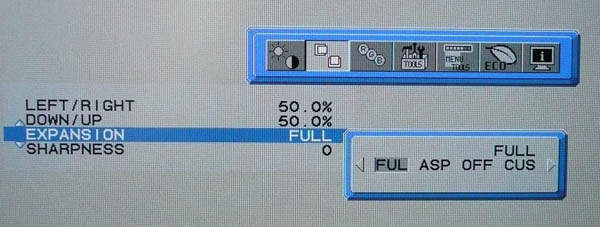
Aspect Ratio Control - The P241W supports
aspect ratio control options through the OSD 'display settings' menu as shown above. There are options
for wide full, aspect, off and custom here.
Preset Modes - There are no defined preset
modes set up for gaming and so you will need to use one of the other provided
presets if you want a specific setup to your liking. There is no dynamic
contrast ratio available from this screen by the way.
Input Lag

As usual I tested the
screen in clone mode with a CRT to determine the level of
input lag. This is
something which can put off some gamers and is a delay between graphics card and
monitor output. By hooking up a CRT you can show that the LCD lags behind
somewhat, which can affect users in some situations where they rely on the
screen image being as fast as their inputs (e.g. fast FPS shooting games).
Often, input lag is very low and probably wouldn't represent too much of a
problem in real terms.
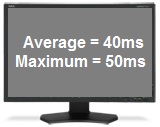
The input lag of the P241W was quite high, with an
average delay of 40ms, and a maximum of up to 50ms. This was a bit of a shame
since we had seen good things from the screen in the pixel response time tests.
The lag was very similar to the LCD2490WUXi (38.8ms) and a little bit more than
the PA241W (26.9ms). It shouldn't present any problems for some light gaming,
but those wanting to play fast paced games or FPS might want to look elsewhere.
Given that this is a high end screen aimed at graphics professionals it's
probably not on anyone's short list for a gaming display anyway given the high
price.
Movies and Video

The following summarises the screens performance
in video applications:
-
24" screen size makes it a reasonable option for
an all-in-one multimedia screen, although quite a bit smaller than modern LCD
TV's of course
-
16:10
aspect ratio is not quite as well suited to videos as a 16:9 format screen, leaving
larger borders on DVD's and wide screen content.
-
1920
x 1200 resolution can support true 1080 HD resolution content
-
Digital interfaces (2x DVI) support HDCP for any encrypted and protected content
-
Additional DisplayPort interface is available although it would have
been useful to feature HDMI as well here as it is
popular and very useful for external Blu-ray / DVD player connectivity.
-
Black depth and contrast ratio are very good for an IPS panel. Detail
in darker scenes and shadow detail should not be lost due to these measurements.
-
Dynamic contrast ratio is not available on this model but is rarely useful on
desktop monitors in our experience.
-
There
are no specific movie preset modes available so you may want to set up one of
the others to be a little brighter and more vivid for enhanced movie viewing.
-
Good
pixel responsiveness which should be able to handle fast moving scenes in
movies without issue. I'd recommend having 'response improve' set to 'on' for
optimum performance here.
-
Wide
viewing angles thanks to e-IPS panel technology meaning several people could
view the screen at once comfortable and from a whole host of different angles.
-
Very
good ergonomic adjustment range available from the stand allowing you to obtain a
comfortable position for movie viewing.
-
Some
small amount of backlight leakage from the four corners but nothing too
severe. Thankfully no leakage along any of the edges which has the potential
to become distracting when watching movies, especially where black borders are
present.
-
No
integrated stereo speakers on this model
-
Picture in picture (PiP) mode available on this model in case you want it.
Conclusion
The NEC P241W
delivered pretty much everything we have come to expect from a high end NEC
professional display. It offered good out of the box setup and excellent
accuracy once calibrated. The hardware calibration option offered a very high
level of adjustment and control although it was a shame that like the other UK
PA models, it was firmware locked for hardware calibration to all software
except the SpectraView II package. At least it was possible to make the most of
the 14-bit programmable 3D LUT through this package. The ColorComp feature
worked very well and provided a very uniform luminance across the screen. Extra
features like AmbiBright light sensors and a full range of ergonomic adjustments
make this a very viable option for a professional use monitor.
Black depth and
contrast ratio were good for an IPS panel although perhaps not as good as we
might have hoped based on some other modern IPS panels. There was some minimal
backlight leakage from the corners which was a shame as well. Responsiveness was
actually extremely good considering this isn't a gamer-orientated screen. The
input lag was however quite high but the P241W should still be able to handle
some moderate gaming and multimedia use without issue.
The price point
of this model is quite high in the 24" sector, with a recommended retail price
of £702 GBP (inc VAT). It is certainly quite a bit cheaper than the PA241W which
retails for ~£850 instead. It is designed as a slightly more cost effective
model and filling a niche for users wanting a pro grade screen with a standard
sRGB colour space. Compared with models like the Dell U2410 (£420) and Asus
PA246Q (£425) it is obviously quite a bit more expensive, but then it does offer
high end features like hardware calibration and uniformity correction which
bring with them this premium cost. If you're looking for a more mainstream
consumer model then the Dell and Asus offerings are probably more suitable, but
if you want higher end performance and a set of professional grade features then
the P241W is a very attractive standard gamut offering.
|
Pros |
Cons |
|
Hardware calibration offering
high levels of accuracy. Available through SV II software |
Some slight backlight leakage
from the corners (results may vary) |
|
ColorComp uniformity
correction works very well |
Price point is high compared
with more mainstream consumer models |
|
Wide range of features and
functions for professional use |
Quite high input lag so
despite good responsiveness, not suited to fast gaming or FPS. |
|
If you have enjoyed
this review and found it useful, please consider making a
small
donation to the site. |