It's been a long time coming, but NEC have finally
decided to release their popular LCD2490WUXi monitor in Europe and the UK! We
spoke about this news
back in January, and NEC have kindly sent us a review unit now it has
been officially launched. The screen has been popular in the USA, where it was
the first mainstream model in this size to feature an IPS based panel. The UK
saw the launch of rival IPS models such as the
Hazro HZ24W in late 2007, and more recently the launch of models such as the
HP LP2475W around September 08.
The NEC LCD2490WUXi has been well recieved
in the United States, where it became the only real option for those wanting an
IPS based screen at 24 inches, and particularly aimed at colour critical work. The larger 26"
LCD2690WUXi had already been
established across the world as an impressive colour enthusiast screen, but the
US market had little to offer in the smaller sizes really. The popularity of the
NEC LCD20WGX2 (again IPS based) helped establish a decent following of it's
24" brother. It is presumably due to demand that the 2490WUXi has therefore
reached our shores, and I am pleased to have the opportunity to review the
screen thoroughly.
The NEC 2490WUXi forms part of their colour
orientated screens, and there are several features designed to make this a more
premium model than many popular screens. Features such as 12-bit Look Up Table (LUT), AmbiBright
and ColorComp will be discussed later, as will the fact that this screen uses an
A-TW polarizer and an H-IPS based panel from LG.Display. Before we get into all
the details and tests, let's take a look at the spec:
|
Size |
24"WS |
Colour Depth |
16.7M (8-bit) from palette of 69 billion. 72% NTSC colour gamut |
|
Resolution |
1920 x 1200 |
Viewing Angles |
178 / 178 |
|
Response Time |
8ms G2G (16ms ISO) |
Panel Technology |
H-IPS |
|
Contrast Ratio |
800:1 |
Interfaces |
DVI-D, DVI-I and VGA |
|
Brightness |
400 cd/m2 |
Colour |
Glossy Black bezel and stand |
|
Special Features |
Tilt, height, pivot, rotate and swivel
adjustments. 12-bit LUT and gamma. AmbiBright, X-Light Pro, Ambix3 and
ColorcComp technologies. Advanced True-Wide (A-TW) polarizer |
NEC's product pages state: "Watch your
productivity soar when you go wide with NEC. The 24” (24.1” VIS) NEC MultiSync
LCD2490WUXi delivers an entirely new perspective to your desktop. With its
wide-format design (16:10 aspect ratio), which provides roughly the same work
area as two smaller sized displays, you can simultaneously view
multiple/side-by-side application windows. With its multitude of leading-edge
capabilities, combined with groundbreaking design, this monitor could easily be
considered the most intelligent visual display solution to date."
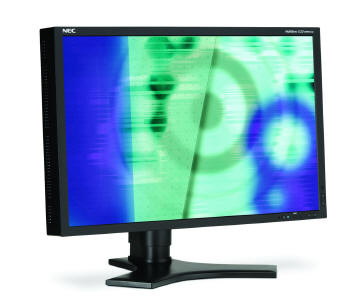
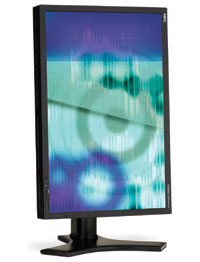
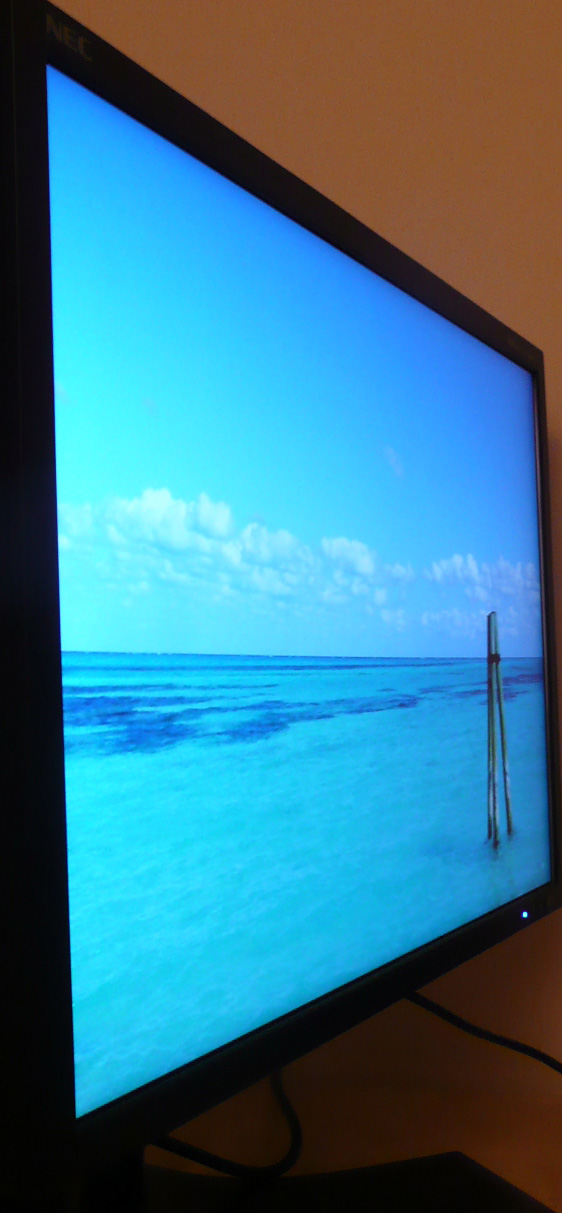
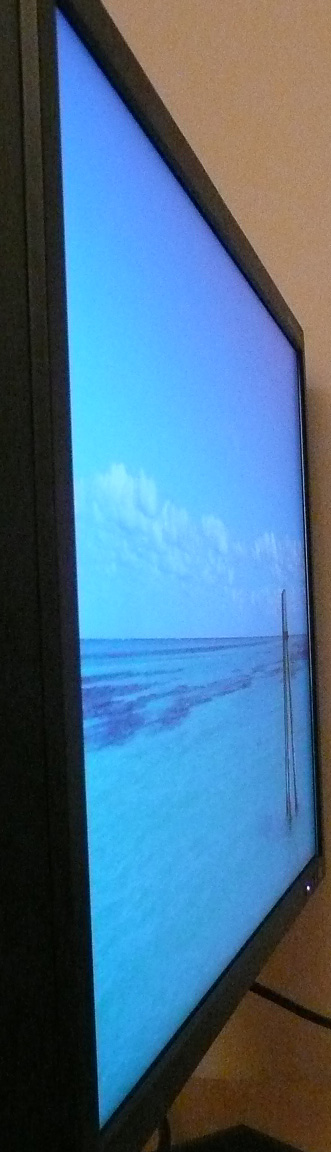
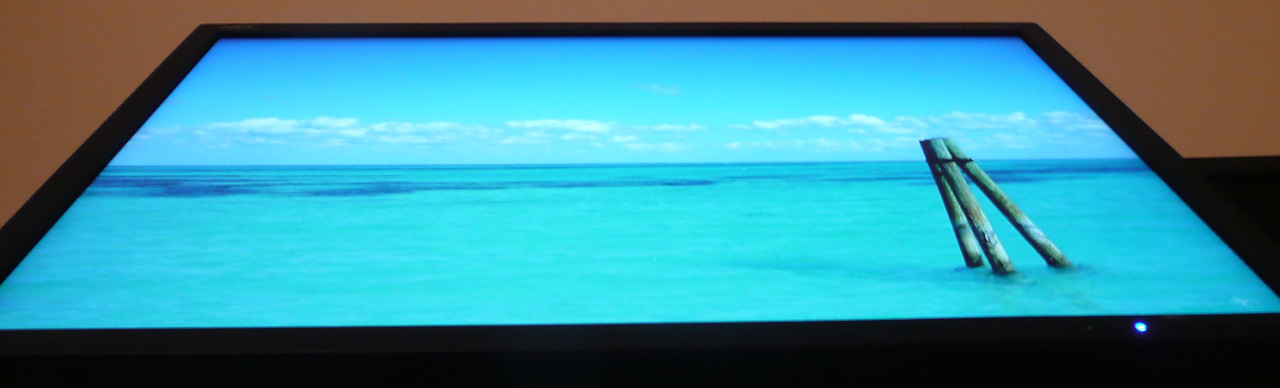
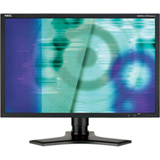
Above: Various
views of the screen, including rotated into portrait mode
The 2490WUXi
features a decent range of ergonomic adjustments, including a large height
adjustment of up to 150mm. There is also a pivot, rotate and tilt option from
the versatile stand. The practical use of the rotate function on a screen
this size is debatable I'd say, but is nice to see included anyway. Tilt, height
and pivot adjustments are all very useful, and I'm glad to see them included.
The movement of the adjustments are smooth and easy to manoeuvre, but I did feel
that the stand was a little unsturdy. It tends to rock around and wobble when
you are moving the screen, and even if you have any knocks on the desk for
instance. It is a well built piece of kit, but I felt the stand and overall feel
was a little 'wobbly'.
The materials are all of a high quality and build
quality is good, save for the stand which we have discussed above. The unit is
very quiet, although there is a very faint buzz if you press your ear up to the
sides, but certainly nothing you can really hear in day to day use or from
anywhere further away. The screen gives off minimal heat, especially once
brightness is turned down from the default 100% (discussed later). The screen
uses 83W of power when active, but drops down to 1W only when in standby. There
are various power saving options including 'Eco Mode' and a timing schedule,
which are all available to explore through the advanced OSD menu.

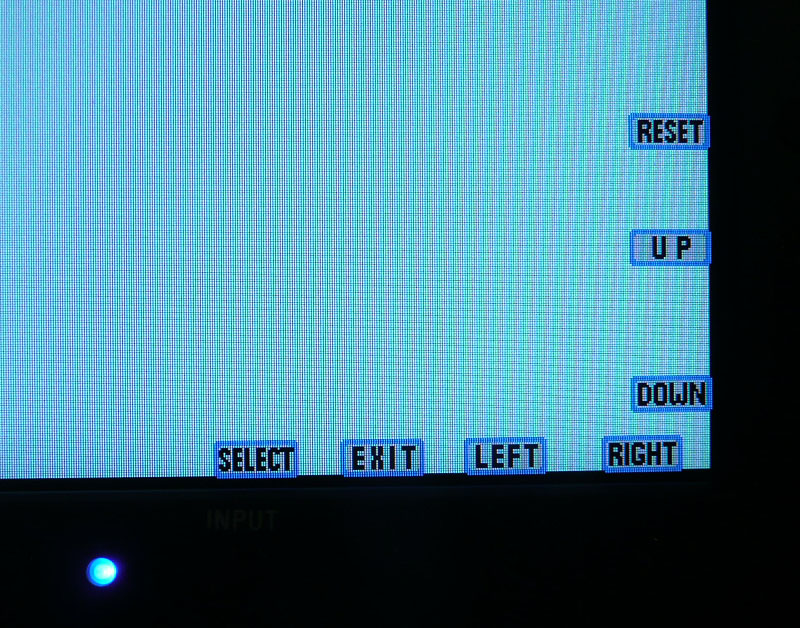
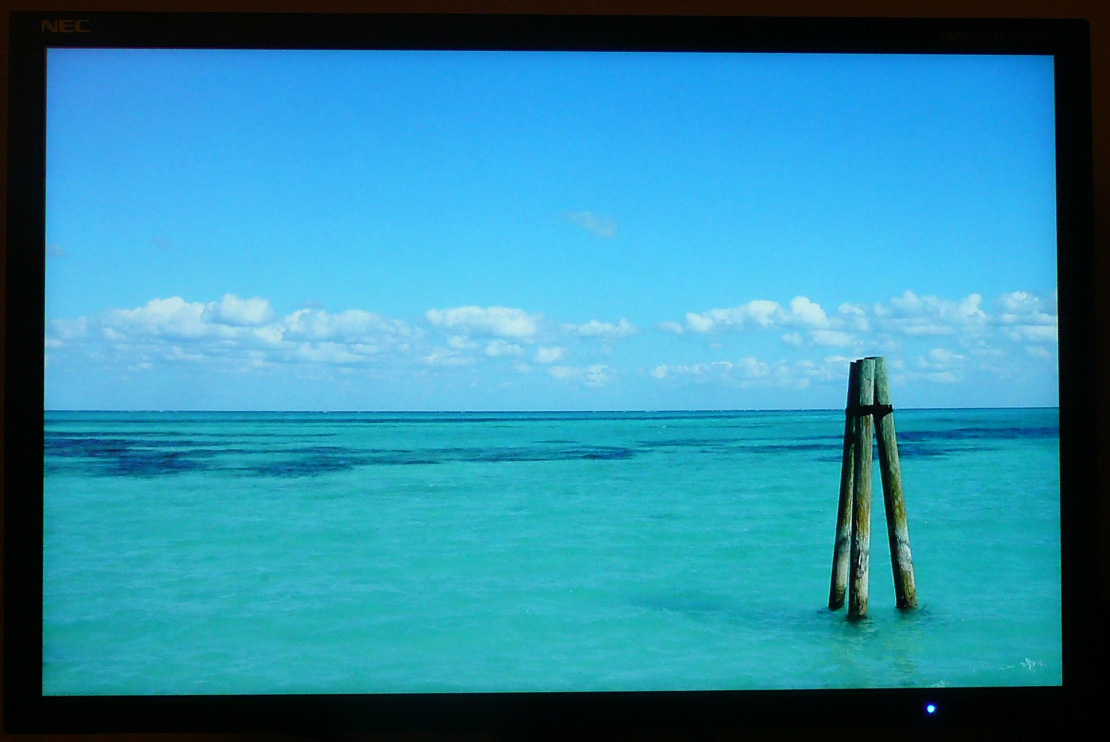
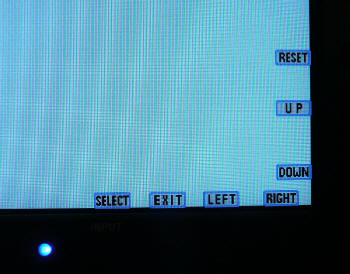
Above: OSD operational buttons as well as ambient light sensor (far left) and
blue operational LED

Above: OSD
operational buttons. Click for larger version
The 2490WUXi has a thin bezel around all of the
panel, being about 2cm thick on all sides. In the bottom right hand corner there
are discreet buttons for operating the OSD (or OSM - On Screen Menu, as the
manual refers to it). These feature a left/right and up/down directional buttons
to help make navigating easy, as well as a couple of unmarked buttons which
feature as 'menu' and 'reset' on the most part. The ambient light sensor is
situated to the left of the power LED, which in itself is fairly subtle. This
glows a bright blue colour normally (not as overbearing as the image above might
suggest) when the screen is operational, but can also
be turned to green if you so desire via the advanced OSD (more on this in a
second). This also glows orange when in standby mode.
There is quick access to input selection via the 'input' button
(obviously), while the left/right control gives one-touch access to brightness,
and the up/down control to contrast.
Above: OSD
options shown when buttons are pressed
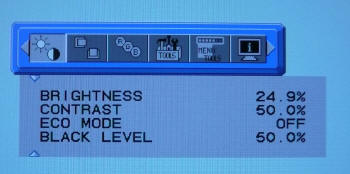

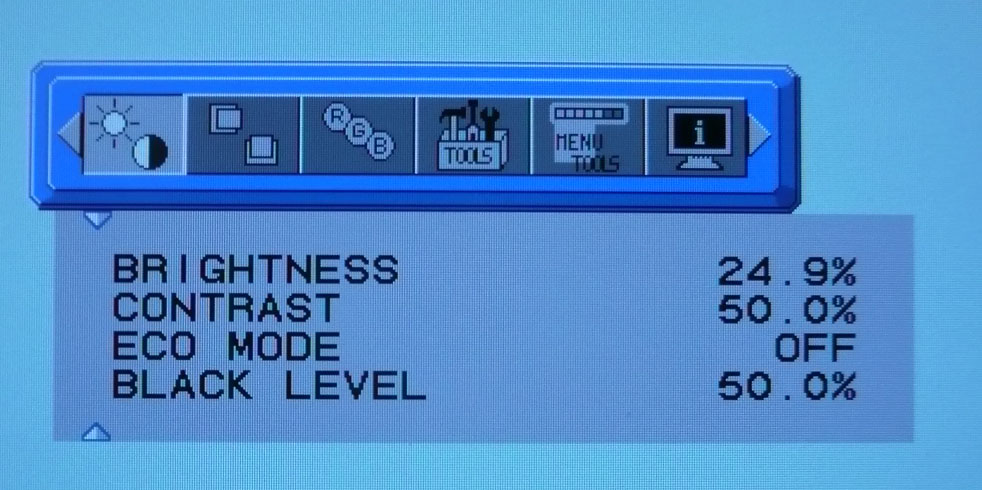
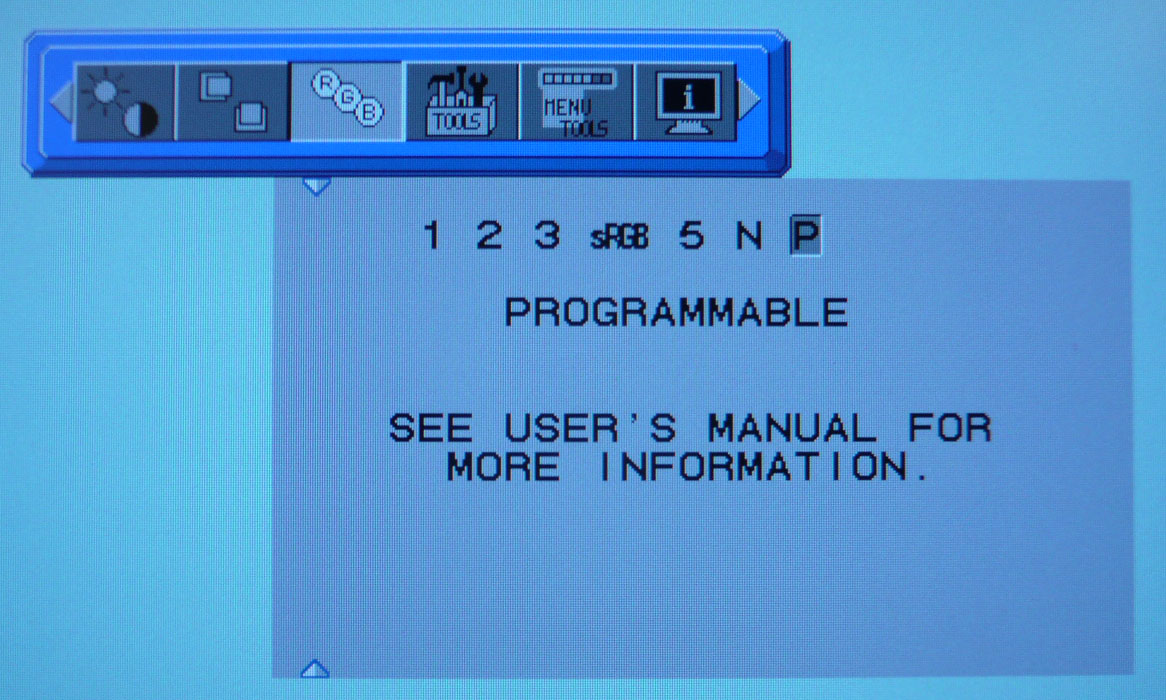
Above: Regular
OSD options shown including RGB section and standard brightness/contrast
controls
Upon pressing any of
the OSD buttons, a little menu pops up in the corner of the screen as shown
above, which tells you what each button will do. The OSD is pretty easy to
navigate and there's plenty of options to choose from. There is also even an
'advanced menu' mode which you can access should you so wish. If you hold the
'input' button down while you turn the screen on, this wil activate or
deactivate the advanced menu when you next press the 'menu' function button.
Within the advanced menu there is a whole host of other options to choose from.

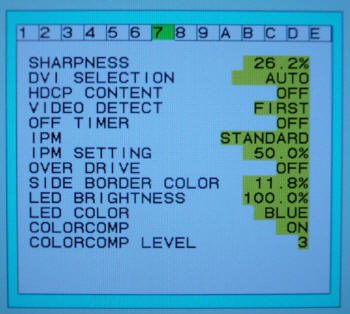
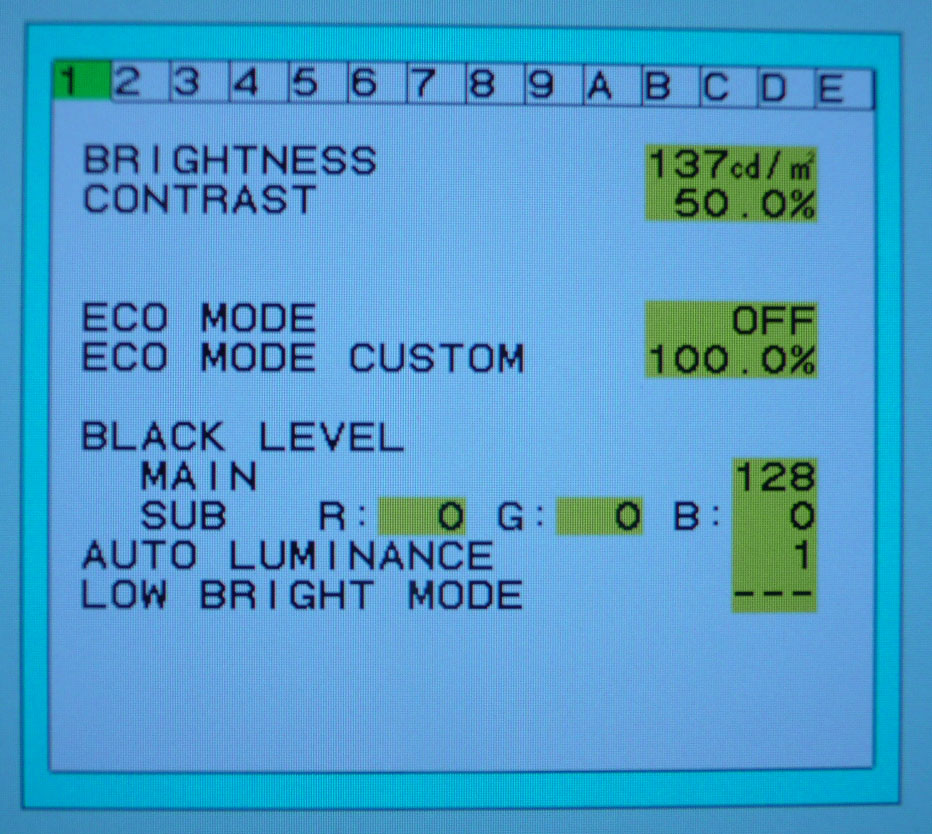
Above: advanced
menu sections 1 and 7
The advanced menu
looks like the above. I've not taken screen shots of every section as there's
too much to go through, but I did want to touch on a few of the more interesting
features and options. As you can see from menu section 1 (left hand image
above), the control for brightness has changed from being a percentage to being
a luminance value. It should be noted that these figures don't quite correspond
to a real value in terms of luminance, and we will cover this a little more in
our contrast
stability section. The value shown here of 137 cd/m2 corresponds
to a percentage setting of 24.9%. In reality this is nearer to 200 cd/m2
when measured by the colorimeter.
Menu section 7 also features a couple of extra
things you won't find in the regular OSD. 'Overdrive' is available here with an
option of on and off, something we will
test later on. You can also
control the level of the ColorComp feature and even change the LED colour
between blue and green.
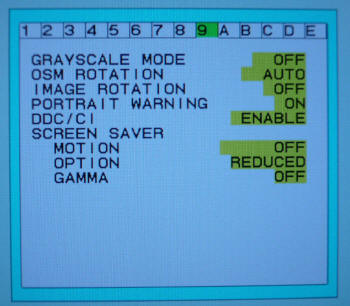
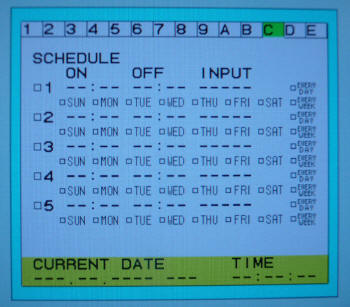
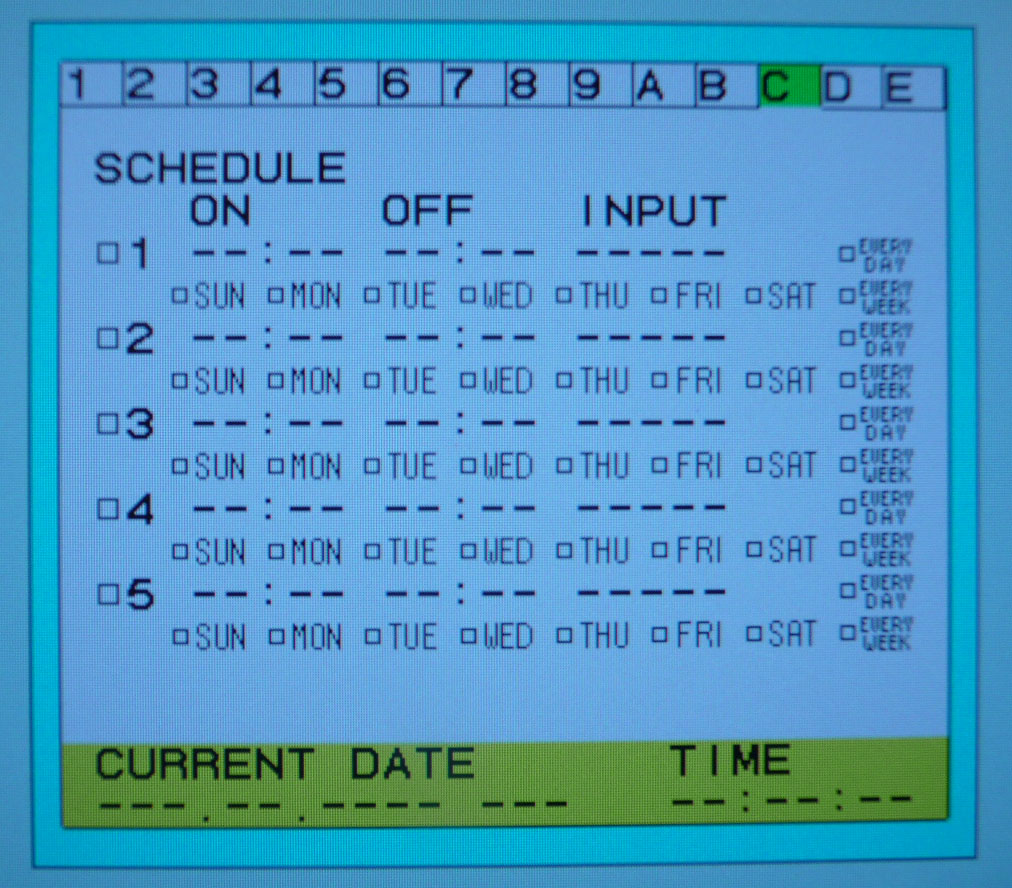
Above: advanced
menu sections 9 and C
Section 9 offers some further features as you can
see above, including the option to turn DDC/CI on or off. This will become handy
later on when we calibrate the
screen. Section C also offers a pretty comprehensive power schedule so you
can control when the screen is on and off, presumably pretty handy for public displays.
There's plenty of features in the advanced menu, but I won't go through them
all! If you read the manual which is available online, it tells you more about
all these options and what they do.
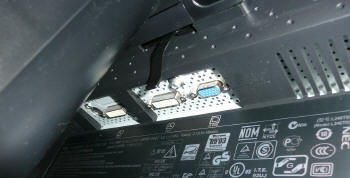
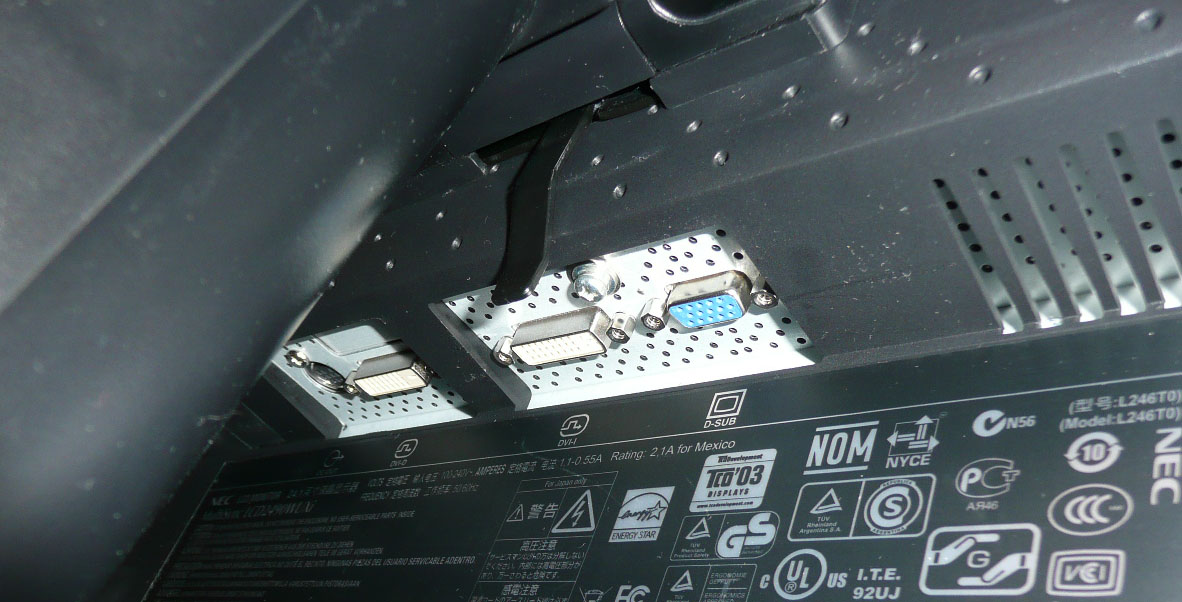
Above: Interface
options. Click for larger version
At the rear of the screen on the underside are the
connections for DVI-D, DVI-I and VGA / D-sub. These are discretely tucked out of
the way and easy to access, and there is a useful cable tie on the rear of the
stand. The 2490WUXi also supports NEC's TileMatrix and TileComp technologies,
which allow you to build virtually seamless video walls of various
configurations (horizontal or vertical) through the Advanced OSD

Colour
Accuracy, Black Depth and Contrast
The NEC LCD2490WUXi utilises an 8-bit H-IPS panel,
capable of producing a true 16.7 million colours. The screen also features a
12-bit LUT (Look Up Table) offering a total palette of 69 billion colours, in
theory helping to eliminate colour banding and posterization effects. Unlike many
modern displays, the screen uses standard CCFL backlighting and so it's colour gamut covers
72% of the NTSC colour space (76% Adobe RGB is also advertised by NEC), a moderate figure compared with many modern W-CCFL
and LED backlit screens with extended gamuts.
An
important thing to consider for most users is how a screen will perform out of
the box and with some basic manual adjustments. Since most users won't have
access to hardware colorimeter tools, it is important to understand how the
screen is going to perform in terms of colour accuracy for the average user. I
restored my graphics card to default settings and set it to its standard
profile. The 2490WUXi was tested at default factory
settings using the DVI interface, and analysed using
LaCie's Blue Eye Pro colorimeter and their accompanying software suite.
Default settings of the screen were as follows:
|
Monitor OSD Option |
Default Setting |
|
Brightness |
100 |
|
Contrast |
50 |
|
Black Level |
50 |
|
RGB Mode |
Native |
|
Auto Brightness |
Off |
|
ColorComp |
Off |
NEC LCD2490WUXi - Default Factory Settings
|
|
Default Settings |
|
luminance (cd/m2) |
380 |
|
Black Point (cd/m2) |
0.45 |
|
Contrast Ratio |
844:1 |
The default settings of the screen left it feeling
over-bright, something not uncommon in the displays we have tested to date.
Again it seems shipping the monitor with 100% brightness setting is the
preferred option, so if nothing else, you are going to want to turn that down
considerably. We look at the contrast stability of the screen, along with
luminance readings at different brightness settings later on in the review, but
at default settings it was just too high. The colorimeter revealed a luminance
of 380 cd/m2, only slightly off the specified maximum brightness of
400 cd/m2. With this high default luminance, black depth was recorded
at a moderate 0.45 cd/m2, giving a pretty reasonable contrast ratio,
especially for an IPS based panel. It should be noted that the IPS panel being
used here (LG.Display LM240WU2) is older than that in the HP LP2475W (LG.Display
LM240WU4) which performed very well in this regard. Not a bad performance at all
for an IPS panel!
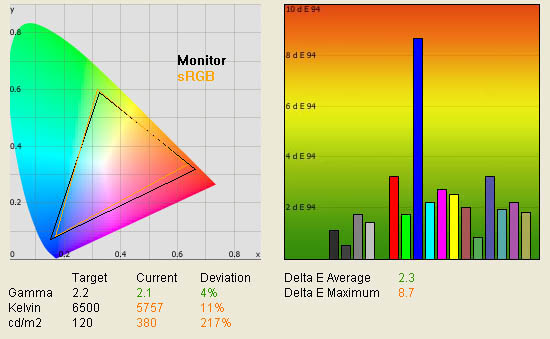
Default gamma was recorded at 2.1, only marginally
off (4%) from the target of 2.2; that being the default for computer monitors
and for the Windows operating system and sRGB colour space. Colour temperature
accuracy was fairly average at 5757k, being a little way off from the 6500k
target (the temperature of daylight). These results at factory settings were
pleasing at least, and so if you at least lower the brightness control, you
should have a reasonable starting point for some
calibration.
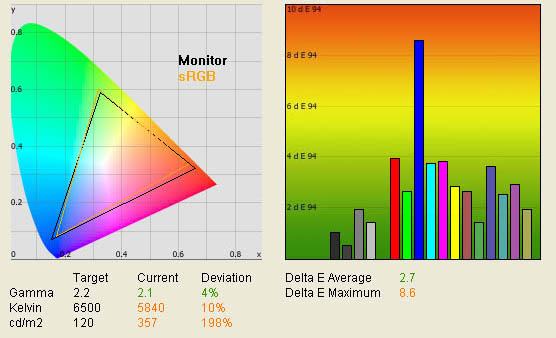
The CIE diagram on the left hand side confirms
that the screen uses standard CCFL backlighting, and so it's
gamut covers about 72% of the NTSC colour space, and is very close to the
reference sRGB colour space shown by the black triangle. The gamut offered here
is low by todays standards really, where W-CCFL and LED backlighting commonly
offer anywhere from 92 to 135% of the NTSC colour space. However, I
will not penalise the 2490WUXi for offering a more 'traditional' gamut, since it
is not all about numbers and specs here! There are pros and cons to a wide gamut
display, and it is largely dependent on what type of content you are using and
what type of colour result you are looking for. In fact many buyers have chosen
the 2490WUXi because it is only standard gamut, selecting it over newer models
such as the HP LP2475W for this very reason. There are a mixture of opinions
on the wide gamut debate, but all you need to know about with this display is
that it is a standard gamut screen. I would thoroughly recommend a read of
this article over at X-bit Labs, which covers the pros and cons well.
Testing with the colorimeter revealed the graph on the right hand side above,
showing DeltaE (dE 94) values across 16 shades.
As a reminder, the lower these bars down the Y-axis, the better, in terms of
colour accuracy. For reference, LaCie describe the DeltaE readings as:
-
If DeltaE >3, the color displayed is significantly different from the
theoretical one, meaning that the difference will be perceptible to the
viewer.
-
If DeltaE <2, LaCie considers the calibration a success; there remains a
slight difference, but it is barely undetectable.
-
If DeltaE < 1, the color fidelity is excellent.
At default settings, colour accuracy was fairly
good on average, with a dE of 2.3. This actually offered pretty accurate colour
reproduction even at factory settings, and this was a pleasing result from the
2490WUXi. The screen is orientated at the colour enthusiast market, and so
accurate colours, even without calibration, are certainly advantageous. dE
maximum ranged up to 8.7 in blue shades, so you will need some form of
calibration to improve on these results.
The OSD offers a range of
preset modes within the 'RGB' menu. These range from settings 1 - 5, which in
turn range in colour temperature
from 5000k to 9300k. There is also an 'sRGB' preset which was listed with a 6500k colour temperature in
the OSD. We selected this sRGB preset to see if it offered any more accurate
settings than the default 'native' mode. All other settings were left at default
for now, and the results of our testing were as follows:
NEC LCD2490WUXi - sRGB Preset Mode
|
|
sRGB Preset |
|
luminance (cd/m2) |
357 |
|
Black Point (cd/m2) |
0.45 |
|
Contrast Ratio |
793:1 |
This preset made little
difference to the overall accuracy of the screen, as compared with our
target settings. Gamma remains at 2.1, colour temperature improved
slightly towards the 6500k target, but only by 1%. The reading here of
5840k was still a way off the desired level, and indicates that the preset
wasn't as close to the 6500k as the OSD would suggest. Luminance was
improved (reduced) slightly to 357 cd/m2, but black depth remains
unchanged at 0.45 cd/m2. As a result static contrast ratio was
a little lower, this time at 793:1. The colour accuracy was also not quite
as good, with an average dE of 2.7 now instead of 2.3. Maximum dE was
still in blue shades at 8.6 (rather than 8.7 before). Not really much
point in changing to this mode to be honest, you will still need to
calibrate for better results from the 2490WUXi.
Calibration
The 2490WUXi offers something a
little different to most screens we test. This model features hardware
calibration, allowing you to change the settings at a monitor LUT level. This
has the advantage of storing the settings and profile in the monitor itself,
which is more reliable and effective when it comes to profiling and
maintaining colour accuracy. Below you will see several different results
including tests we did with NEC's own latest SpectraView II (v1.1.00)
software.
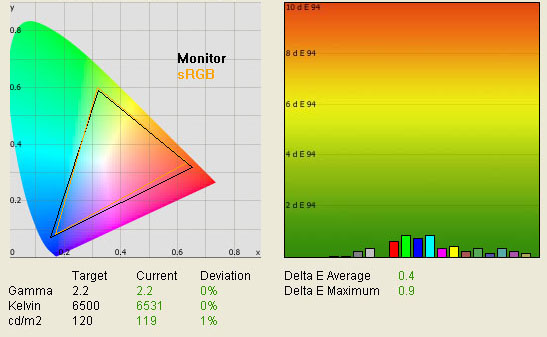
Stage 1: Initial Calibration Process -
LaCie Blue Eye Pro Software
We carried out our calibration process as we
would normally in our reviews, working from a starting point of default
settings (as tested above), and following the guided process in the LaCie
sofware. During the calibration process there was no prompts to manually select brightness, contrast, RGB values etc
from the OSD as there would be normally, and instead
the whole process is automated. Upon loading the LaCie Blue Eye sofware and
clicking 'calibrate', the software says "connecting monitor" which causes the
screens brightness to flash and vary. This stage sets up the communication
between the software / colorimeter and the hardware LUT, via the
DDC/CI communication. This is all without the need for any additional
cables, and is done over the DVI cable and interface.
This automated
process continues, and the software then
tells you it is "updating monitor" and flashes through several different
colour temperature modes ranging from the very blue, to very yellow then
begins to optimize grey balance and other settings in a more familiar way. The
process takes longer than the usual automated process we are used to from
LaCie's software, in total lasting around 10 minutes.
|
Monitor OSD Option |
Adjusted Setting |
|
All settings remain unchanged
from default |
|
|
Calibrated Settings 1 |
|
luminance (cd/m2) |
119 |
|
Black Point (cd/m2) |
0.59 |
|
Contrast Ratio |
202:1 |
The calibration was clearly a great success!
The screen felt more comfortable to use, and luminance was key to this of
course. The colours felt even and testing with horizontal and vertical
gradients showed no signs of colour banding. Gamma, colour temperature and
luminance were all corrected nicely. Average dE was now a very respectable
0.4, with a maximum of only 0.9. LaCie would consider colour fidelity to be
excellent now. You will notice the black depth and contrast ratio are poor
here though, and we will discuss this in a moment.
Even in the other areas there was still some
room for improvement though...
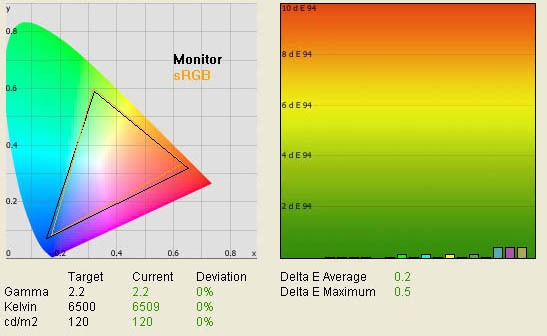
Stage 2: LaCie Blue Eye Pro software
with LUT Profiling
We actually went into the advanced settings of
LaCie's software to select a LUT profile rather than a matrix profile (which is
the default), and
tested whether this would offer improved results over the above. This resulted
in the following (again OSD settings remained unchanged):
|
|
Calibrated Settings 2 |
|
luminance (cd/m2) |
120 |
|
Black Point (cd/m2) |
0.59 |
|
Contrast Ratio |
203:1 |
Colour accuracy was improved even more, with a
dE average of only 0.2, better than the avearage of 0.4 from the matrix
profiling. Maximum dE was also only 0.5 now as compared with 0.9 before. This
was the best result we have seen from a calibrated screen in all of our tests,
beating the previous champion the HP LP2475W, which offered a default dE of 0.3
and maximum of 0.5.
Again, you will notice that black depth and
contrast ratio are poor here, even after calibration and we have an explanation
for this. Since the calibration process with LaCie's software is automated, it
offers you no prompts to alter the OSD settings for brightness and contrast. As
a result, the brightness setting remains at it's default factory maximum of
100%. At this setting, the intensity of the backlight lamps are at their
highest, and so even though the calibration as altered luminance by changing the
LUT's, the backlight is still blaring out at 100% intensity behind the panel!
This results in a poor black depth and contrast ratio.
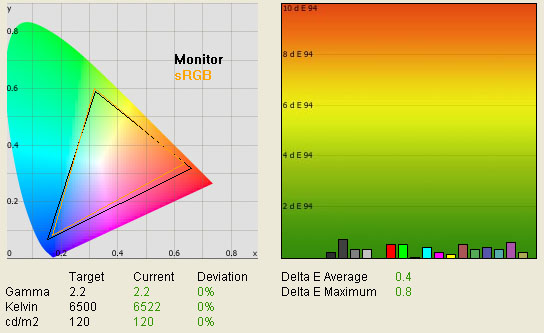
Stage 3: LaCie Blue Eye Pro software
Without Hardware Calibration
It's an odd thing, but it seems
if you allow the LaCie software to automatically communicate with the monitors
hardware LUT, it doesn't seem to think that an adjustment of the brightness
control in the OSD is necessary. As a result, you are left with an overly
intense backlight, and a poor black depth. There is a way round this while still
using LaCie's software, but you have to resort to doing so without hardware
calibration.
Firstly you need to stop the
software communicating with the monitor automatically. Since this is done via
the DVI cable, and using the DDC/CI communication method, you need to turn this
feature off. While this option is not available in the standard OSD, it is
available in the advanced OSD which we discussed earlier. As a reminder, hold
the 'input' button down while turning the monitor on, and you are then given
access to the advanced version of the menu. Turning the DDC/CI function to 'off'
means you can calibrate the screen in the more traditional way, at a graphics
card LUT level.
During this process you are
given full access to the brightness and contrast controls as normal. We adjusted
the brightness setting to 137 cd/m2, which equates to 24.9% in the
normal OSD. Contrast and black depth were both left at 50%. We also changed the
RGB values to 184, 251, 229 respectively, something which you again have access
to via the advanced OSD menu.
|
Monitor OSD Option |
Adjusted Setting |
|
Brightness |
137 cd/m2 (24.9%) |
|
Contrast |
50 |
|
RGB |
184, 251, 229 |
|
Hue, saturation, offset |
default |
|
|
Calibrated Settings 3 |
|
luminance (cd/m2) |
120 |
|
Black Point (cd/m2) |
0.20 |
|
Contrast Ratio |
600:1 |
As you can see, the main thing
we were looking to fix here was the black depth, which is now a far more
respectable 0.20 cd/m2, giving us a static contrast ratio of 600:1.
Gamma, luminance and colour temperature remain spot on, and although colour
accuracy isn't quite as good as hardware LUT alteration, it still results in an
average dE of only 0.4, and a maximum of 0.8. Still very impressive.
Stage 4: SpectraView II Calibration
NEC actually offer their own
calibration software for use with some of their range, and this is the
SpectraView II package. I'll give a trimmed overview of the software, before
going into some tests to see how well it can calibrate the screen, and if it can
do any better than LaCie's software. NEC's documentation states:
"The
SpectraView system uses a color sensor to take color measurements of the display
screen during calibration. The software analyzes these measurements and sends
color adjustment commands directly to the display monitor. This means that color
adjustments are made in the monitor rather than in the video graphics adapter,
resulting in full use of the number of colors available on the graphics adapter
and a much brighter image with the maximum possible color gamut. With
SpectraView, the video graphics adapter is not used at all to make any gamma or
Tone Response Curve corrections to the display, so the full color resolution and
fidelity of the system is maintained."
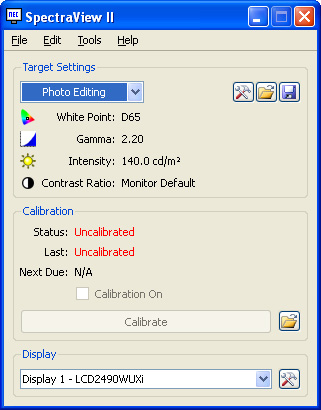
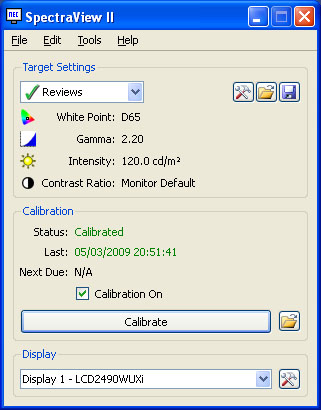
After installing and loading
the software, it automatically detects your connected NEC display, and your
connected colorimeter. There is an indication (as shown above) of your target
calibration settings, which are based on the preset modes which is selected as
'photo editing' here. There are also options including broadcast video, DICOM
Blue, DICOM Clear, Digital Camera and Print Standard. Each has it's own preset
values for white point (colour temperature), gamma and intensity (luminance).
The software confirms the screen is currently uncalibrated.
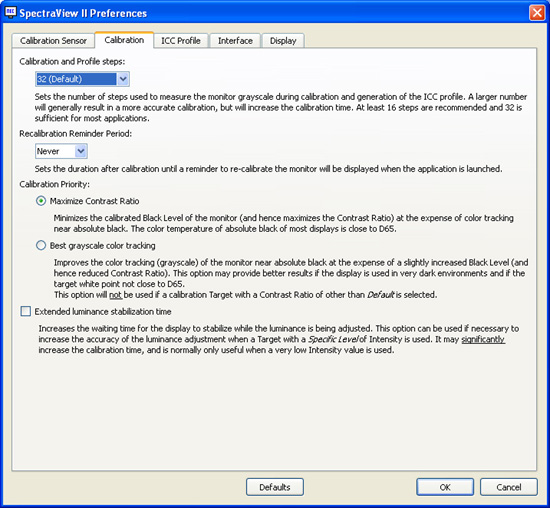
Entering the 'preferences' menu
provides access to select your colorimeter along with some more advanced
options. These include the option to choose the number of 'calibration and
profile steps', with the higher number of steps taking more time, but
potentially producing the best results. While 32 steps it supposedly "sufficient
for most applications", we have choosen 52 for highest quality results. There
are also choices as to whether the calibration priority should be to achieve the
best contrast ratio possible or the best grayscale colour tracking. The details
of these options are shown in the screenshot above and we will test both here.
There are options to generate
an
ICC profile after calibration and whether the software should then
automatically associate this profile with the Colour Management System (CMS).
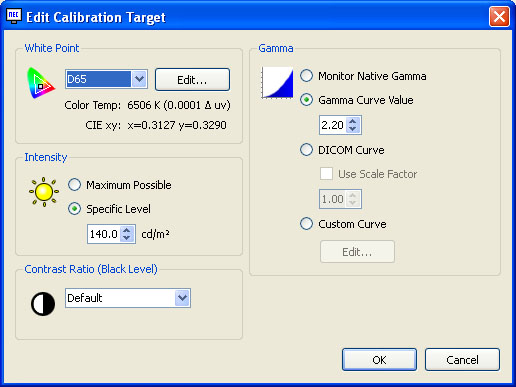
The target sub-menu allows you
to manually select the target levels for colour temperature, luminance, black
level and gamma should the preset modes not suit. For the purposes of this
review, we are working towards the 120 cd/m2 as recommended for LCD
screens.
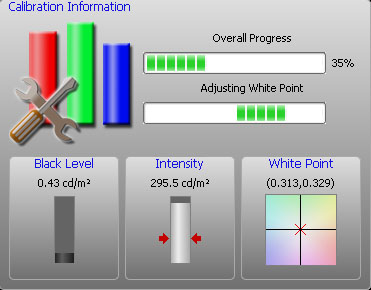
We proceeded with the
calibration process which is again entirely autmomated. The software goes
through several stages including optimizing white point (colour temperature),
intensity and black level, all the while giving you a nice indication of
progress and on-the-fly readings as shown above. It cycles through several
colours and in total takes around 10 minutes to complete. At the end you are
prompted to name and save the ICC profile, presuming you have selected these
options in the preferences menu.

At the end you are presented
with an 'Information' page as shown above, giving you the readings for white
point and so on that you have now reached. You will note that here the black
depth has reached a respectable level of 0.19 cd/m2, and checking the
OSD shows that the software has been able to alter the 'brightness' control (and
therefore backlight intensity) to 24.9%. Contrast and black depth remain at 50%
in the OSD. This improved black depth leaves us with a fairly respectable
contrast ratio of 618:1, not bad from an IPS based panel, especially as it's a
year or two old now. This figure actually doesn't quite add up when you look at
the 120 and 0.19 cd/m2 values shown for luminance and black level
above. This should be more like 632:1, but perhaps there's some rounding of the
values somewhere which is skewing it? Contrast ratio is good for an IPS panel,
but can't quite keep up with modern S-PVA and TN Film panels.

The gamut tab gives you a
visual representation of the screen's colour space using a CIE diagram as we are
used to. Nothing staggering here, but again showing the monitor covers pretty
much the sRGB colour space.
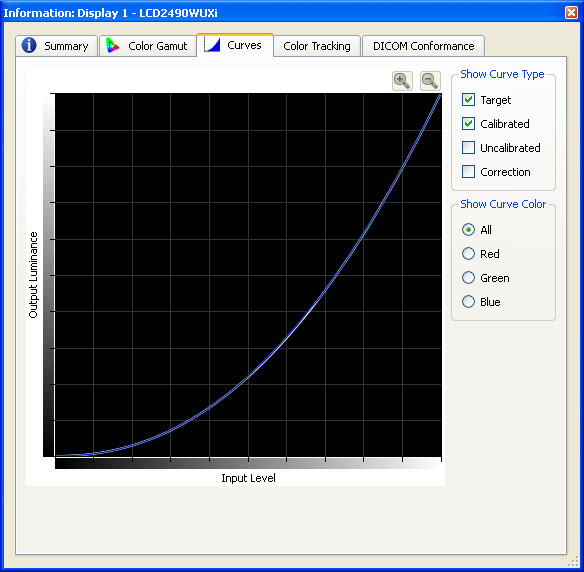
The gamma curves tab compares
the target and calibrated gamma curves, showing again that calibration was very
successful here.
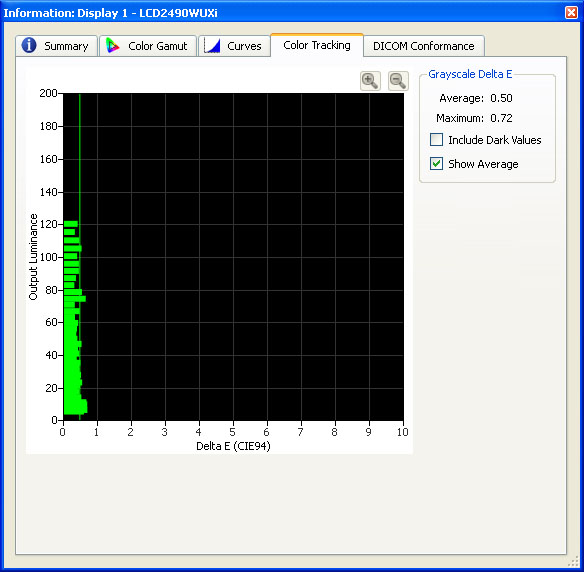
The colour tracking tab gives
you a view of deltaE values, albeit in a less 'friendly' way than LaCie's
software. The SpectraView II analysis suggests we have reached an opimum
calibration of dE 0.5 (average) and dE 0.72 (maximum). There is a section for
DICOM conformance, but we won't go into detail there.
The SpectraView II software now
confirms we have calibrated the screen as shown above.

|
|
Calibrated Settings 4 |
|
luminance (cd/m2) |
120 |
|
Black Point (cd/m2) |
0.19 |
|
Contrast Ratio |
632:1 |
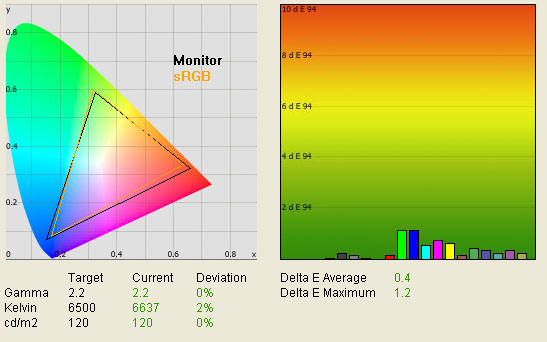
I tested the new calibrated
settings using LaCie's software to see what it thought of the results, and this
is shown above. LaCie actually reckon that the calibration has given us a dE
average of 0.3, whereas the SpectraView II software thought it was more like
0.5. Maximum dE was 1.3 here though whereas SV II thought it was 0.72.
Regardless, this is still evidence of a good calibration, and we at least have a
decent luminance and black level compromise which the LaCie software couldn't
attain when left to hardware calibration. The calibration doesn't seem to be
quite as good as the LUT-profile process of LaCie's software, but is pretty
close. The accuracy in darker tones and greys let the overall result down
slightly.
It's interesting to note that
while LaCie's automated process did not seem to adjust the monitors 'brightness'
control, the SpectraView II software did so nicely. With the former, although
this had given us excellent results in terms of colour accuracy etc, the 100%
backlight intensity left us with a poor black depth of 0.59 cd/m2,
and a poor contrast ratio of 203:1 as a result. NEC's software at least
automatically controls the backlight intensity, and brought the setting for
brightness down to 24.9%. This resulted in a much better black depth of 0.19
cd/m2, and a contrast ratio of 632:1.
I repteated the SpectraView II
process again, this time choosing grey-scale optimization from the preferences
menu to see if that offered anything different and whether it helped improve the
grey tone accuracy. It did help improve the accuracy there, but other colour
tones were adversely affected and the overall accuracy was actually a little
worse than before, where optimized contrast ratio was selected.
All the ICC profiles produced during our
calibration process are available in our
ICC Database. If you have software which is capable of communicating with
the hardware LUT, these will even activate the profile at that level for you.
Calibration Summary and Comparisons
We've tested the 2490WUXi quite
thoroughly here, but have determined a few things. Hardware monitor LUT
calibration offers the most accurate results in terms of colour accuracy which
is not surprising really. This was the best results we have seen from any of our
reviews, offering an average dE as low as 0.3, and a maximum of only 0.5.
However, the LaCie software was responsible for bringing us the best results in
terms of accuracy, but had trouble producing a decent black depth and contrast
ratio. It seems it deemed it unnecessary to change the OSD setting for brightness
to anything below 100%, resulting in an overly intense backlight and washed out
blacks. Calibrating without hardware LUT alteration still produced good results,
but gave us access to change the backlight intensity and give a decent black
depth and contrast ratio.
The NEC SpectraView II software
was capable of altering the backlight through the brightness control and
produced some good results at a monitor LUT level. This was pleasing and it's a
nice piece of software. Calibrating at a monitor level as opposed to graphics
card level should in theory mean the screen can retain better settings when
using extenal devices, other PC's etc, and the calibration remains stored in the
hardware itself offering better longer term results.
NEC also advertise this screen as featuring X-Light Pro technology,
designed to maintain a consistent light output from the backlight unit (BLU) for the useful
life of the display, as well as correcting for short-term fluctuations. This
should in theory help in the long term to keep the display performing as it does
when it's new.

We have plotted the results of the NEC 2490WUXi
here against some of the other 22" - 26" monitors we have tested. As you can
see, the 2490WUXi offered very good default accuracy of colours when compared
with some of the other models, and once calibrated, it was the best we have
seen.
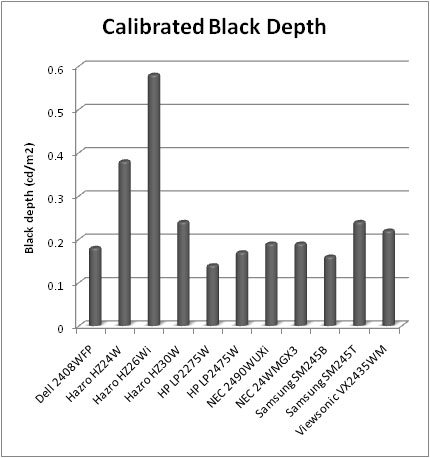
Calibrated black depth was also pretty good,
being on par with the AMVA based NEC 24WMGX3 (0.19) and certainly better than
some other IPS based screens such as the Hazro HZ24W (0.38) and HZ26Wi (0.58).
The more recent HP LP2475W still offers a slightly better black depth than the
2490WUXi, with a very impressive 0.17 after calibration. Top place goes to the
S-PVA based HP LP2275W, with a black depth of 0.14; showing that S-PVA is very
strong in this regard.
All the ICC profiles produced during our
calibration process are available in our
ICC Database. If you have software which is capable of communicating with
the hardware LUT, these will even activate the profile at that level for you.
Contrast
Stability
I wanted to see how much variance there was in the screens contrast as we
adjusted the monitor setting for brightness.
In theory, brightness and contrast are two independent parameters, and good
contrast is a requirement regardless of the brightness adjustment.
Unfortunately, such is not the case in practice. We recorded the screens
luminance and black depth at various OSD brightness settings, and calculated
the contrast ratio from there. All other monitor and graphics card settings
were left at default. It should be noted that we used the BasICColor
calibration software here to record these, and so luminance at default
settings varies a little from the LaCie Blue
Eye Pro report.
|
OSD Brightness |
Luminance
(cd/m2) |
Black Point (cd/m2) |
Contrast Ratio ( x:1) |
|
100 |
374 |
0.45 |
831 |
|
90 |
352 |
0.42 |
838 |
|
80 |
330 |
0.40 |
826 |
|
70 |
307 |
0.37 |
829 |
|
60 |
285 |
0.34 |
838 |
|
50 |
262 |
0.31 |
846 |
|
40 |
239 |
0.29 |
824 |
|
30 |
215 |
0.26 |
829 |
|
20 |
190 |
0.23 |
828 |
|
10 |
166 |
0.20 |
831 |
|
0 |
158 |
0.19 |
831 |
Note:
The OSD on this model does not always allow you to select these settings
to the exact value (e.g. they may be 0.1 to 0.2% out). All settings for
OSD brightness were nearest to those values shown as possible.
The brightness control in the
OSD allows you to control the level of the backlight intensity, in turn allowing
you to control the luminance of the display. The default setting for the screen
is 100%, which actually gives you a luminance of around 374 cd/m2,
clearly far too high for any continued use. Thankfully the brightness control
affords you a fair range of luminance, allowing you to reach down to a level of
around 158 cd/m2 at 0% setting. The 'Low Bright Mode' feature in the
advanced OSD allows further reduction, in theory up to another 50 cd/m2
through digital white level control. This is still not ideal however, and
so you're going to need some degree of calibration to reach the recommended 120
cd/m2 setting for LCD screens in normal lighting conditions.
Black depth also varies nicely
as you lower the brightness control, ranging from 0.45 cd/m2 at 100%,
down to 0.19 cd/m2. This is a respectable performance, especially
when you consider this is an IPS matrix, and one which has been around for a
couple of years in fact! Throughout this test, contrast remained very even, with
a contrast ratio of around 830:1 being available.
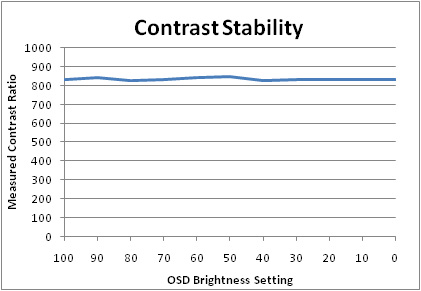
Plotting these results on the
above graph shows that the 2490WUXi offers very good contrast stability, with
the backlight control having very little impact on the screens ability to
maintain a decent ratio to black.
Viewing Angles

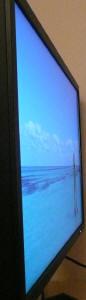

Above: Viewing
angles shown from front and side, and from above and below. Click for
larger images
The NEC 2490WUXi features an
H-IPS panel which offers the widest viewing angles of the main panel
technologies in the market. NEC even state that this screen uses their
"XtraView+" technology, which they say is why viewing angles are so wide. In
reality, it's down to panel technology, and IPS has long been regarded as having the widest
viewing angles, and is also free from the off-centre contrast shift you can
detect from VA matrices. This is the reason why many colour enthusiasts consider
IPS to be the only choice for colour work, as the VA contrast shift anomaly can
be quite distracting in practice. Viewing angles of the 2490WUXi were very good
in all directions, but you could spot a shift in the contrast as you moved past
about 50° horizontally, and past about 30° vertically.
This screen also features an
Advanced True-Wide polarizer, which helps maintain a deeper black from wide
angles of view. This is something which has featured on a few models, including
the larger brother of this model, the 26-inch LCD2690WUXi. This A-TW polarizer has
the effect of improving black depth from an angle, but does add a slight white
tint to the image when you look at it from a fairly wide angle. This replaces
the common purple tint you can see from IPS panels without this A-TW polarizer.
Panel Uniformity
Measurements of the screens luminance were taken
at 35 points across the panel on a pure white background. The measurements were
taken using BasICColor's calibration software package, combined with the LaCie
Blue Eye Pro colorimeter. The above uniformity diagram shows the difference, as
a percentage, between the luminance recorded at each point on the screen, as
compared with the reference point of a calibrated 120 cd/m2. This is
the desired level of luminance for an LCD screen in normal lighting conditions,
and the below shows the variance in the luminance across the screen
compared with this point. It is worth noting that panel uniformity can vary from
one screen to another, and can depend on manufacturing lines, screen transport
and other local factors. This is only a guide of the uniformity of the sample
screen we have for review.
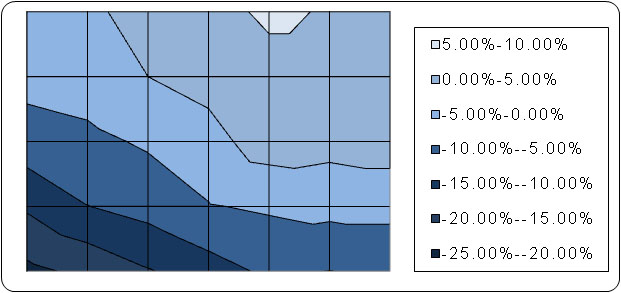
ColorComp = On
The 2490WUXi features an
advanced feature to supposedly help improve panel uniformity. ColorComp reduces
uniformity imperfections by compensating for differences in colour and luminance
across the screen area, claims NEC's documentation. By default, this feature is
turned 'on' in the OSD, and in the advanced menu you can even control its level
from 1 - 5. We have left this setting on 3 which is the default. I tested the
screens uniformity first of all with this feature left on. Panel uniformity
overall was not too bad, but the bottom half of the screen, particularly towards
the bottom left hand corner, was darker than the top. Luminance ranged down to
99
cd/m2 in the very bottom left corner,
being quite a way off from the target of 120 cd/m2. Towards the top
edge of the screen the luminance was recorded up to around 127 cd/m2.
ColorComp = Off
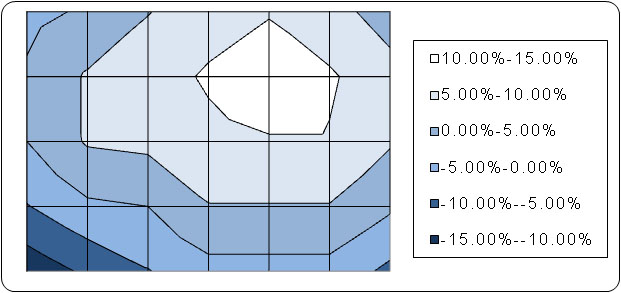
I turned the ColorComp setting to 'off' to see
what difference this technology was making to uniformity. No other settings were
altered. It's hard to know what to think here really. Overall the screen was a
little brighter than when ColorComp was turned on, and so the minimum luminance
was now only 106 cd/m2 in the bottom left. However, maximum luminance
was now 136 cd/m2. The pattern of uniformity seems to be very similar
here really as it was when ColorComp was on. The reason for the higher
brightness now was only because we had carried out our calibration process while
ColorComp was on, and so the tests there were nearer to the 120 cd/m2
we had aimed for. It's hard to tell if this technology really makes any
difference in practice, but there at least doesn't seem to be any harm in having
it turned on. Results may vary from one unit to another, but with our sample, it
didn't seem to make a lot of difference.

Above: All black screen in darkened room. Click for larger version
As usual, I tested the screen in a darkened room, showing an all black
background. The above image was captured by my camera. There was very little
noticeable light leakage from any of the edges or corners, and black uniformity
was very good overall. There was only a very slight leakage towards the very
bottom left hand corner, but nothing obvious at all.
Office and Windows Use
The 2490WUXi is primarily aimed at colour
enthusiasts, and so use with office applications is bound to be important. The
1920 x 1200 resolution gives you a large resolution for applications, and is
suitable for some nice side by side split screen office work. You can
comfortably have two Word documents side by side on a resolution this size which
is very useful I find.
The 0.270mm pixel pitch is a nice intermediate
level I find (personally), between the slightly small 0.258mm of 20"WS and the
slightly too big 0.282mm of 22"WS models. I tested the screen in clone mode
which showed that the DVI interface was a little sharper and clearer than the
D-sub VGA connection. The 2490WUXi offers excellent picture quality with no text
blur or issues that I could detect. There are even two DVI interfaces on this
model for connecting 2 PC's or devices digitally.
You will definitely need to calibrate the screen,
or at least lower the brightness setting massively, in order to use this model
for any prolonged period of time. The default luminance is far too high for
comfortable use, but thankfully calibration is easy and effective. The ColorComp
feature, which we have discussed already in the
uniformity section,
doesn't seem to offer much, but is there as a feature to help maintain an even
backlight intensity. This could be useful to some (if you find it helps) for
office work.
Within the advanced OSD is the settings for auto
luminance and auto brightness. The auto luminance feature
stabilizes the
luminance and colour of the image when the brightness setting is adjusted.
Option 1 stabilizes luminance, 2 stabilizes colour, and 3 stabilizes both.
Turning the feature to 'off' reveals the auto
brightness (AmbiBright) control, which works well. Level 1 activates the auto
brightness sensor which is situated just next to the power button. This
automatically regulates the backlight intensity (brightness setting) on the fly,
depending on your ambient lighting conditions. I like this feature, and it's a
nice thing to see included in my opinion. Selecting '2'
activates auto
adjustment based on the content of the image on the screen. When setting 2 is
selected, the AmbiBright sensor itself is not functional and so doesn't respond
to ambient light conditions. All in all,
this is a very decent screen for office use.
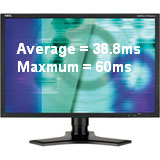
Responsiveness and Gaming
The NEC 2490WUXi was tested using the chase
test in PixPerAn, a good bit of software for trying to quantify differences in
real terms responsiveness between monitors. As a reminder, a series of pictures
are taken on the highest shutter speed and compared. The images below show the
best case example on the left hand side, and the worst case example on the right
hand side. This should only be used as a rough guide to comparative
responsiveness but is handy as a way of keeping a constant test of each screen.

8ms G2G LG.Display H-IPS

8ms G2G LG.Display H-IPS

6ms G2G LG.Display H-IPS

6ms G2G AU Optronics AMVA

6ms G2G Samsung S-PVA
The 2490WUXi uses
response time compensation (RTC) to boost the pixel response times across
grey transitions. The panel is made by LG.Display, who have rated the panel with
both a traditional ISO response time (black > white > black transition) of 16ms,
and a G2G figure of 8ms. This signifies the use of RTC technologies, commonly
also referred to as overdrive.
The above tests show a few
interesting things. Firstly, the H-IPS panel being used here is the LM240WU2
from LG.Display. This is also used in the
Hazro HZ24W which we tested quite a while ago. You will see from the
PixPerAn images that both these models are very similar in performance really.
The Hazro shows a slightly paler trail in the best case scenario pictures,
signifying that the RTC impulse is not quite as well controlled as on the NEC.
Poorly implemented RTC impulses can cause an element of 'overshoot', where the
overdriving voltage causes the pixels to go a little too far before they reach
their desired orientation, resulting in a white halo behind moving objects. This
can also affect pixels by leaving a darkened or even black trail behind moving
objects, something which was 'famously' evident in the
Dell 2407WFP-HC. Here, the 2490WUXi shows less of a white halo than the
Hazro which is a positive sign.
If you compare the screen to
the more modern panel (LM240WU4) used in the
HP LP2475W you also see a few slight differences. The panel used in HP's
model is a newer generation from LG.Display, featuring an extended colour gamut
and a slightly improved response time of 6ms G2G. The above images show that the
trail behind the moving car on the LP2475W is less pronounced, showing an
improved response time which could warrant the descrease of 2ms on the spec
sheet. However, the trailing images on the HP are of a darker tone, again
signifying a slight overshoot of the RTC impulse, and some inverse "overdrive
trailing". This is nowhere near as obvious as on the Dell 2407WFP-HC we
mentioned earlier, but you can spot it if you look closely. The NEC 2490WUXi
doesn't show this dark trailing, again suggesting the RTC impulse is well
controlled.
The
NEC 24WMGX3 and
Dell 2408WFP are also shown here for reference, and are a little behind the
2490WUXi in terms of pixel responsiveness. The 2490WUXi's responsiveness was
very good I felt, offering no obvious ghosting or trailing, and a seemingly well
controlled RTC impulse to boot. This was one of the better 24" screens in fact
when it comes to pixel responsiveness, which is quite surprising when you
consider this is really a colour enthusiasts screen. In gaming there was still
noticeable blurring in fast moving scenes, but you should expect this from LCD
displays anyway.

I also wanted to see what the 'overdrive' function
did in the advanced OSD. It is clear from the first set of images that the
screen is already using RTC to boost response times anyway, and the 'overdrive'
option is set to 'off' as default. Moving the setting to 'on' must increase the
RTC impulse for an even more aggressive overdrive, and the PixPerAn shots above
suggest this is the case as well. If you watch the moving car in the test and
flick between overdrive being on and off, you can easily spot the difference
even to the naked eye. The feature doesn't appear to do much, if anything, for
the actual responsiveness of the moving image, and blurring is no less apparent.
What the feature does do is introduce a rather obvious pale halo behind the
moving car, showing that the RTC impulse is perhaps too much now, and is causing
some quite noticeable overshoot. I can't see any reason to use this option in
the menu to be honest, it is probably something NEC were toying with during
production, but decided to settle at a far more sensible level of RTC at default
settings which is enough to make the responsiveness very good.
Input Lag
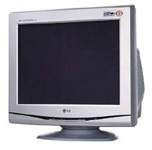
As usual I tested the
screen in clone mode with a CRT to determine the level of
input lag. This is
something which can put off some gamers and is a delay between graphics card and
monitor output. By hooking up a CRT you can show that the LCD lags behind
somewhat, which can affect users in some situations where they rely on the
screen image being as fast as their inputs (e.g. fast FPS shooting games).
Often, input lag is very low and probably wouldn't represent too much of a
problem in real terms.
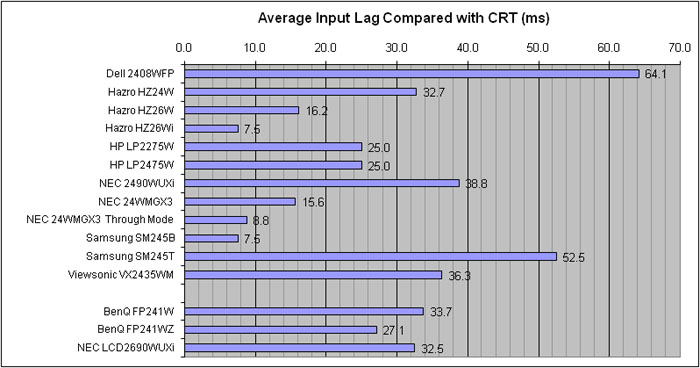
The NEC 2490WUXi was only
average in this test I'm afraid. While the responsiveness tests had proved very
pleasing, the input lag of the screen was behind that of some other competing
screens. It was faster than some models such as the Dell 2408WFP (64.1ms) and
Samsung SM245T (52.5ms) on average, but not as fast as the HP LP2475W (25ms) or
the Samsung SM245B (7.5ms). This isn't to say it is unusable or anything, but
some hard core gamers might find it a little distracting for very fast paced
gaming. The input lag did range between 30ms and 40ms typically, but sometimes
reached even higher at around 50 - 60ms.
Movies and Video

The following
summarises the movie and video capabilities of the 2490WUXi:
-
24" screen
size and 16:10 aspect ratio are a nice size for movie playback, and a good
corss over between desktop monitor and LCD TV
-
1920 x 1200
resolution can support true 1080p HD content resolutions
-
HDCP
supported over digital interfaces for compatibility with protected content
such as Blu-Ray
-
Good black
depth once calibrated and once backlight intensity is altered. This is
important for viewing dark scenes, where detail can be detected more easily
-
Standard
sRGB colour gamut meaning colours do not appear oversaturated and 'neon' in
non colour aware applications such as watching movies
-
Wide
viewing angles thanks to H-IPS panel technology, meaning minimal contrast
and colour shift when viewing the screen from different angles, when
compared with other panel technologies
-
Good panel
uniformity on the whole, and no noticeable backlight bleed from the edges or
corners, which can be problematic when watching movies with black borders
-
Fast
response time means fast moving images and action packed scenes show minimal
ghosting and blurring. This model is more responsive in practice than many
other competing 24" models we have tested in fact
-
Noise is
fairly noticeable due to the screen size and resolution, and particularly
apparent with low definition content. Sitting a sensible distance away
alleviates the issue
-
Multiple
interface options available including VGA and 2x DVI. However, there are no
additional connections which would have been handy for this type of use,
especially if you wanted to connect external devices to the screen. HDMI,
Component and DisplayPort are missing, but available on some competing
models. HDMI in particular is becoming more and more useful from modern
displays.
-
There are
no specific 'multimedia' enhancements here such as Picture In Picture (PiP)
or Picture By Picture (PbP) which some people may find useful on other
models
-
There is also
no dynamic contrast mode on this model, which some users may find useful.
Not a big issue though as many dislike this feature
-
Screen is
compatible with optional add-on sound bar for simple all-in-one multimedia
solution
Conclusion
Overall I was thoroughly impressed with the NEC
2490WUXi. I can see now why the screen has proved popular already in the USA,
and I can only hope that the market is open to the screen in Europe and the UK.
The RRP of £799 is pretty steep compared with competing models such as the Dell
2408WFP, NEC 24WMGX3 and HP LP2475W, which can all be had for around £400 - 450.
Once the 2490WUXi becomes more readily available though, I should expect
to see that price fall at e-tailers, and if the price is more sensible,
this could be a good choice.
Price aside, the screen offers some very
impressive performance. Colour accuracy is excellent, and even black depth and
contrast ratio are very good which is pleasing for an IPS panel. The advanced
features such as 12-bit LUT and hardware calibration help set this model apart
from others, and secure it a spot as a great screen for colour enthusiasts.
Responsiveness is even very good, which is a pleasing result for this type of
screen, and its use in gaming is only let down by its fairly poor input lag.
Viewing angles, office use and ergonomic are all very good as you might expect,
and all in all, this is a very good screen. If you can get it at a reasonable
price, it really can fit a whole range of uses.
|
Pros |
Cons |
|
Excellent colour accuracy,
especially with hardware LUT calibration |
Slightly 'wobbly' stand and
build |
|
Advanced features useful
including ColorComp, AmbiBright, 12-bit LUT and A-TW polarizer |
Poor input lag |
|
Very good responsiveness |
Comparitively high retail
price |