|
|
| |
|

 |
| |
|
|
HP LP2475W
Simon Baker, 9 September 2008

|
|
| |
|
|
 Twitter: Stay up to date:
@TFTCentral |
Twitter: Stay up to date:
@TFTCentral |  Forum:
Discuss this review |
Forum:
Discuss this review |
 RSS Feed:
Review Alerts
RSS Feed:
Review Alerts |
It's not
often that you see this in the 24" sector, but HP have broken from the current
trend of producing cheaper TN Film based displays, and have introduced a rare
IPS based model into the market. At the time of writing, there are really only
two IPS based screens in the 24" sector, one being available predominantly in
the US, the NEC LCD2490WUXi, and one being available predominantly in the UK,
the
Hazro HZ24W (now updated to the HZ24Wi). IPS based screens are proving
popular amongst enthusiasts out there, and have long been the choice of
photography professionals and those looking for a screen for colour critical
work.
HP have kindly sent us their
new LP2475W screen, using the latest H-IPS panel from LG.Display, the
LM240WU4. On a quick note, HP list this screen as being S-IPS based on their
website, but close inspection of the pixel structure reveals the pixel
orientation to be vertical, and characteristic of the latest
H-IPS generation. Ultimately they are IPS matrices, just with different
naming schemes depending on structure and generation. Being one of the few IPS
24" screens in the market, the LP2475W is obviously picking up a fair amount of
attention. Let's take a look at the listed specs first:
|
Size |
24"WS |
Colour Depth |
16.7M (8-bit), 92% NTSC colour gamut |
|
Resolution |
1920 x 1200 |
Viewing Angles |
178 / 178 |
|
Response Time |
6ms G2G (12ms ISO) |
Panel Technology |
H-IPS |
|
Contrast Ratio |
1000:1 |
Interfaces |
DVI-I (x2), HDMI, DisplayPort, Component,
S-Video and Composite Video. 6 port USB hub |
|
Brightness |
400 cd/m2 |
Colour |
Black bezel with silver stand |
|
Special Features |
Tilt, height, pivot and rotate ergonomic
adjustment. Full range of aspect ratio control options, 92% colour gamut,
PiP and PoP support, integrated USB hub |
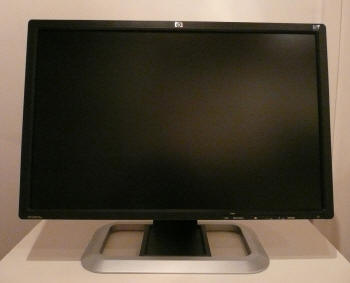
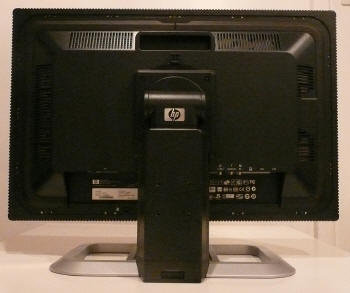
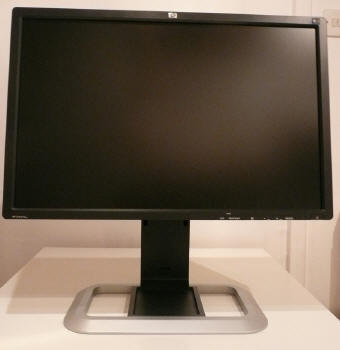
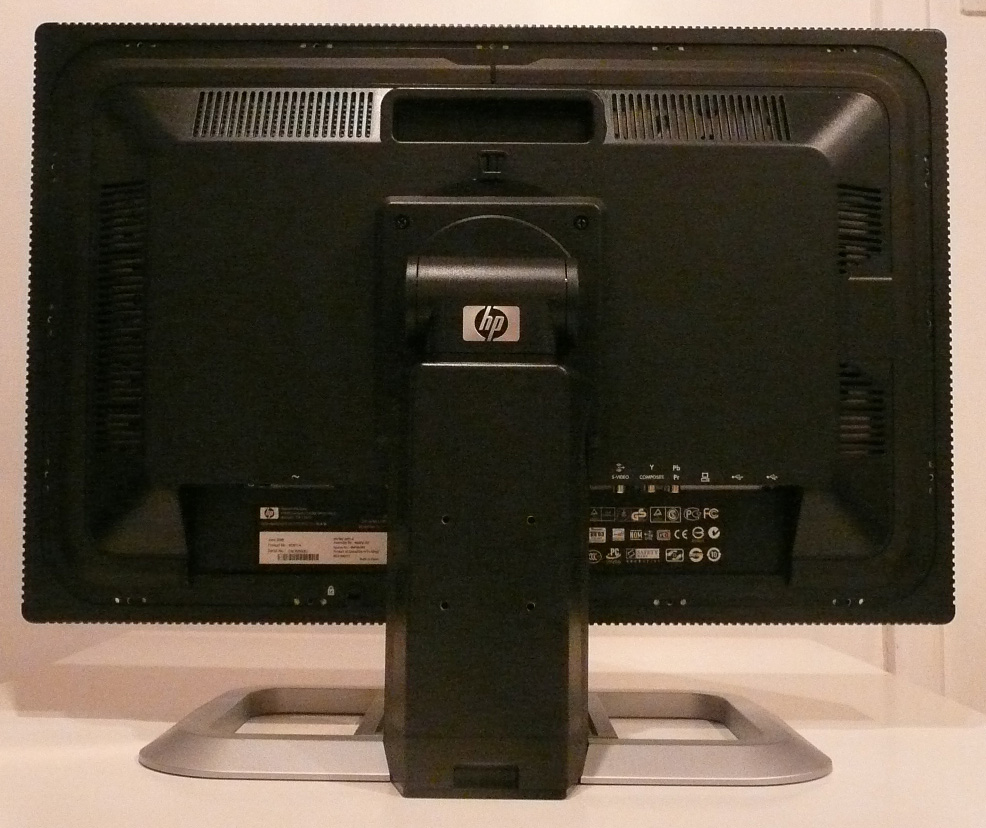
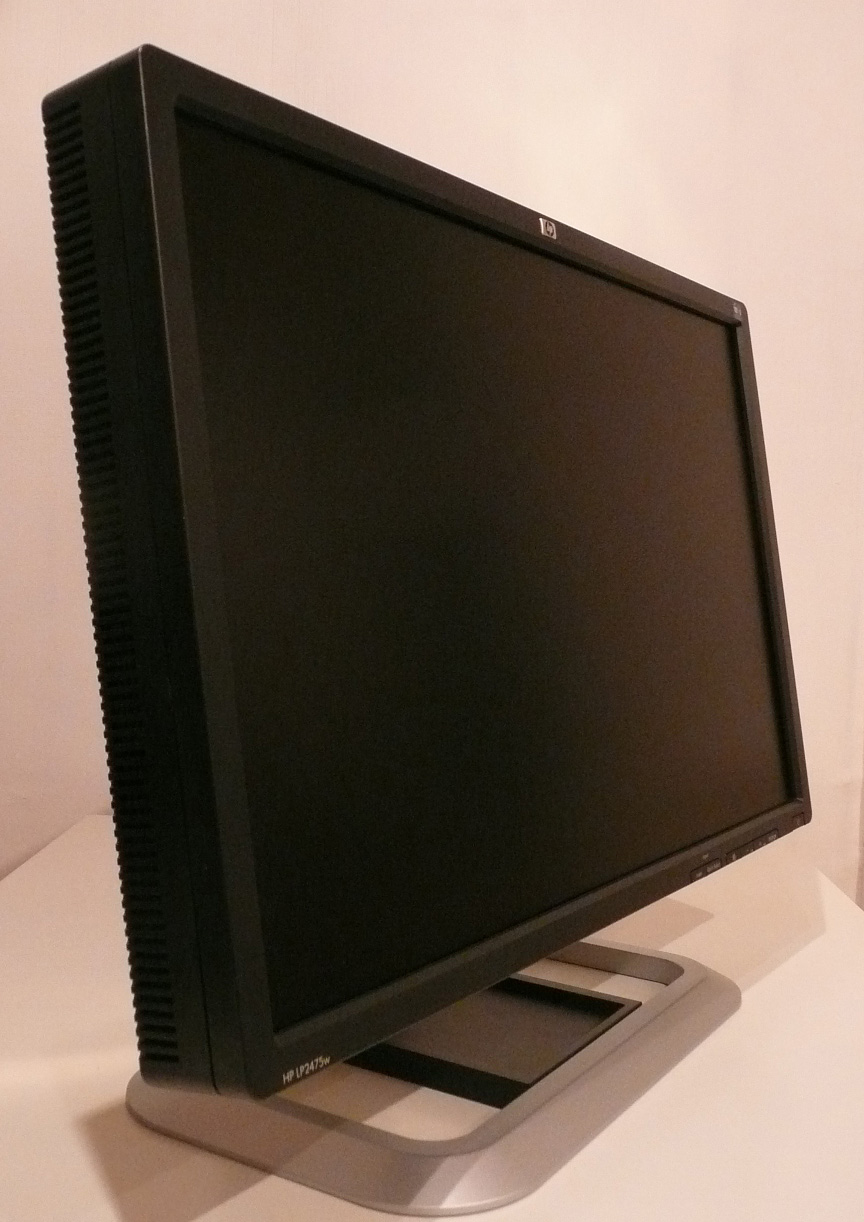
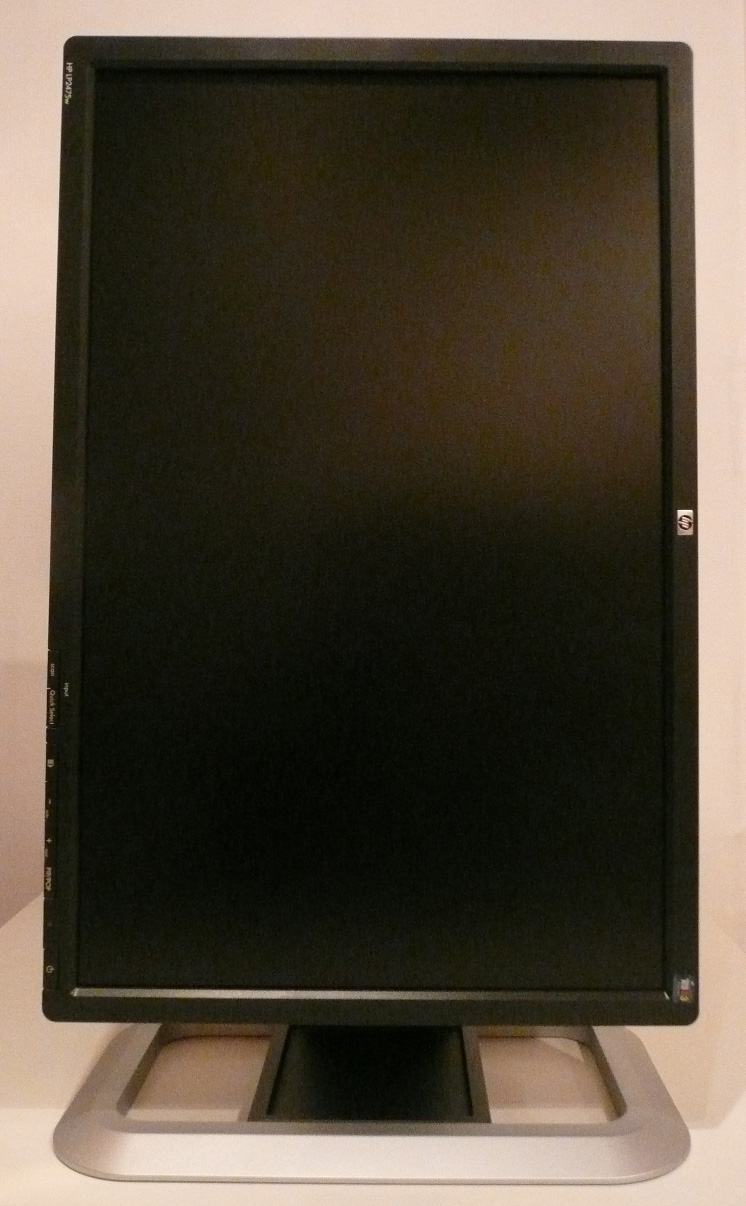
Above:
Front and back views of the LP2475W. Click for larger versions
The HP LP2475W comes in an attractive black
design, with a nice thin bezel and matte finish to the screen surrounds. The
panel is also of the traditional matte Anti-Reflective (AR) finish, as opposed
to any glossy screen coating. The stand is finished in a silver colour, and
offers a large rectangular footprint on the desk. Some people may find the stand
a little bulky and unattractive, and in my opinion it was perhaps a little too
large. It did however offer a very sturdy base for the screen and all in all,
the LP2475W looked professional sat on the desk.
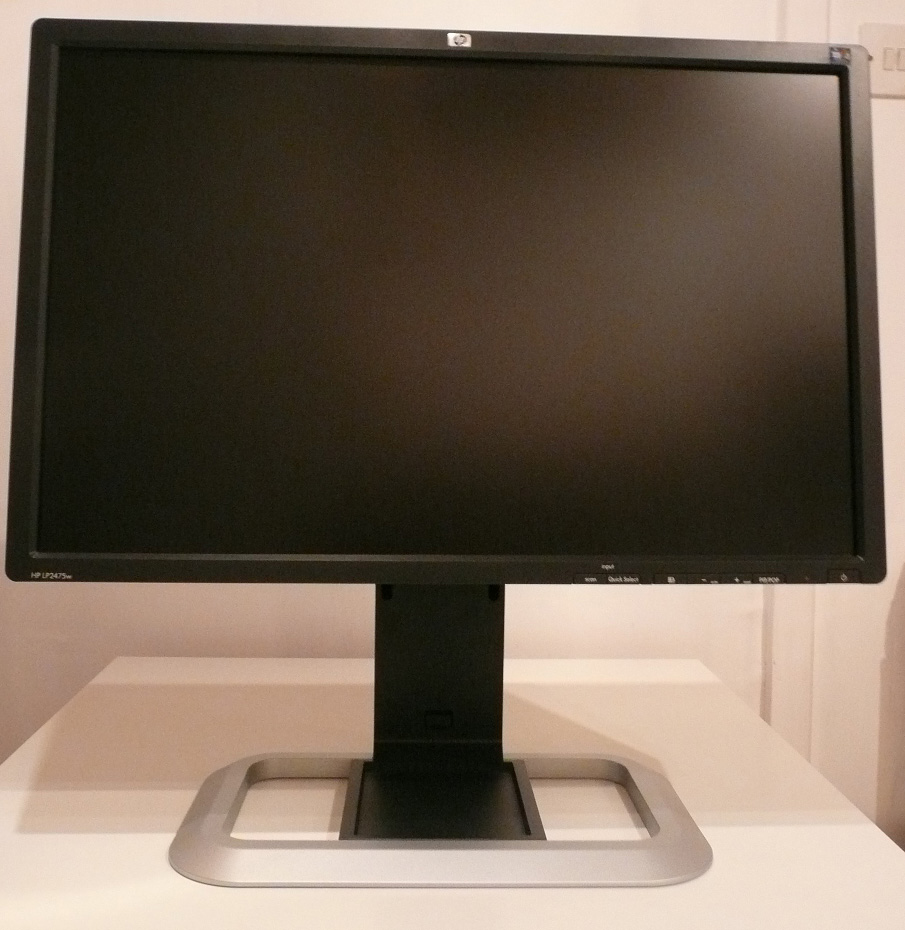
The screen features a small unobtrusive HP logo at
the top in the centre, and the OSD operational buttons are situated in the lower
right hand corner. These are tucked nicely out of the way and are flush against
the bezel. The power LED glows a bright green colour when the screen is turned
on, and glows amber when in standby. I felt the power LED was a little overly
bright in fact, and was a bit distracting in practice. The OSD does feature an
option to disable this however should you find the same thing.
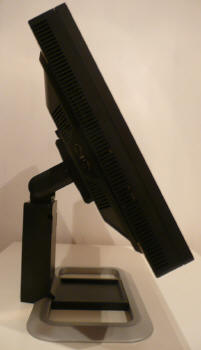
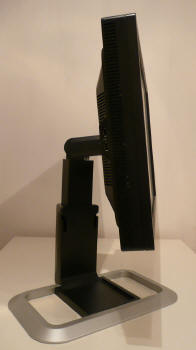
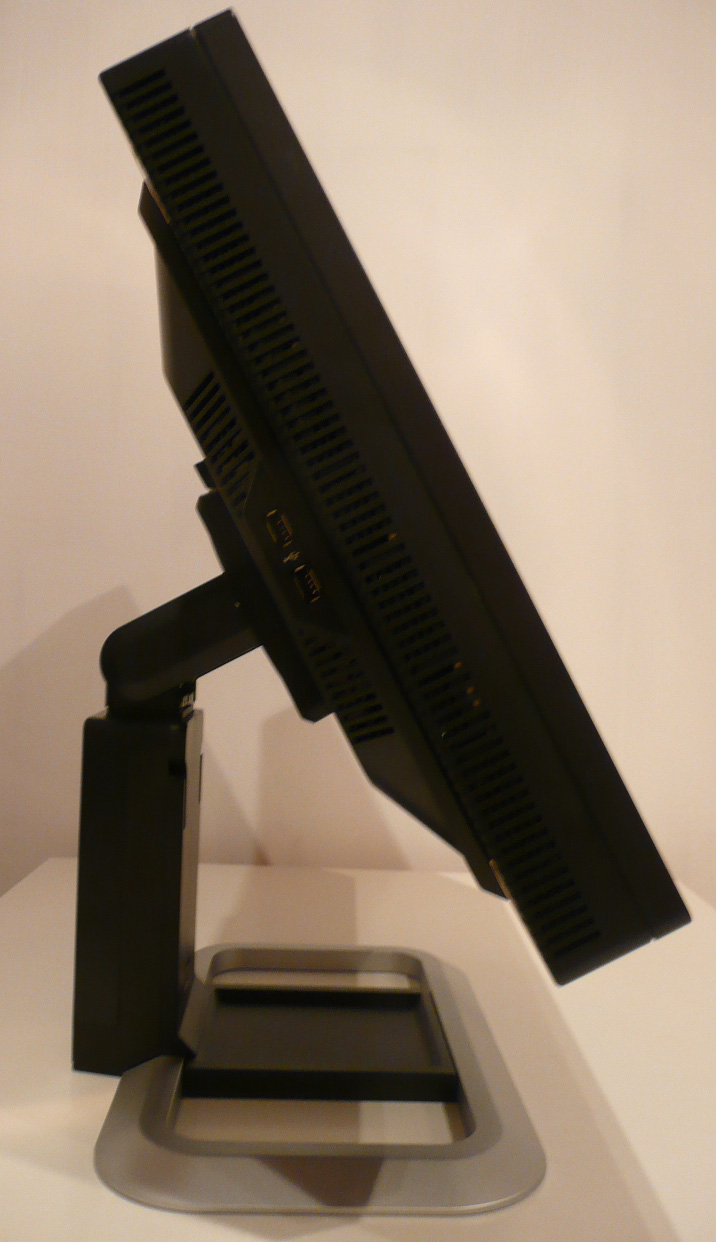
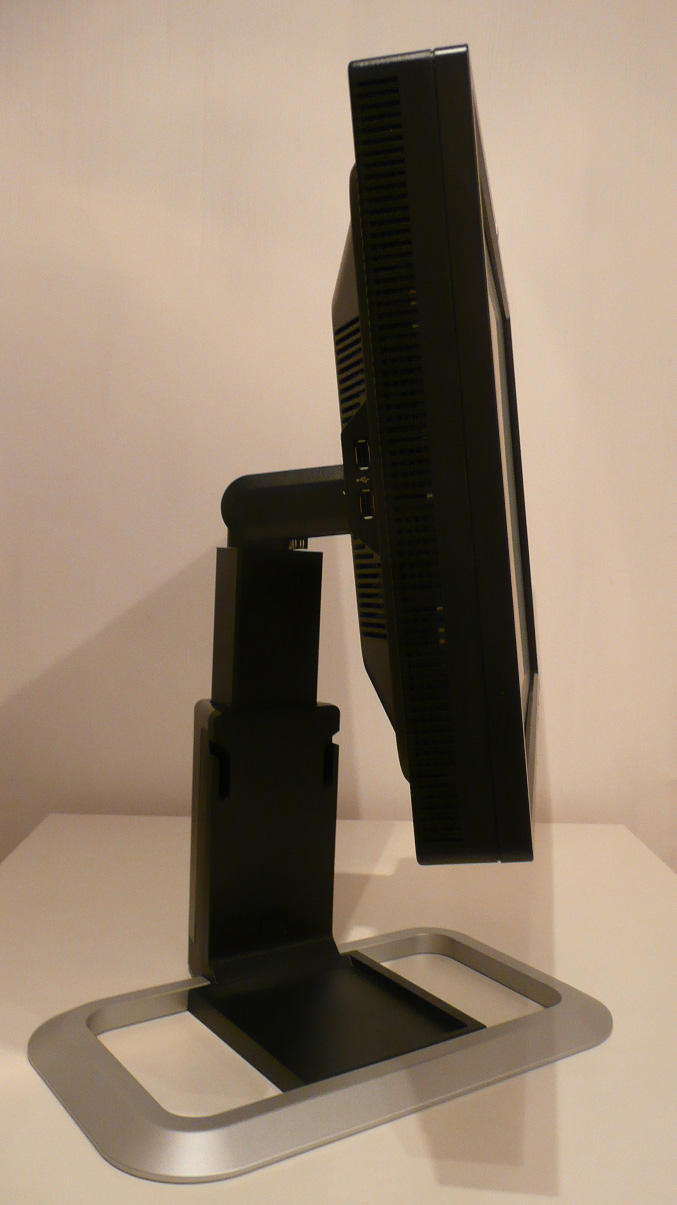
Above: Tilt
range of LP2475W. Click for larger versions
The screen offers an impressive array of ergonomic
adjustments. There is a decent tilt range (as shown above), along with a large
height adjustment range, 90 degree pivot and full landscape / portrait rotation
(all shown below). All these mechanisms are very smooth to operate and the
screen feels sturdy and well supported no matter how you adjust it.

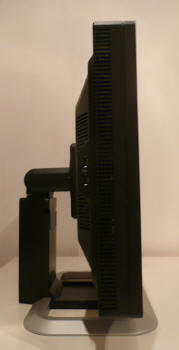
Above:
Pivot function of screen shown
Below: height and rotation adjustments shown. Click for larger versions

Materials are all of a very high standard and the
build quality feels excellent. It's a professional looking piece of kit in my
opinion, and would look particularly good wall or arm mounted I think. The
screen features an integrated power supply, so no need for any external bricks
here. There is no noise or buzzing detectable, and the screen gives off minimal
heat, even after long hours of use.
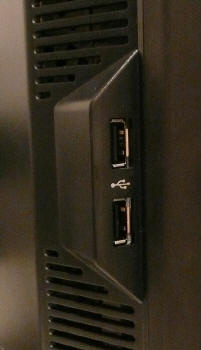

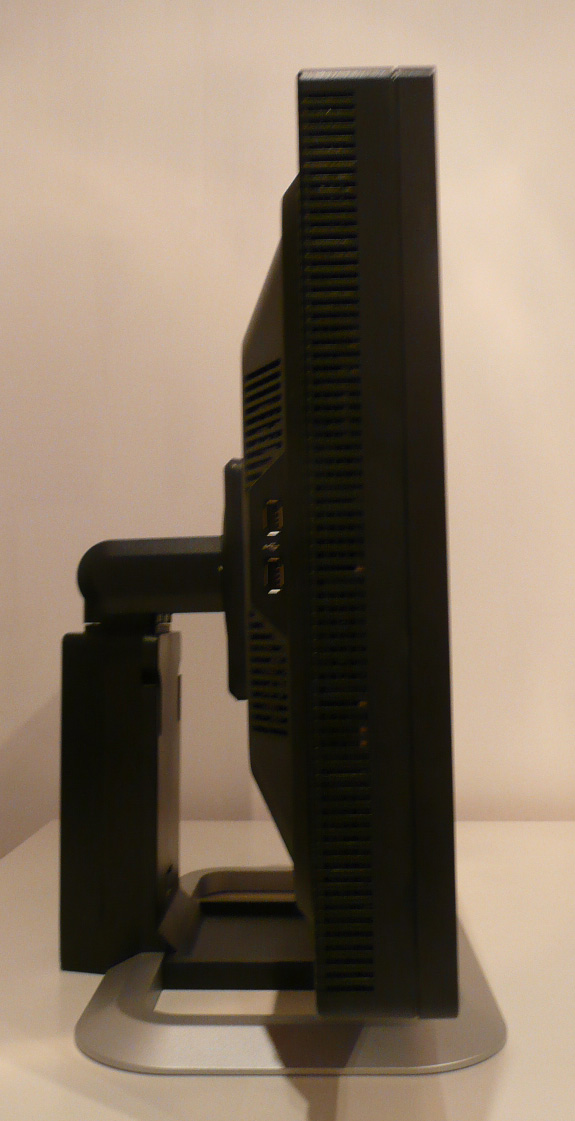
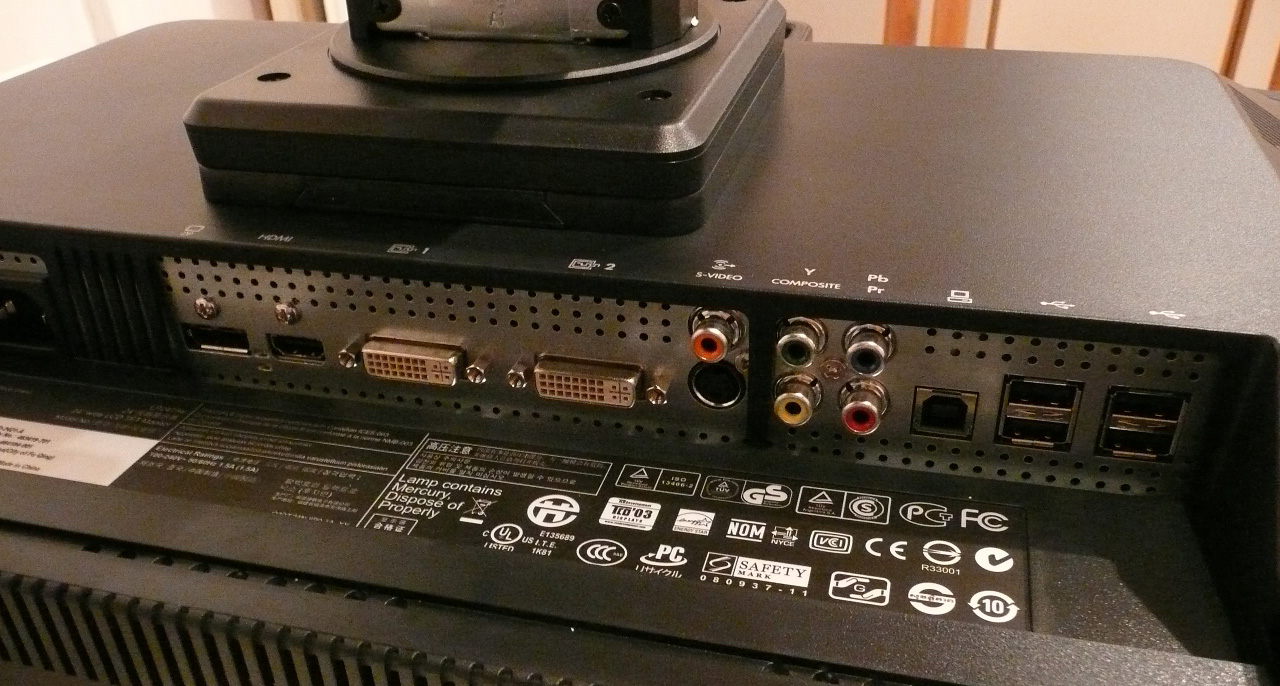
Above: USB
ports shown (left) along with range of interface options (right). Click for
larger versions
The LP2475W features an integrated 6 port USB hub,
with 2 located for easy access on the left hand side of the screen, and the
other 4 located next to the wide range of interface options. The back of the
screen shows you the interface options available, with DisplayPort, HDMI, 2x
DVI, S-video, Composite, component and the USB ports being visible in the above
image. The screen is oddly lacking a D-sub VGA interface, but a DVI > VGA cable
is supplied for those who need it. It might have been nice for HP to include VGA
for connection of some devices and for some older Graphics card support.
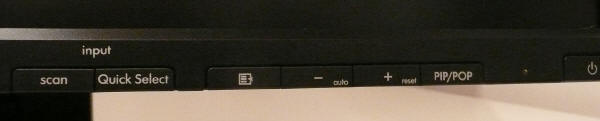
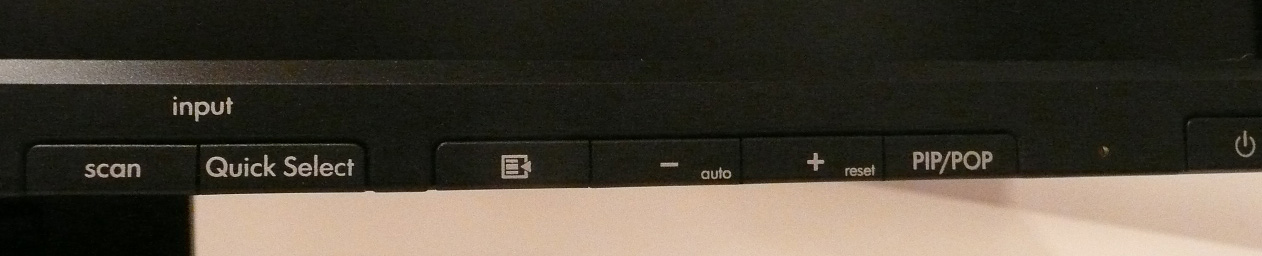
Above: OSD
operational buttons. Click for larger version
The operational buttons are located along the
bottom right hand edge. There is quick access to 'scan' (for inputs),
'quick select' (to switch between interface), menu (the main menu), auto adjust
(for analogue inputs), reset (factory reset quick access) and PiP / POP.
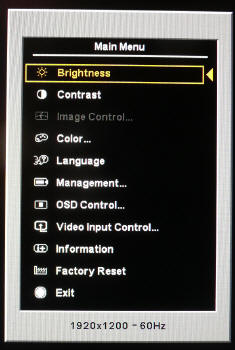
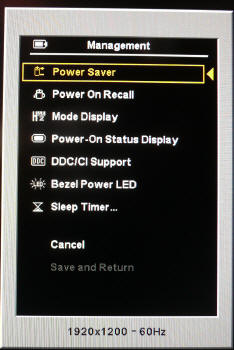

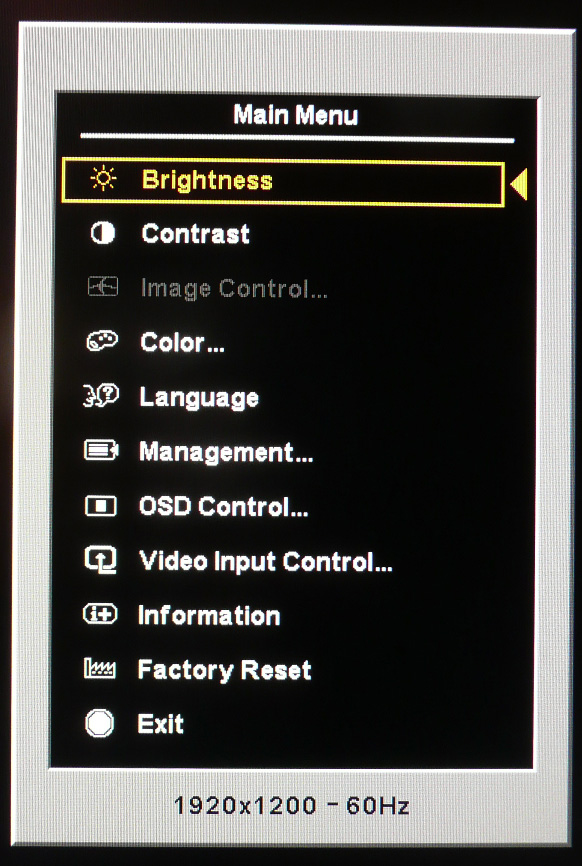
Above:
Various OSD menu screen shots
The OSD menu itself is very thorough and easy to
navigate. There are many options to choose from, and the buttons are easy to
press and select. I've shown a few pictures of the menu above to give you an
idea of what is available in some sections. I turned a couple of options off
when I first plugged in the screen as I personally found them annoying. The
auto-scan for inputs and interface choice confirmation boxes were disabled, but
that is down to taste really. The color section includes preset modes for 9300k,
6500k (default), Custom Color (RGB access) and sRGB (simulation).
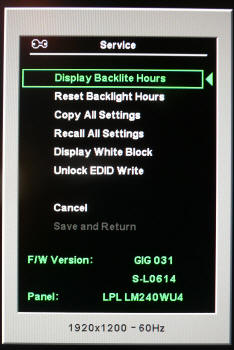
Above:
Factory OSD menu
You can access the factory menu of the LP2475W by
holding the menu button down while you turn the screen on. Release 'menu' after
about 5 seconds and when you go into the main menu you will see an option for
'service'. Entering this section confirms the panel being used is the LG.Display
(LPL) LM240WU4.
Colour
Accuracy, Black Depth and Contrast
The HP LP2475W utilises an 8-bit H-IPS panel,
capable of producing a true 16.7 million colours. The screen uses enhanced W-CCFL backlighting and so it's colour gamut covers
92% of the NTSC colour space.
An
important thing to consider for most users is how a screen will perform out of
the box and with some basic manual adjustments. Since most users won't have
access to hardware colorimeter tools, it is important to understand how the
screen is going to perform in terms of colour accuracy for the average user. I
restored my graphics card to default settings and set it to its standard
profile. The LP2475W was tested at default factory
settings out of the box using the
LaCie Blue Eye Pro and their accompanying software suite.
Default settings of the screen were as follows:
|
Monitor OSD Option |
Default Setting |
|
Brightness |
90 |
|
Contrast |
80 |
|
RGB |
n/a |
|
Colour Temperature Mode |
6500k |
HP LP2475W - Default Settings (Default 6500k Colour Mode)

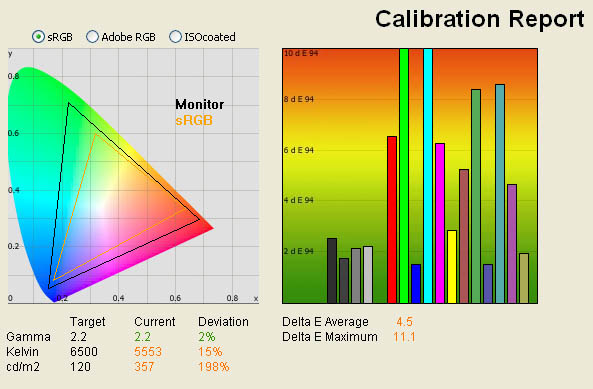
|
|
Default Settings |
|
luminance (cd/m2) |
357 |
|
Black Point (cd/m2) |
0.45 |
|
Contrast Ratio |
793:1 |
The screens default settings
were considerably over-bright, and you could immediately feel this when you
started to work with it. Our colorimeter revealed the default luminance to be
a pretty high 357 cd/m2, not far off the specified maximum
brightness of 400 cd/m2 even! You could tell that you would need to
adjust the brightness of the screen straight away. Considering the OSD
brightness control was defaulted at 90%, this should be easy enough to adjust
later on anyway. With this high luminance value, we recorded the default black
depth at 0.45 cd/m2, giving a static contrast ratio of 793:1. This
was a little out from the specified 1000:1, which is perhaps a little hopeful
for an IPS matrix, but very close to 800:1 which is a decent performance for
an IPS screen.
As you can see from the
measurements on the left of the image above, the default gamma was actually
very good, being only 2% out, and rounded to 2.2 overall; this being the
default for computer monitors and for the Windows operating system and sRGB
colour space. Despite the default preset colour mode of ''6500k' being
selected, the recorded colour temperature was actually only 5553k, quite a way
out from the desired value (by 15%), that being the colour temperature of daylight.
In a new test, I wanted to
see how much variance there was in the screens contrast as we adjusted the
monitor setting for brightness.
In theory, brightness and contrast are two independent parameters, and good
contrast is a requirement regardless of the brightness adjustment.
Unfortunately, such is not the case in practice. We recorded the screens
luminance and black depth at various OSD brightness settings, and calculated
the contrast ratio from there. All other monitor and graphics card settings
were left at default. It should be noted that we used the BasICColor
calibration software here to record these, and so luminance at default
settings varies a little from the LaCie Blue
Eye Pro report.
|
OSD Brightness |
Luminance
(cd/m2) |
Black Point (cd/m2) |
Contrast Ratio ( x:1) |
|
100 |
356 |
0.45 |
790 |
|
90 |
355 |
0.45 |
789 |
|
80 |
315 |
0.40 |
788 |
|
70 |
282 |
0.36 |
783 |
|
60 |
255 |
0.33 |
774 |
|
50 |
231 |
0.29 |
797 |
|
40 |
207 |
0.27 |
765 |
|
30 |
181 |
0.23 |
786 |
|
20 |
155 |
0.20 |
777 |
|
10 |
129 |
0.16 |
807 |
|
0 |
103 |
0.13 |
793 |
As you can see from the above results, the control of the screens luminance
via the OSD menu was very good. The default 90% OSD setting gave a luminance
value of around 355 cd/m2 as we have
discussed already. As you lower the brightness control in the menu, the voltage
sent to the CCFL backlighting is reduced, and therefore the backlight intensity
is reduced as well. The luminance ranges down to 103 cd/m2 when
brightness is set to 0%. Even if proper calibration is not possible, you can get
a comfortable luminance of the screen at around 10% brightness setting, which is
re-assuring.
While brightness is reduced, the black depth
improves quite nicely as well, reaching a very impressive 0.13 cd/m2
at 0% brightness. This is very respectable for an IPS matrix, and the best black
depth we have recorded on such technology so far in our reviews. During these
brightness changes, the contrast remains pretty static and within the range of
774:1 to 807:1. Very good performance in this regard, showing that with proper
backlight adjustments you can achieve not only comfortable settings for every
day use, but retain a decent contrast and black point throughout the range.

The results were plotted on the above graph,
showing the contrast stability of the screen. You can adjust the brightness
setting to anywhere within the 0 - 100% range without really impacting contrast
ratio. As you reduce the brightness setting, luminance is adjusted nicely, and
black depth improves as one would hope.
Testing with the colorimeter revealed the graph on the right hand side above,
showing DeltaE (dE 94) values across 16 shades.
As a reminder, the lower these bars down the Y-axis, the better, in terms of
colour accuracy. For reference, LaCie describe the DeltaE readings as:
-
If DeltaE >3, the color displayed is significantly different from the
theoretical one, meaning that the difference will be perceptible to the
viewer.
-
If DeltaE <2, LaCie considers the calibration a success; there remains a
slight difference, but it is barely undetectable.
-
If DeltaE < 1, the color fidelity is excellent.
As you can see from the graph,
the default results were not that great. DeltaE on average was 4.5, meaning the
colours displayed were considerably out from the requested colours overall.
Maximum dE even ranged up to 11.1, so you are definitely going to need to
calibrate this screen if you intend to do any colour critical work. This is
quite a common situation in todays market, especially where extended gamut
backlighting is used. In contrast, the IPS based
Hazro HZ26Wi we recently tested showed much better colour accuracy out of
the box, showing that perhaps the HP was not particularly well configured in the
factory. This of course need not matter if you have access to a hardware
colorimeter device, but for those without, it might be a consideration to take
into account.
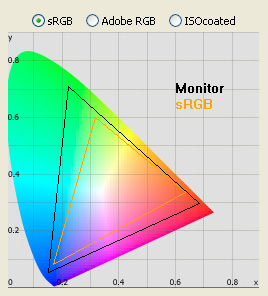
The graph on the left hand
side (recreated here as well) shows the
CIE diagram
which represents the colour space which the monitor is capable of displaying.
The LP2475W uses enhanced wide colour CCFL
(W-CCFL) backlighting which offers a colour space (gamut) covering 92% of the
reference NTSC space. On the above diagram, the black triangle represents the
monitors colour gamut, and it stretches considerably beyond the reference
triangle of the sRGB colour space. The sRGB colour space covers about 72% of
the NTSC colour space for those interested.
HP LP2475W - Default Settings (Custom Colour Mode)
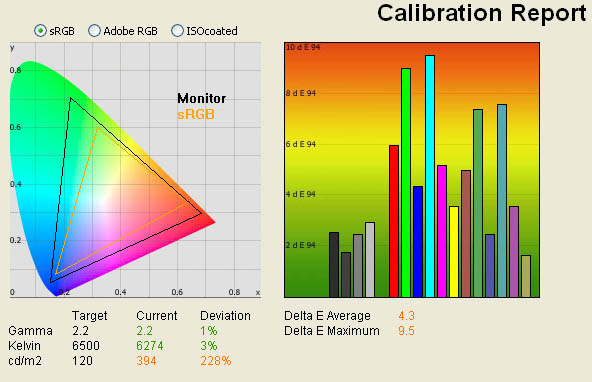
|
|
Default Settings |
|
luminance (cd/m2) |
394 |
|
Black Point (cd/m2) |
0.45 |
|
Contrast Ratio |
875:1 |
We tested the screen again
after simply switching to the "custom colour" mode in the OSD. This allows
access to the RGB controls for calibration and moves the screen away from the
preset 6500k mode. To the naked eye, the image looked a little more blue, and a
little less yellow, and testing with the colorimeter actually revealed a
slight positive change on the most part. Luminance was actually increased to 394 cd/m2
resulting in an even better contrast ratio of 875:1, but being a little less
comfortable for prolonged use. Colour temperature was
actually nearer to the desired 6500k than it was using the 6500k preset mode
(!!) and gamma still remained very accurate at 2.2 (1% out now). Colour accuracy
was also improved a little, with maximum dE reduced from 11.1 down to 9.5, and
average dE was now 4.3 instead of 4.5. Not a massive change overall, but even if
it's just for the sake of a better colour temperature, it's worth switching to
the 'custom colour' mode from the off-set.
HP LP2475W - Default Settings (sRGB Simulation Mode)
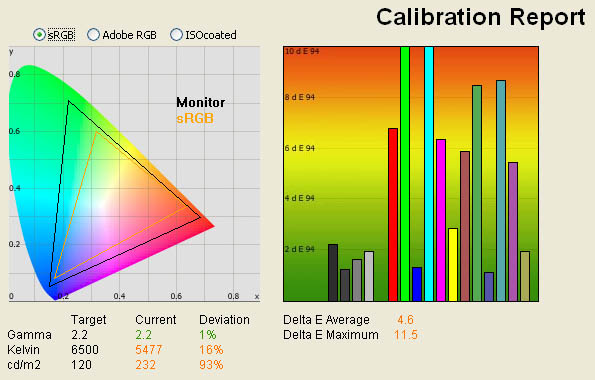
|
|
Default Settings |
|
luminance (cd/m2) |
232 |
|
Black Point (cd/m2) |
0.45 |
|
Contrast Ratio |
875:1 |
The LP2475W offers a
supposed
sRGB simulation mode via the OSD menu as well, so we wanted to test how this performed,
again with everything else left at default. The screen immediately looked darker
and slightly more 'murky' to the eye, and the colorimeter revealed luminance was
reduced down to 232 cd/m2 now. Colour temperarture moved further away
from the desired 6500k (being 16% out now) and colour accuracy didn't really
change. The main thing this mode is supposed to do is simulate the sRGB colour
space, which is important for those not wanting to work with extended colour
spaces. Strangely, this mode did nothing for the screens gamut, and the CIE
diagram on the left shows the colour space remains considerably larger than the
sRGB reference triangle! I am left to assume that all this mode really does is
darken the image! Very odd...
HP LP2475W - Calibrated Settings
|
Monitor OSD Option |
Adjusted Setting |
|
Brightness |
17 |
|
Contrast |
65 |
|
RGB |
251 / 235 / 242 |
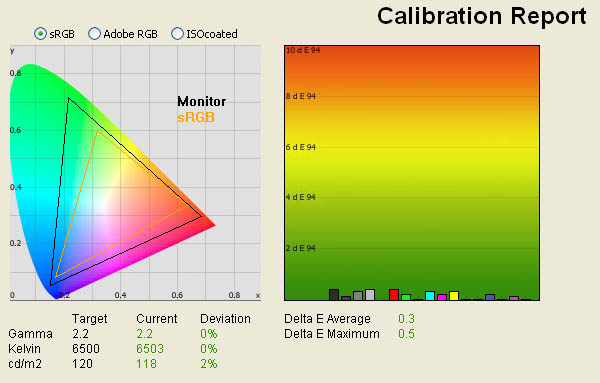
|
|
Calibrated Settings |
|
luminance (cd/m2) |
118 |
|
Black Point (cd/m2) |
0.17 |
|
Contrast Ratio |
694:1 |
I calibrated the screen using
the LaCie Blue Eye Pro software package and hardware colorimeter. During the
process, the OSD settings were adjusted, forming a small part of the overall
calibration proceedings. Brightness was adjusted down to a value of 17,
contrast was reduced to 65, and RGB values were changed to 251, 235 and 242
respectively. The calibration process then automatically makes adjustments at
a graphics card Look Up Table (LUT) level, before creating and activating an
ICC profile. There is no hardware level LUT correction with the LP2475W, which
some premium colour critical screens in this sector do offer. Immediately to the naked eye you could feel the difference, with
the main obvious adjustment being the far more comfortable and sensible
luminance setting. Colours also looked more even to the naked eye.
Testing with the colorimeter
confirmed our initial impressions. Luminance was now a far more comfortable
118 cd/m2, gamma was corrected perfectly to 2.2 and colour
temperature was now less than 0.5% out at 6503k. Since we altered the OSD
brightness control during the manual calibration stages to 17%, the automated
LUT adjustments didn't need to alter the luminance much. We already knew from
our contrast stability tests that a brightness level of around 10% was optimum
for 120 cd/m2. With this adjustment, black depth was improved quite
nicely from the default 0.45 cd/m2 to a very impressive 0.17 cd/m2.
This is the best result we have tested from an IPS based screen, and a static
contrast raito of 694:1 is very admirable. It looks like finally IPS panels
might have overcome their main traditional weakness and can now offer decent
black depth. Subjectively, it was impossible to detect only the first 2 shades
of grey on the scale from 0 - 255 (255 being pure white). I followed the
useful tests
here, where
the first square you could distinguish on the LP2475W was number 3 (just).
Impressively, the calibration
also improved colour accuracy no end. Average dE was now only 0.3, and maximum
was down to 0.5. This was a massive improvement, and actually the best
colour accuracy results we have obtained in our reviews! This even beats the
Hazro HZ30W which recently became our champion in this regard with average
dE of 0.3 and maximum of 0.8.
Testing the screen with
various colour gradients showed smooth transitions both horizontally and
vertically, and no real sign of even slight gradation. There was certainly no
banding issue here.
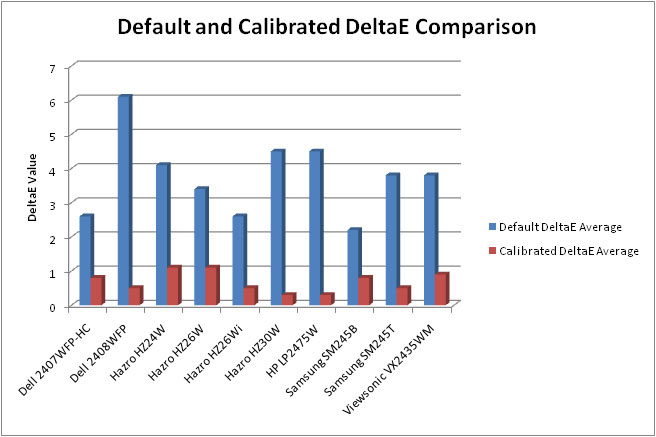
If I compare the colour
accuracy results of the LP2475W with the other 24"+ sized screens we have
tested, I see the above graph. As you can see, while the default colour
accuracy overall was not that good, the calibrated results were excellent. The
average dE results before and after were actually identical to the Hazro
HZ30W, but the HP LP2475W had the slight edge after calibration as we have
discussed above. All in all, calibraiton was a great success. You can be
confident of some very good colour rendering capabilities from this screen,
but you are going to have to invest in a hardware colorimeter if you want the
best from it.
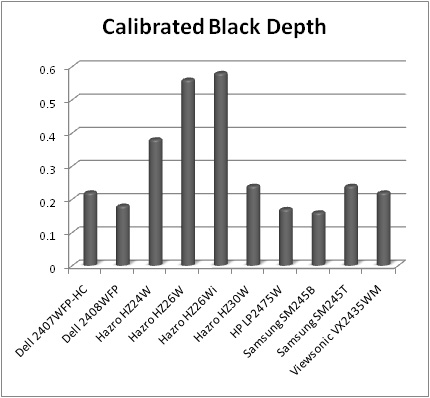
If we compare the calibrated
black depth of all the 24"+ models we have tested, you can see the LP2475W
performs very well here. The results here are perhaps not what one might
expect in the battle of TN Film vs IPS vs PVA vs MVA however! The best black
depth after calibration we have here is from the TN Film based (and very
cheap)
Samsung SM245B (0.16), only just ahead of the H-IPS based LP2475W (0.17)!
Who would have thought that TN Film and IPS technology would beat VA matrices
in this regard?! True, VA panels, particularly PVA panels, are more
consistently impressive in terms of black depth, but with advances like this
in H-IPS, and particularly TN Film, it seems PVA panels could be getting a run
for their money very soon. The best performing PVA panel here was that used in
the
Dell 2408WFP (0.18), with the
ViewSonic VX2435WM representing the S-MVA generation (0.22). I was
suitably impressed with the LP2475W in black depth, an area where I previously
felt IPS was lacking.
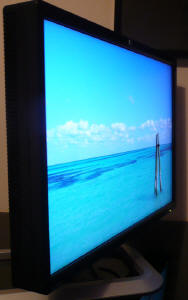
Viewing Angles


Above: Viewing
angles shown from front and side, and from above and below. Click for
larger images
The viewing angles of the
LP2475W were very good, as one would expect from an H-IPS based matrix. The
field of vision was wide in all directions, and the technology was free of the
obvious contrast shifts vertically of TN Film, and the off-centre contrast
shift of VA panels. IPS is widely regarded as the choice for colour critical
work because of its wide viewing angles, and the LP2475W did not disappoint in
this regard. The panel does not feature an Advanced True Wide (A-TW)
polarizer, and so you can spot the characteristic white glow of H-IPS on dark
backgrounds, when viewed from extreme angles. In practice, I doubt you'd ever
even spot this since you would be very unlikely to view the screen from such
an odd position.
Panel Uniformity
Measurements of the screens luminance were taken
at 35 points across the panel on a pure white background. The measurements were
taken using BasICColor's calibration software package, combined with the LaCie
Blue Eye Pro colorimeter. The above uniformity diagram shows the difference, as
a percentage, between the luminance recorded at each point on the screen, as
compared with the reference point of a calibrated 120 cd/m2. This is
the desired level of luminance for an LCD screen in normal lighting conditions,
and the above shows the variance in the luminance across the screen
compared with this point. It is worth noting that panel uniformity can vary from
one screen to another, and can depend on manufacturing lines, screen transport
and other local factors. This is only a guide of the uniformity of the sample
screen we have for review.
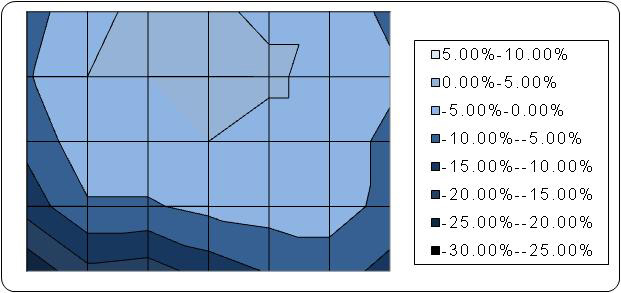
As you can see from the above report, the screen
was, on the whole, pretty uniform, being between 5% either side of the target
luminance of 120 cd/m2 across most of the screen. The luminance did
drop a little towards the right and left hand edges, and particularly towards
the very bottom of the screen. The readings reached as low as 98 cd/m2
in the lower left hand corner, but this minor difference was nothing to be
particularly worried about.
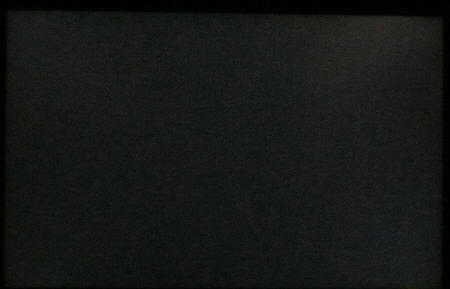
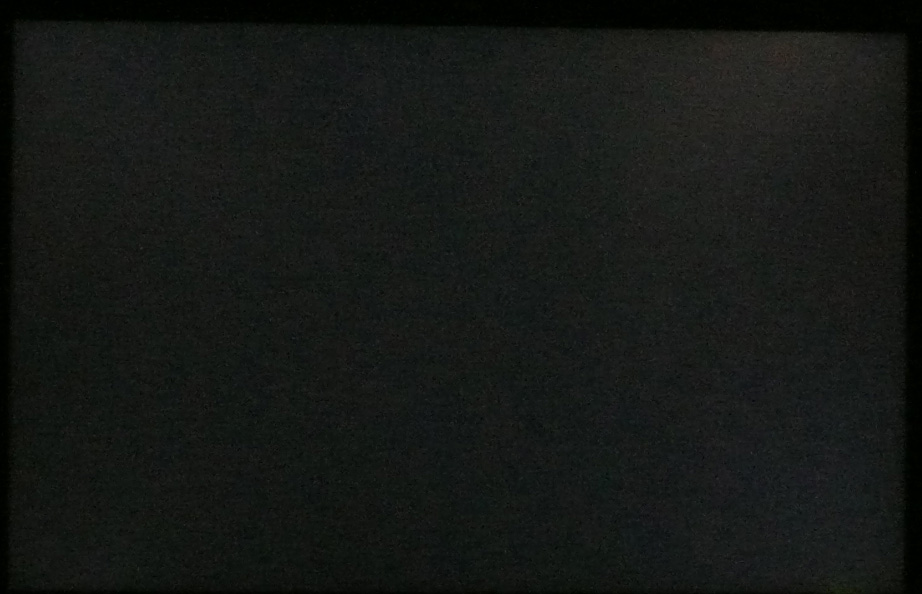
Above:
All black screen in darkened room. Click for larger version
Setting the screen to an all black background and dimming the lights resulted in
the above. There was very little difference across the screen that you could
detect with the naked eye, and only a very slight leakage of the backlight
towards the top right hand corner of the screen. In practice this was almost
impossible to detect, and thankfully the screen was free from any leakage along
the top and bottom edges, where it can be particularly problematic and
off-putting in movies, where black borders are present.
Office and Windows Use
The LP2475W offers a nice big 1920 x 1200
resolution to work with, along with a tight
pixel pitch of 0.270 mm. This is a tighter pitch than 22"WS, 26"WS and 19"WS
format screens, and so text is a little smaller and sharper. There are no preset modes for "office" or "text"
which can be handy in varying lighting conditions, and you will definitely
want to calibrate the screen, or turn OSD brightness down a lot to get the luminance
to a comfortable level for use. There is no analogue interface so I cannot
compare that to the digital option. The DVI offered a very crisp and clear
image, with sharp text and very good picture quality.
The screen resolution is ideal for side by side
split screen working, and the wide range of ergonomic adjustments means the
screen can be easily positioned to a comfortable level. The rotate
functionality might be handy for some people, but at this screen size I feel
it is perhaps a little gimmicky. Height and tilt adjustments are invaluable
however.
Responsiveness and Gaming
The HP LP2475W was tested using the chase
test in PixPerAn, a good bit of software for trying to quantify differences in
real terms responsiveness between monitors. As a reminder, a series of pictures
are taken on the highest shutter speed and compared. The images below show the
best case example on the left hand side, and the worst case example on the right
hand side. This should only be used as a rough guide to comparative
responsiveness but is handy as a way of keeping a constant test of each screen.

6ms G2G LG.Display H-IPS panel

5ms G2G LG.Display H-IPS panel
The LP2475W uses LG.Display's
latest 24" H-IPS panel, the
LM240WU4. The panel only went intro production in Q1 of 2008 and is so new
that it is not even listed on their
main module page. Details of the panel are instead available in their
latest product catalogue, and in our panel parts database (of course). The
module is their latest generation of IPS matrix, and sports a specified
response time of 5ms G2G. The LP2475W actually has a specified response time
of 6ms G2G, and there's not really much explanation as to why there is a
discrepency here. The LP2475W is the first model we have seen which uses this
new panel, and perhaps HP have re-measured the response time themselves to
provide a figure for their spec list? Regardless, the LM240WU4 is LG.Display's
latest generation of H-IPS and so users might expect some top performance as a
result.
The H-IPS panel used features
Response Time Compensation (RTC) technology, widely used nowadays to boost
the response time of transitions across the grey range. These transitions are
far more common in practice than a full black > white change, which was
previously the fastest response time of an LCD display before these
technologies were introduced. As such, a G2G response time is far more
suitable for understanding the potential responsiveness of the panel in
practice than an ISO black > white response time is.
In the above tests, the
LP2475W performed very well. It remained very close to the Hazro HZ24W in
these tests and we've already touched on the fact that the panel is 5ms G2G
rated, so there is no real reason to separate the Hazro and HP models here,
despite their quoted spec. The Hazro HZ24W actually showed a slight white
halo-ing behind the moving car, indicating a slight over-shoot of the RTC
impulse. This can be fairly common on heavily overdriven displays, and is down
to the RTC control being slightly off. It was hardly noticeable in practice,
but our tests capture this a little bit in the best case (left) image.
In
contrast, the LP2475W didn't show any of this, but did show a slight dark
trail behind the moving car. This was evident if you looked closely at the
moving image, even without capturing it with the camera. You can see this dark
trail behind the speech bubble and the yellow man's head in the above images.
This reminded us of an issue we looked at a little while ago with the
Dell 2407WFP-HC where an 'overshoot' of the RTC impulse was causing some
very obvious inverse ghosting artefacts. I tested the screen in a similar way
to how we tested the 2407WFP-HC and saw some slight black trailing behind a
white mouse cursor, as it moved across a dark grey background. I don't want to
make too big a fuss of this, since I don't feel that it is nearly as obvious
or distracting as it was with the 2407WFP-HC - which was effectively
discontinued because of this issue. It is worth noting in this review since
you can spot the dark trailing image in the PixPerAn tests. Whether this is
more of less distracting than a white trailing on other screens is down to the user, but
in practice it was pretty hard to spot really.

6ms G2G LG.Display AS-IPS

5ms Samsung TN Film

6ms G2G Samsung S-PVA
I've included the same
PixPerAn tests for the Samsung SM245B, Dell 2408WFP and NEC 20WGX2 (our
reference monitor for these tests) so you can compare. As you can see, the HP
LP2475W was not far behind the performance of the NEC, providing you discount
the RTC overshoot artefacts we have discussed above. The Samsung SM245B uses a
non-overdriven TN Film panel and the difference is quite obvious. The 6ms G2G
Dell 2408WFP is a fair bit slower than some other S-PVA panels from the same
generation, but I have included it here since it is a very popular screen
right now.
The screen thankfully features a wide range of
hardware level
aspect ratio control, accessible via the OSD menu. There were options for
"fill to screen", "fill to aspect ratio" and "one to one". I tested all of
these using various gaming resolutions and they seemed to work nicely without
issue. Testing the 1:1 aspect ratio mode with external devices using the main
HD resolutions (720 and 1080) showed they were scaled properly and with no
stretching vertically or horizontally.
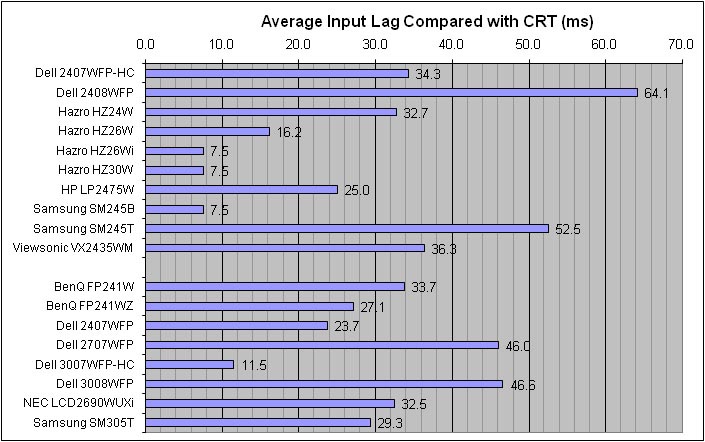
As usual I tested the
screen in clone mode with a CRT to determine the level of
input lag. This is
something which can put off some gamers and is a delay between graphics card and
monitor output. By hooking up a CRT you can show that the LCD lags behind
somewhat, which can affect users in some situations where they rely on the
screen image being as fast as their inputs (e.g. fast FPS shooting games).
Often, input lag is very low and probably wouldn't represent too much of a
problem in real terms.
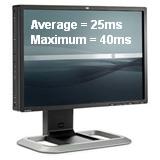
The HP LP2475W performed pretty well in
this test, with an average input lag of 25ms being recorded. The input lag
ranged from 10 - 40ms but never got above or below this. The 25ms on average
is pretty good and represents very little problem in practice, especially if
you compare it to the results of other 24"+ models. It's not quite as good as
the Samsung SM245B, Hazro HZ30W or Hazro HZ26Wi (all at 7.5ms average), but
remains a long way ahead of some very popular 24" screens such as the Dell
2408WFP A00 (64.1ms) and Samsung SM245T (52.5ms).
Movies and Video

The following summarises the HP LP2475W's performance
in video applications:
-
Large 24" screen size and widescreen aspect ratio
make it great for watching movies
-
Large 1920 x 1200 resolution support for high
definition content (supporting 1080p)
-
The resolution can be a problem however since any
SD content needs to be scaled up, and
the resolution means any imperfections and pixelation are accentuated even
further. Not necessarily a good screen for watching anything from close up
-
Wide viewing angles thanks to the H-IPS panel,
good for several viewers watching at once
-
Very good black depth mean detail in darker scenes
is not lost. Very good in this regard for an IPS matrix
-
Decent panel responsiveness ensures no ghosting
and minimal blurring in fast moving scenes. Any slight inverse RTC overshoot not
apparent in video applications
-
Panel uniformity is good overall. No obvious
leakage and no problems along top or bottom edges where it is most apparent in
movies with black borders
-
HDCP is strangely not listed in HP's specification
for the LP2475W which could cause problems for people wanting to watch encrypted
content. I tested the screen however with a Blu-Ray source which played fine
over both DVI and HDMI. I don't have other sources to test, but it looks like
HDCP is included after all
-
HDMI, DisplayPort, component, composite and
S-video interfaces provided for
connecting external devices
-
Noise is noticeable due to the screen size and
resolution, and particularly apparent with low definition content. You need to
sit a fair distance away to get away from this
Conclusion
Overall I was very impressed by the performance
of the LP2475W. While default colour accuracy was pretty poor, once calibrated
the screen offered the best colour results we have seen in our reviews. Black
depth was excellent for an IPS matrix, and even out-did many PVA matrices we
have tested! These were very positive improvements for IPS technology, and
hopefully this is a sign of things to come. The screens massive range of
ergonomic adjustments and interfaces was also nice to see, and the HP had a
very "Dell feel" in terms of finish, functionality and features.
Responsiveness was very good, but there was some slight RTC overshoot which
caused some dark artefacts in practice. However, the decent pixel
responsivenss, combined with pretty good input lag, could make this a good
screen for gamers, as well as those wanting an excellent all round performer.
If you want a 24" monitor, this is a hard one to beat in my opinion. Given the
extreme lack of IPS in this sector, HP are probably on to a winner here.
|
Pros |
Cons |
|
Excellent colour accuracy once
calibration |
Poor default colour accuracy |
|
Excellent black depth,
especially for an IPS panel |
Some RTC overshoot causing
some slight inverse trailing |
|
Very wide range of interface
and ergonomic options |
Couple of missing features
such as D-sub interface and A-TW polarizer |
|
|
|


