Dell Alienware AW2721D

Introduction
Dell’s Alienware line-up of displays has become very popular in the last few years. We have recently reviewed the largest model in their Alienware range, the new 37.5″ ultrawide AW3821DW, and we have with us now their latest 27″ offering, the AW2721D. This model features a 2560 x 1440 resolution, that should be very familiar to 27″ monitor users, but this time combined with a native 240Hz refresh rate – something that has until very recently been limited to only 1080p IPS displays. This will be the first 1440p @ 240Hz IPS panel we’ve had chance to test, and a few screens with this spec are now starting to appear in the market. Dell have also made use of the still-popular and beneficial NVIDIA G-sync hardware module (“Native G-sync”) for the AW2721D, offering reliable and verified variable refresh rate (VRR) performance, variable overdrive to control response times nicely and super low input lag. The screen has actually even been awarded the ‘NVIDIA G-sync Ultimate’ certification, which is their top tier level, although something that has recently been relaxed it seems. We will talk a bit more about that later in the review. For gaming the screen also offers a 1ms G2G response time spec, although they do stipulate that is in the ‘extreme’ mode so we will see how that really performs later.
Other interesting features of the AW2721D include the VESA DisplayHDR 600 certification which necessitates some form of backlight local dimming, a wide colour gamut (98% DCI-P3 coverage is quoted) and 10-bit colour depth support for HDR content. The screen has a distinctive Alienware design including their RGB ‘AlienFX’ lighting system.

If you enjoy our work and want to say thanks, donations to the site are very welcome. If you would like to get early access to future reviews please consider becoming a TFT Central supporter.
| Check Availability and Pricing – Affiliate Links |
|---|
| Amazon |
| TFTCentral is a participant in the Amazon Services LLC Associates Programme, an affiliate advertising programme designed to provide a means for sites to earn advertising fees by advertising and linking to Amazon.com, Amazon.co.uk, Amazon.de, Amazon.ca and other Amazon stores worldwide. We also participate in a similar scheme for Overclockers.co.uk. |

Specifications and Features
The following table gives detailed information about the specs of the screen as advertised:

Design and Ergonomics


The AW2721D comes in black (front and edges) and white (stand and rear enclosure) design and has a 4-side “borderless” panel. There is a thin 2mm black plastic edge along the top and sides, with an additional 3.5mm black panel border before the image starts (total edge is 5.5mm). This provides a nice thin border overall for multi-screen setups if needed. Along the bottom edge is the same thin 2mm matte black plastic bezel, with a slightly thicker 8mm black panel border before the image starts (total edge approx 10mm). This bottom edge slopes away from you so is actually a little thicker but out of your line of sight. There are no label, markings or logos on the front of the screen anywhere.
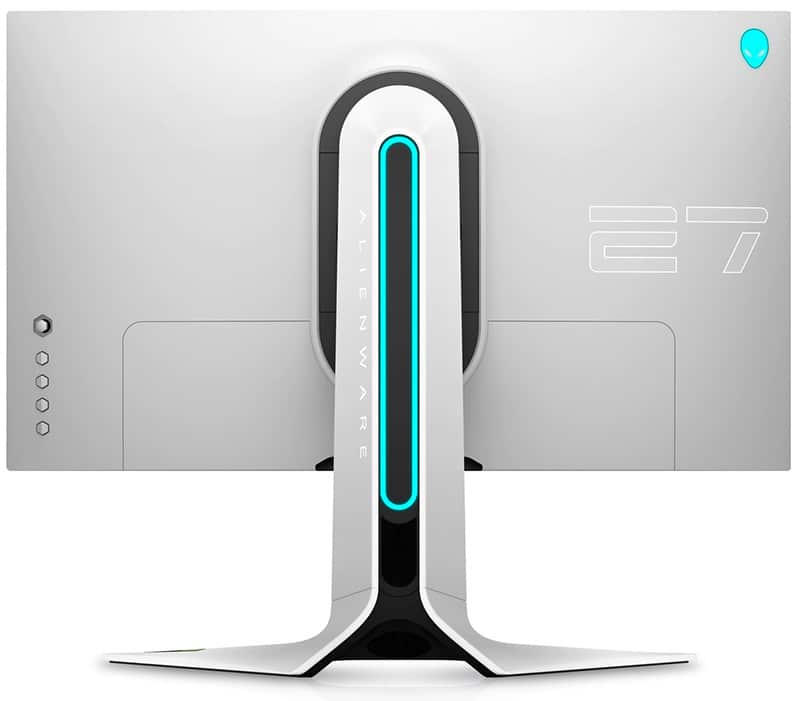
The back of the screen is encased in a matte white plastic which looks attractive and provides something different that stands out relative to all the usual black screens on the market. The stand connects in the middle and can be removed for VESA 100mm mounting if you’d prefer. You can also notice the built in cable tidy hole on the back of the stand here in the black central section.
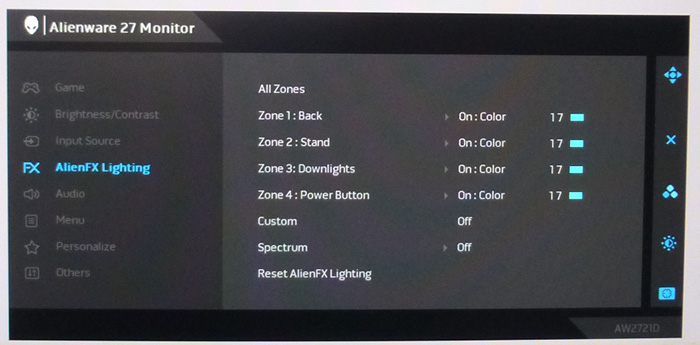
There is an RGB lighting system built in to the back of the stand as shown in the pictures and a small alien logo in the top right corner as well. There is also a small “down-lighting” strip on the bottom of the front edge of the screen, which you can see from the front view pictures above. All of these lighting sections along with the power LED (bottom right hand edge of the screen) can be controlled via the OSD menu individually or additional Dell AlienFX software utility. There is a wide range of colours and settings to choose from. It’s not the kind of RGB lighting system that will provide any major bias lighting projection for your setup or underneath the screen, they are a bit more subtle than some others available. But they do look pretty cool if you can see them where your screen is positioned. The bottom bezel is also touch sensitive to turn the down-lighting strip on/off which is neat.
There is an integrated cooling fan in this model given the use of the Native G-sync module v2.2, but you can only really hear this if you put your ear up to the top/back of the screen or have a super-quiet room. It remained quiet during all our testing.


The screen has a thick stand as shown above but it is also very strong and stable. The stand offers a full range of tilt, height, swivel and rotate adjustments. Tilt adjustment is smooth but quite stiff to operate, but it does provide a wide adjustment range. Height adjustment is also smooth and a bit easier to move. At the lowest adjustment the bottom edge of the screen sits low, being 70mm above the desk edge. At maximum extension it is 200mm and so a total 130mm adjustment range is provided here and it allows a good range of positions. Side to side swivel is smooth and easy to move as is the rotation function to switch from landscape to portrait orientation. The screen remains very stable when making adjustments with minor wobble thanks to the sturdy and strong stand design, despite the large panel size.
A summary of the ergonomic adjustments are shown below:

The materials were of a very good standard and the build quality felt solid. The whole screen remained cool even during prolonged use.
The AW2721D offers a reasonable range of connectivity with 1x DisplayPort 1.4 and 2 x HDMI 2.0 offered for video connections. There is no HDMI 2.1 offered, and that has yet to be used on any available desktop monitor. Although it’s interesting to note that this screen uses a Native G-sync hardware module and until now the “v2” module has been limited to a single DP 1.4 and single HDMI 2.0. NVIDIA haven’t yet added HDMI 2.1 support, but it’s interesting to see a second HDMI 2.0 port is now available. We refer to this as the v2.2 module to make that distinction.


The ports are located on the back underside of the screen along with an audio output and 1x USB upstream / 2x USB downstream ports. There are also an additional 2x USB 3.2 ports (1 with fast charging support) and a headphone connection located on the bottom front edge of the screen for easier access which is a nice feature. For PC connectivity the DisplayPort is the most common option and required to support the maximum resolution and refresh rate of the screen, with HDMI being available then for connecting external games consoles or Blu-ray players potentially. At native resolution the HDMI 2.0 connection can support a maximum 144Hz refresh rate. The screen has an internal power supply and the screen also comes packaged with a standard kettle lead power cable.
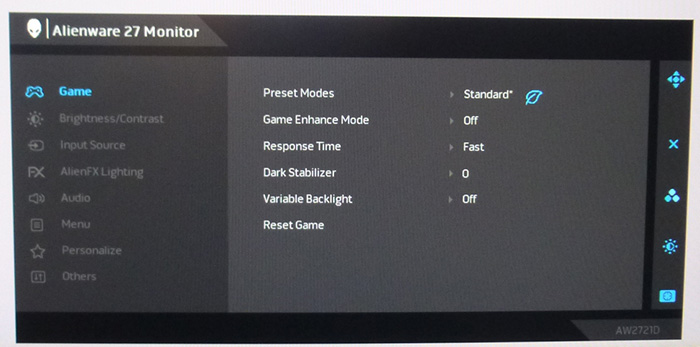
The OSD menu is identical to the AW3821DW and is controlled primarily via a joystick control on the back right hand side of the screen (when viewed from the front). There are also a couple of pressable buttons that give quick access to the preset mode, brightness/contrast and Black Stabilizer options by defaults. These can also be configured to give quick access to other controls via the main menu too. When you press any button you also get a confirmation of a few key settings as shown in the top image above. The OSD menu itself is then split in to 8 sections and each contains a modest range of options and settings. Navigation was quick, easy and intuitive thanks to the joystick which was good, although we felt some of the normal colour-related controls were a bit lacking. For instance there’s no gamma or colour temperature modes beyond just a cool and warm preset, and no blue light filter modes either just a specific ‘ComfortView’ mode.
Panel and Backlighting

It should be noted that while the screen supports a 10-bit colour depth, this is only actually available at some refresh rates due to the limitations of the DisplayPort 1.4 interface used. You can select 10-bit colour depth from your graphics card for (natively available) refresh rates up to and including 144Hz. For refresh rates of 200Hz and the maximum 240Hz you are restricted to 8-bit colour depth. This may not even be an issue depending on whether you have a game that supports 10-bit and whether you’re able to even reach 240fps.

Confirmation of flicker free backlight operation, shown above at calibrated brightness level. Horizontal scale = 5ms
Brightness and Contrast
This section tests the full range of luminance (the brightness of the screen) possible from the backlight, while changing the monitors brightness setting in the OSD menu. This allows us to measure the maximum and minimum adjustment ranges, as well as identify the recommended setting to reach a target of 120 cd/m2 for comfortable day to day use in normal lighting conditions. Some users have specific requirements for a very bright display, while others like a much darker display for night time viewing or in low ambient light conditions. At each brightness level we also measure the contrast ratio produced by the screen when comparing a small white sample vs. a black sample (not unrealistic full screen white vs. full screen black tests). The contrast ratio should remain stable across the adjustment range so we also check that.
Graphics card settings were left at default with no ICC profile or calibration active. Tests were made using an X-rite i1 Display Pro Plus colorimeter. It should be noted that we used the BasICColor calibration software here to record these measurements, and so luminance at default settings may vary a little from the LaCie Blue Eye Pro report you will see in other sections of the review.

At the full brightness setting in the OSD the maximum luminance reached was a very high 502 cd/m2 in SDR mode which was a bit higher than manufacturer quoted spec of 450 cd/m2. There was a very good 460 cd/m2 adjustment range in total, so at the minimum setting you could reach down to a luminance of 43 cd/m2. This was a good adjustment at the lower end, and should allow you a low luminance option for working in darkened room conditions with low ambient light. A setting of 19 in the OSD menu is needed to return you a luminance as close to 120 cd/m2 as possible at default settings. Backlight dimming is achieved with a flicker free backlight (no need for PWM) which should avoid eye strain and headaches that PWM screens often cause.
We have plotted the luminance trend on the graph above. The screen behaves as it should in this regard, with a reduction in the luminance output of the screen controlled by the reduction in the OSD brightness setting. This controls a marginally steeper adjustment curve for settings between 100 and 50, and then provides a more subtle adjustment curve below that for more smaller possible adjustments and slightly better control.
The average contrast ratio of the screen was measured at 997:1 out of the box which was good for an IPS-type panel and was basically spot on to the 1000:1 specification.
Testing Methodology

An important thing to consider for most users is how a screen will perform out of the box and with some basic manual adjustments. Since most users won’t have access to hardware colorimeter tools, it is important to understand how the screen is going to perform in terms of colour accuracy for the average user.
We restored our graphics card to default settings and disabled any previously active ICC profiles and gamma corrections. The screen was tested at default factory settings using several devices. This includes the X-rite i1 Pro 2 Spectrophotometer combined with LaCie’s Blue Eye Pro software suite. An X-rite i1 Display Pro Plus colorimeter was also used to verify the black point and contrast ratio since the i1 Pro 2 spectrophotometer is less reliable at the darker end. We also make use of an UPRtek MK550T spectroradiometer and custom tool to accurately calculate gamut coverage and performance. Where necessary this device may also be used for black depth validation if this reaches beyond the limit of the i1 Display Pro Plus.
Targets and explanations for these tests are as follows:
- CIE Diagram – confirms the CIE-1976 colour space covered by the monitors backlighting in a 2D view, with the white triangle representing the displays gamut, and other reference colour spaces shown for comparison as labelled. Usually shown as a comparison against the common sRGB space.
- Colour space coverage volumes – using a special calculation tool we can input the u’/v’ colour coordinates for the RGB primaries and from there calculate the colour space (gamut) volumes produced by the backlight. This is calculated relative to the sRGB, DCI-P3, Adobe RGB and Rec.2020 colour spaces. We calculate the absolute coverage of the reference space, and then also provide a “relative” coverage for situations where it might extend some way beyond that reference. sRGB is the most commonly used colour space so it is important to have a decent coverage from the screen here. If the colour space is >100% sRGB then the screen can produce a wider colour gamut, often reaching further in to the wide gamut DCI-P3 (commonly used for HDR), Adobe RGB (commonly used for production) and Rec.2020 reference spaces
- Gamma – we aim for 2.2 which is the default for computer monitors
- Colour temperature / white point – we aim for 6500k which is the temperature of daylight
- Luminance – we aim for 120 cd/m2, which is the recommended luminance for LCD monitors in normal lighting conditions
- Black depth – we aim for as low as possible to maximise shadow detail and to offer us the best contrast ratio
- Contrast ratio (static) – we aim for as high as possible. Any dynamic contrast ratio controls are turned off here if present
- dE average / maximum – we aim for as low as possible. If DeltaE >3, the color displayed is significantly different from the theoretical one, meaning that the difference will be perceptible to the viewer. If DeltaE <2, LaCie considers the calibration a success; there remains a slight difference, but it is barely undetectable. If DeltaE < 1, the color fidelity is excellent.
Default Performance and Setup

We made sure that the ambient light sensor and backlight local dimming were turned off from within the OSD menu for these tests. Initially out of the box the screen was set in the ‘standard’ preset mode. The display was set with a moderate 50% brightness which was a bit too bright for general use but not too eye-scorching. As with most displays will need to turn it down though. Colours looked vivid thanks to the wide gamut backlight, particularly in reds but the colour balance and temperature felt pretty good. We went ahead and measured the default state with our testing equipment.
The CIE-1976 diagram in the middle section confirms that the monitors colour gamut (white triangle) extends a significant way beyond the sRGB reference space (maroon coloured triangle), mostly in green and particularly red shades. We measured using our newly updated more accurate methods a 99.5% absolute coverage of the sRGB space, leaving a tiny part of the colour space not quite met although this is so minor as to not be any issue at all. If we were comparing the colour space relative to a standard gamut screen then actually the colour space corresponds to about 132.5% of the sRGB reference, very close to Dell’s listed 131.3% coverage. The screen also covers 97.0% of the DCI-P3 reference, slightly under than the 98% spec, and it stretches beyond that space a bit in some areas (see below) giving rise to the 105.7% relative coverage measurement.

There is oddly no sRGB emulation mode available on this screen which is a strange omission, and we’d seen the same from the 37.5″ ultrawide AW3821DW model too. That means that there is no way to reduce the colour gamut to the more common colour space in a simple way. So if you wanted to specifically work with smaller standard gamut content or prevent some of the saturated appearance you will have difficulty away from a colour managed workflow. We should say thought that the wider gamut here does provide more vivid colours is nice for gaming and multimedia which is the screen’s primary target usage anyway. But we’re not really sure why Dell didn’t include an sRGB mode as well for those who might want to use it for general uses.
Default gamma was recorded at a 2.3 average with a small 6% deviance from the target of 2.2 which was ok. Thankfully this was fairly well set up as there are no gamma controls available in the OSD menu at all. The default colour temperature was quite good at 6269k, being a little too warm at default settings. Thankfully you can switch to other modes like the ‘custom color’ preset where you have access to the RGB channels and can correct this easily.
Luminance at the default 50% brightness level was recorded at 226 cd/m2 which was too high for prolonged general use, you will want to turn that down to something more comfortable. The black depth was measured at 0.23 cd/m2 at this default brightness setting, giving us a decent 976:1 contrast ratio for an IPS panel and very close to the spec of 1000:1. Colour accuracy measurements should be ignored here as they are comparing the produced wider gamut display colours against an sRGB reference which will always lead to errors. There was no sign of any colour banding at default settings when testing gradients which was good news, and smooth gradation across the range.
Optimal Settings Pre-Calibration
We also measured the screen after adjusting only the OSD controls, to obtain the optimal setup without a full calibration, and without the use of an ICC correction profile. This represents what could be achieved through just simple changes to the monitor itself, and also what you could expect when working with content outside of an ICC profile managed workflow. The early stages of our calibration software helped identity these optimal OSD settings.
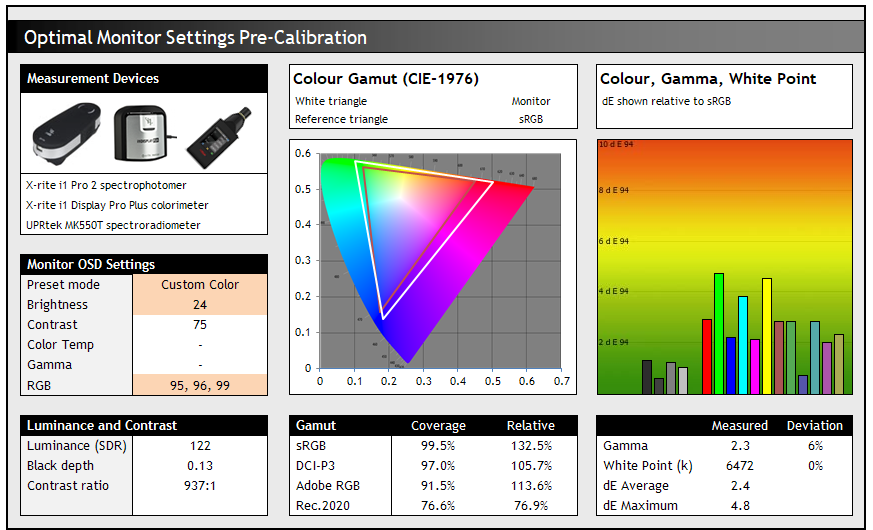
For this section we switched to the ‘Custom Color’ preset mode where we had full access to the RGB controls. Brightness control was also adjusted to make the screen more comfortable. As we said before there is no option to use anything other than the native wide gamut of the screen, and no control over the gamma either from within the OSD menu.
The changes we made to the RGB controls helped produce a balanced white point at 6472k, correcting the small 4% deviance we’d seen at default settings. Thanks to the reduction of the brightness control we had obtained a much more comfortable level. The contrast ratio took a small hit down to 937:1 but remained pretty decent for an IPS panel. These optimal settings helped the screen look a bit better than out of the box, certainly helping with the brightness if nothing else. Further calibration and profiling below can help improve things a bit further.
Calibration
We used the X-rite i1 Pro 2 Spectrophotometer combined with the LaCie Blue Eye Pro software package to achieve these results and reports. An X-rite i1 Display Pro Plus colorimeter was used to validate the black depth and contrast ratios due to lower end limitations of the i1 Pro device.

The OSD settings were adjusted as shown in the table above, as guided during the calibration process and measurements. These OSD changes allowed us to obtain an optimal hardware starting point and setup before software level changes would be made at the graphics card level. We left the LaCie software to calibrate to “max” brightness which would just retain the luminance of whatever brightness we’d set the screen to, and would not in any way try and alter the luminance at the graphics card level, which can reduce contrast ratio. These adjustments before profiling the screen would help preserve tonal values and limit banding issues. After this we let the software carry out the LUT adjustments and create an ICC profile.
The default gamma curve had been pretty good with only a deviation of 6% which was corrected nicely here after profiling. The white point was maintained at the accurate 6517k (0% deviance) after we had found the optimal RGB settings in the previous section. The brightness control adjustment had reduced the luminance to a comfortable level now and contrast ratio remained pretty good at 939:1, although a little below the spec of 1000:1. Colour accuracy of the resulting profile was very good, with dE average of 0.2 and maximum of 0.4 which is considered excellent colour fidelity overall. Gradients remained mostly smooth with only a little banding introduced in darker tones from the profile and gamma corrections at a graphics card level.
You can use our settings and try our calibrated ICC profile if you wish, which are available in our ICC profile database. Keep in mind that results will vary from one screen to another and from one computer / graphics card to another.
Setup Comparisons
The comparisons made in this section try to give you a better view of how each screen performs, particularly out of the box which is what is going to matter to most consumers. We have divided the table up by panel technology as well to make it easier to compare similar models. When comparing the default factory settings for each monitor it is important to take into account several measurement areas – gamma, white point and colour accuracy. There’s no point having a low dE colour accuracy figure if the gamma curve is way off for instance. A good factory calibration requires all 3 to be well set up. We have deliberately not included luminance in this comparison since this is normally far too high by default on every screen. However, that is very easily controlled through the brightness setting (on most screens) and should not impact the other areas being measured anyway. It is easy enough to obtain a suitable luminance for your working conditions and individual preferences, but a reliable factory setup in gamma, white point and colour accuracy is important and some (gamma especially) are not as easy to change accurately without a calibration tool.
From these comparisons we can also compare the calibrated colour accuracy, black depth and contrast ratio. After a calibration the gamma, white point and luminance should all be at their desired targets.


Default setup of the screen out of the box was fairly good overall with a pretty good gamma and only a small deviance in the white point that is easy to correct with some simple OSD changes. We would have liked a slightly better gamma curve given there are no gamma options or settings available on the screen in the OSD menu. The screen offered a wide colour gamut with good DCI-P3 coverage as quoted although it was a shame that there is no sRGB emulation mode available. Calibrated contrast ratio was ok, but a bit lower than some modern IPS panels can reach (1100 – 1300:1 even nowadays), and certainly a lot lower than any VA panel can offer (2500 – 3000:1 being common). It was actually identical to the result we obtained from the 37.5″ AW3821DW model.
| Check Availability and Pricing – Affiliate Links |
|---|
| Amazon |
| TFTCentral is a participant in the Amazon Services LLC Associates Programme, an affiliate advertising programme designed to provide a means for sites to earn advertising fees by advertising and linking to Amazon.com, Amazon.co.uk, Amazon.de, Amazon.ca and other Amazon stores worldwide. We also participate in a similar scheme for Overclockers.co.uk. |
Viewing Angles

Viewing angles of the screen were very good as you would expect from an IPS panel. Horizontally there was very little colour tone shift until wide angles past about 45°. A slight darkening of the image occurred horizontally from wider angles as you can see above as the contrast shifted slighting. Contrast shifts were slightly more noticeable in the vertical field but overall they were very good. The screen offered the wide viewing angles of IPS technology and was free from the restrictive fields of view of TN Film panels, especially in the vertical plane. It was also free of the off-centre contrast shift you see from VA panels and a lot of the quite obvious gamma and colour tone shift you see from some of the modern VA panel type offerings.

On a black image there is a characteristic pale glow introduced to the image when viewed from a wide angle, commonly referred to as “IPS glow”. This type of glow is common on most modern IPS-type panels and can be distracting to some users. If you view dark content from a normal head-on viewing position, you may see this glow as your eyes look towards the edges of the screen. The level of glow on this panel was a little more pink/purple in colour in these photos than some other IPS panels we’ve tested like the larger AW3821DW model where it was a bit more white, but it still remained fairly typical for an IPS-type panel.
This type of glow is common on most modern IPS-type panels and can be distracting to some users. If you view dark content from a normal head-on viewing position, you may see this glow as your eyes look towards the edges of the screen depending on your viewing position. It will also be more noticeable in darker ambient light conditions and if you’re viewing a lot of dark content. Some people may find this problematic if they are playing a lot of darker games or watching darker movies. In normal day to day uses you couldn’t really notice this unless you were viewing darker content. If you move your viewing position back, which is probably likely for movies and games keep in mind, the effect reduces as you do not have such an extreme angle from your eye position to the screen edges.
Panel Uniformity
We wanted to test here how uniform the brightness was across the screen, as well as identify any leakage from the backlight in dark lighting conditions. Measurements of the luminance were taken at 35 points across the panel on a pure white background. The measurements for luminance were taken using BasICColor’s calibration software package, combined with an X-rite i1 Display Pro colorimeter with a central point on the screen calibrated to 120 cd/m2. The below uniformity diagram shows the difference, as a percentage, between the measurement recorded at each point on the screen, as compared with the central reference point.
It is worth noting that panel uniformity can vary from one screen to another, and can depend on manufacturing lines, screen transport and other local factors. This is only a guide of the uniformity of the sample screen we have for review.

Luminance uniformity of the screen was mediocre on our sample, with only 51% of the screen within a 10% deviance of the centrally calibrated area which was not great. The lower area and particularly in the bottom left hand corner showed a fairly significant drop in luminance down to 93 cd/m2 in the most extreme example (-29% deviance). Results may vary of course from one sample to another. This still shouldn’t present any major problems for gaming or multimedia, or day to day usage, but could be an issue for colour critical or photo work if you wanted to do any.
We also tested the screen with an all black image and in a darkened room. A camera was used to capture the result. There were a couple of areas where the backlight shone through a bit more brightly in the lower corners, particularly in the bottom right, but they were hard to see in normal usage.
Note: if you want to test your own screen for backlight bleed and uniformity problems at any point you need to ensure you have suitable testing conditions. Set the monitor to a sensible day to day brightness level, preferably as close to 120 cd/m2 as you can get it (our tests are once the screen is calibrated to this luminance). Don’t just take a photo at the default brightness which is almost always far too high and not a realistic usage condition. You need to take the photo from about 1.5 – 2m back to avoid capturing viewing angle characteristics, especially on IPS-type panels where off-angle glow can come in to play easily. Photos should be taken in a darkened room at a shutter speed which captures what you see reliably and doesn’t over-expose the image. A shutter speed of 1/8 second will probably be suitable for this.
General and Office Applications
This screen features a 2560 x 1440 WQHD resolution, a significant step up from the wide range of 1920 x 1080 screens on the market and a comfortable resolution for this size screen we feel. Nearly all the 240Hz refresh rate screens in all panel technologies released to date have been limited to 1080p, so it was great to see something more offered here. This is the first 1440p IPS 240Hz display we’ve had chance to test and it was great not to have to drop to 1080p to get this high refresh rate.
These higher resolution 27″ models offer a tighter pixel pitch of 0.233mm which results in a smaller text size than common 24″ 1080p screens, although it is still a nice and comfortable size. We are very used to working with 27″ 1440p screens all the time and find them very comfortable and a significant upgrade over 1080 / 1200p models. The extra screen size takes some getting used to over a few days as there really is a lot of room to work with but once you do, it’s excellent. For those wanting a high resolution for CAD, design, photo work etc, this is a really good option. The image was very sharp and crisp and text was very clear. With its WQHD display, you enjoy 77% more desktop space than a full HD screen to spread out your windows and palettes.
The light AG coating of the panel is welcome, and much better than the grainy and dirty appearance of older IPS AG coatings. The wide viewing angles provided by this panel technology on both horizontal and vertical planes, helps minimize on-screen colour shift when viewed from different angles.
The out of the box setup was fairly good overall and offered a pretty good gamma with only a small deviance from the target. This was good news as there’s no gamma controls available in the OSD menu. The white point needs some minor correction as it’s a bit too warm, but that’s easy to do. The screen operates with a wide gamut and unfortunately there is no sRGB emulation mode available on this display. This means that if you want to work specifically with standard gamut content outside of a colour managed workflow you might have some issues, and will have to live with the wider gamut and more saturated colours.
The brightness range of the screen was good, with the ability to offer a luminance between 502 and 43 cd/m2 even in SDR mode. This gives you flexibility even in darker room conditions and low ambient light conditions. A setting of 19 in the OSD brightness control should return you a luminance close to 120 cd/m2 out of the box. The brightness regulation is controlled via a flicker free backlight, without the need for Pulse Width Modulation (PWM), and so those who suffer from eye fatigue or headaches associated with flickering backlights need not worry. There is an ambient light sensor integrated in to the screen that might be useful if you want the backlight to be controlled dynamically depending on your room and lighting conditions.
There was no audible buzzing from the screen, even when conducting specific tests which can sometimes cause issues. There is an integrated fan in this model given the use of the Native G-sync module v2.2, but you can only really hear this if you put your ear up to the top/back of the screen or have a super-quiet room. It remained quiet during all our testing.
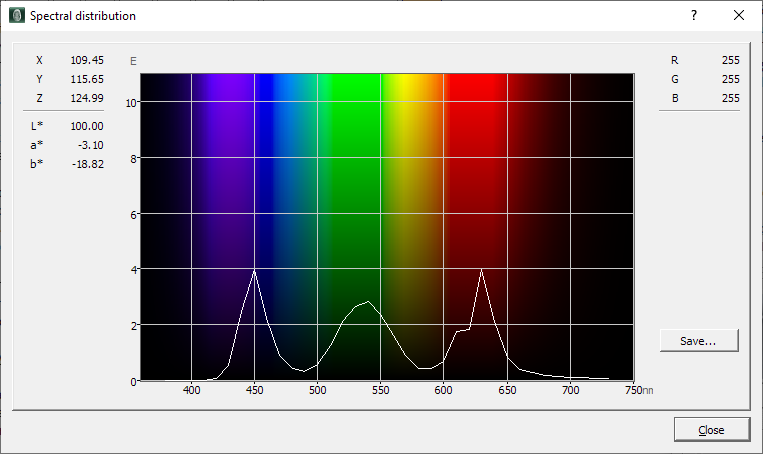
Spectral distribution graph showing calibrated mode at 6500k

Spectral distribution graph in ComfortView preset mode
There are settings no settings for a Low Blue Light filter available in the OSD menu on this display, although there is a ‘ComfortView’ preset mode which is designed to offer such performance. That appears warmer and more yellow than our calibrated custom color mode, and has a warmer white point/colour temperature of 5012k. You can see that this does help reduce the blue spectral output a bit.
There are 2x USB 3.0 ports provided on the back of the screen which are tucked out of the way with the video connections and not very easy to get to. But Dell have also provided an additional 2x ports (1 with fast charging) on the bottom edge of the screen which are much easier to get to. There’s also an easy access headphone port provided here too. There are no other extras like motion sensors or card readers on this screen which are sometimes useful for office-type uses. There is also a good range of adjustments offered overall from the stand which provided a stable and sturdy base, with smooth and easy adjustments.
Gaming

The screen uses overdrive technology to boost pixel transitions across grey to grey changes as with nearly all modern displays. The part being used is an LG.Display LM270WQB Nano IPS technology panel. Have a read about response time in our specs section if you need additional information about this measurement. Our thanks to NVIDIA for hooking us up with an RTX 3090 for all our testing.
| Check Pricing and Buy – Affiliate Links |
 NVIDIA RTX30 Series graphics cards: Amazon and Overclockers UK |
| TFTCentral is a participant in the Amazon Services LLC Associates Programme, an affiliate advertising programme designed to provide a means for sites to earn advertising fees by advertising and linking to Amazon.com, Amazon.co.uk, Amazon.de, Amazon.ca and other Amazon stores worldwide. We also participate in a similar scheme for Overclockers.co.uk. |
Response Times
We use an ETC M526 oscilloscope for these measurements along with a custom photosensor device. Have a read of our response time measurement article for a full explanation of the testing methodology and reported data.


We first of all carried out some response time measurements at the maximum 240Hz refresh rate. Through some visual tests we were quickly able to determine that the ‘Fast’ mode provides the optimal performance and looks the best with no noticeable overshoot in practice. Like the 37.5″ AW3821DW we tested recently, we spotted an oddity with the response time control in the OSD in that when you enable each mode, you actually have to exit the OSD fully for it to become active, but it was easy to see once you had the difference each mode made.
In the ‘Fast’ mode we measured a 4.2ms G2G average from this small sample set of measurements with overshoot measured at all from these specific measurements (see later for more detailed measurements in the Fast mode). Motion clarity was very good thanks to the very high 240Hz refresh rate as well. Pushing up to the ‘super fast’ mode improved the measured response times a bit down to 3.3ms G2G, but introduced some fairly noticeable overshoot problems, and you could start to see some pale halos appear on moving objects. At the maximum ‘Extreme’ mode pixel transitions were faster and we reached down to 2.9ms G2G average but it was at the cost of some ridiculously high overshoot levels, with obvious and distracting pale halos now a major problem in moving content.
Like with all the other 1ms rated IPS panels we’ve tested to date, this spec has only been achieved in the most extreme conditions and at the expense of major overshoot problems. In fact we measured a best-case 0.8ms G2G in the maximum ‘Extreme’ overdrive mode. Obviously this 1ms G2G spec is complete marketing right now, and is not something achievable in practice at all without serious side-effects. There’s no denying that the panel is fast anyway, even in the more modest and sensible ‘Fast’ mode, and we don’t want to take anything away from it’s performance in what we consider the optimal mode as it’s very impressive. We’d have rather Dell had stuck with a more traditional response time spec like 4 ms G2G and delivered a great performance in that range, than push unrealistic and unachievable marketing figures that don’t live up to the hype. I suppose at least they do bother to list the 4ms G2G figure as well in their detailed spec table for the Fast mode, but the general marketing is focused on it being a 1ms panel, which it isn’t really in any practical, usable sense.
Stick with the ‘Fast’ mode for optimal performance here. You can see the motion clarity and captured overshoot levels in each mode below in our pursuit camera photos, which are designed to capture the motion as the human eye would see it. These were taken at 240Hz which does provide some nice motion clarity benefits relative to 120/144Hz screens. See later in this section for some comparisons against the AW3821DW (at 144Hz).

Above: pursuit camera test capturing real perceived motion clarity at 240Hz in each Response Time mode
Refresh Rate

The AW2721D can support variable refresh rates from both AMD FreeSync and NVIDIA G-sync systems. Despite being a Native G-sync screen with their added hardware module we confirmed that it can be used for FreeSync from an AMD graphics card over DisplayPort, as it includes the latest firmware that allows this. G-sync also works over HDMI if for some reason you want to connect a PC via that connection, but importantly it does not offer FreeSync over HDMI though unfortunately which could have been useful for console VRR support. The VRR range supported is between 1 and 240Hz thanks to the G-sync module.
The support for G-sync and FreeSync will be very useful given the significant system demands of running a screen at such a high 1440p resolution and at high refresh rate up to 240Hz. It was of course very good to see it included here. You might also want to read our detailed article about Variable Refresh Rates here for more information.
This is the first 1440p resolution 240Hz IPS screen we have tested, and this separates it from all the previous 1080p models we’ve tested in this bracket. The added resolution is a significant upgrade, and helps make the screen far more suited to general uses, office work etc too. It provides a sharper and crisper image and enhances the detail and clarity in gaming nicely. No longer do you have to sacrifice resolution from 1440p down to 1080p on a 27″ model to reach 240Hz refresh rates, you can have the best of both worlds.
| Refresh Rate (using DisplayPort) | Colour Bit Depth Supported | Colour Range |
| 144Hz and below | 10-bit | Full RGB |
| Native maximum 240Hz | 8-bit | Full RGB |
We should also touch on the colour depth support here when considering different refresh rates. There is only enough bandwidth from the DP 1.4 connection to power the screen at 2560 x 1440 resolution and up to 144Hz with 10-bit colour depth. So if 10-bit is a specific requirement for your content and it supports 10-bit colour depth, then you may want to stick to a max 144Hz. For anything higher including the full 240Hz support you need to drop to 8-bit colour depth but do not need to move away from full RGB/4:4:4 chroma which is good news. To be honest we expect this need to use 8-bit colour depth to not be noticeable in any way to most normal people. In fact finding suitable 10-bit content and having the relevant support end to end is difficult, and so many people won’t even need to worry about it.
G-sync Ultimate
We will largely repeat what we said recently in our Dell Alienware AW3821DW review in this section.
The screen includes a Native G-sync hardware module which is in fact a slightly updated revision of what we refer to as the “v2 module”. The v2 module includes DisplayPort 1.4 and HDMI 2.0 connections and allows support for high bandwidths of modern displays at high resolutions and refresh rates. We’ve seen the v2 module used in a fair few screens to date, including most recently in our reviews from the 24.5″ sized Asus ROG Swift 360Hz PG259QN. What makes this slightly different on the AW2721D is that the module now supports a second HDMI 2.0 port as well, with previous generations being limited to just a single HDMI. It’s not a major step change in the module as it doesn’t yet support anything like HDMI 2.1 or DisplayPort 2.0 for instance, so we will refer to this as v2.2 for now.
Anyway, the screen features a Native G-sync hardware module, but what about the ‘G-sync Ultimate’ certification? This is an area that has caused a bit of confusion recently as NVIDIA seem to have relaxed their criteria for this certification level. Below is the original classification of G-sync Ultimate from NVIDIA.com:

Above: original G-sync Ultimate criteria up until end of 2020
As you can see, the original criteria for G-sync Ultimate is largely linked to HDR capabilities and includes “1000 nits peak brightness” and a “multi-zone backlight”. That was quite specifically called out in the requirements and listed on their website until around the end of 2020. However, now their website says:

Above: new 2021 G-sync Ultimate description with more general and relaxed criteria
So now the criteria have been made a little less specific and now requires the more general “lifelike HDR”. They don’t specify that a multi-zone backlight is needed any more either, although perhaps that is implied. What exactly constitutes “lifelike” is very much open to debate, and some would argue that you may never achieve proper HDR performance from a display without per-pixel level dimming, such as that which is offered from OLED technology. NVIDIA have said that the reason for the change is that displays like OLED can deliver infinite contrast and exceptional HDR performance, even though they may only reach 600 – 700 nits brightness peak, so the 1000 nits rule is no longer really applicable. That’s a bit confusing in itself. The theory makes sense but in reality it’s currently irrelevant.
OLED display HDR capabilities only really applies in the TV space right now. NVIDIA do have some OLED TV’s that support G-sync, such as the LG CX OLED we reviewed, but none of these feature a Native G-sync hardware module – which is listed still as a requirement where it “features the top NVIDIA G-sync processors”. So right now this ‘G-sync Ultimate’ certification is pointless in the TV space and with any OLED display anyway as there are none that feature a G-sync module, AND are OLED. G-sync Compatible is currently all that is available in the OLED TV space. So lowering the requirements because of OLED seems a little confused.
In the desktop space this also leaves some confusion. Previously you needed 1000 nits peak brightness and a G-sync module, which really until now was only possible from the true high-end HDR options in the LCD market with the FALD (Full Array Local Dimming) and newer Mini LED backlight models like the Asus ROG Swift PG27UQ or PG35VQ (both FALD) for instance. Any screen until now that had a G-sync module and reached 1000 nits peak brightness features these kind of backlights and so this did help provide some “elite” classification and justify the ‘G-sync Ultimate’ badge. These truly did offer the best HDR capabilities currently available from LCD monitors. Note that you will see some other screens with 1000 nits peak brightness without using FALD/Mini LED backlights, but those do not feature the G-sync module (e.g. Samsung G9 49″ display).
But now that this criteria has been relaxed and you no longer need 1000 nits, that opens the door to more widespread use (abuse?) of the G-sync Ultimate certification for lesser quality displays. The Dell Alienware AW2721D features a more basic multi-zone backlight that we will talk about later on in more detail, but only delivers HDR 600 levels with 600 nits+ peak brightness. The peak brightness is not really the issue and it’s true you don’t necessarily need 1000 nits+ to have a good HDR experience, but now the certification allows for screens with far fewer dimming zones, and potentially (by the letter of their description) no dimming zones at all! With far fewer dimming zones being offered on the AW2721D for instance the HDR experience is not as good as you’d get from a FALD backlight, and whether or not you’d call it “lifelike HDR” is very debatable.

What we think is probably happening here really is that the G-sync naming conventions have become very confused of late and NVIDIA want to try and bring back in the distinctions to promote true G-sync module displays. Originally it was supposed to be in simple terms:
- “G-sync” = a screen with Native G-sync module
- “G-sync Ultimate” (aka “G-sync HDR”) = a screen with Native G-sync module and top-end HDR (1000 nits, FALD or better backlights)
- “G-Sync Compatible” = a screen with normal adaptive-sync (FreeSync), where it can be used from later generation NVIDIA graphics cards and has passed a range of tests to certify the VRR experience, VRR range etc. It lacks the G-sync module and so might not offer other benefits like variable overdrive or super low lag, but should perform well for variable refresh rates.
What then happened is you had a wide range of different uses of these terms from display manufacturers and the meanings became blurred. The term “G-sync” is used widely and more generically to mean a screen that supports G-sync from an NVIDIA graphics card. It doesn’t necessarily mean the screen featured a Native G-sync module, they just mean you can use the G-sync option from your graphics card. You will see loads of screens that are adaptive-sync screens list G-sync as a feature, often without talking about AMD FreeSync even which was the original use for adaptive-sync. This doesn’t mean it features a G-sync module, it doesn’t even mean NVIDIA have certified it as good, it just means you can turn on and use G-sync. It might be rubbish and VRR performance could be poor, but it still supports it. The only real way to know if a screen listed as supporting G-sync has a hardware module is to see if NVIDIA list it on their website under the “G-sync” section, or confirm via reliable review/news sites.
So with the “G-sync” classification becoming very murky and confusing, what we believe is happening here is a move from NVIDIA to perhaps 2 simpler tiers. They need a way to separate the true Native G-sync hardware module displays again. 1) “G-sync Compatible” will continue to be for any adaptive-sync display certified by NVIDIA as offering decent VRR, as it is today. Then 2) “G-sync Ultimate” would be used to distinguish any display with a Native G-sync module moving forward. The generic term “G-sync” can then be widely used and abused to just mean it will support G-sync in some way as it has become already. In this way, the G-sync Ultimate badge is used for all future G-sync module screens, and the fact that all those modern screens that bother to include the expensive module will almost certainly offer HDR in some so-say “lifelike” way helps meet the new criteria. We expect many will conform to HDR 600 levels which then require multi zone local dimming backlights, wide colour gamut and 10-bit colour depth as well. Although note that the new G-sync Ultimate criteria doesn’t actually list a multi-zone backlight any more anyway. We hope though that the badge will still be used with at least HDR 600 level screens, and not start to be used for poor meaningless HDR 400 options. If a display manufacturer wants to invest in using the G-sync module and wants to market it in a clear way then to earn that G-sync Ultimate badge we think it should require at least mid-level HDR still.
Response Times and Refresh Rate
There’s various things you need to consider when it comes to response times and gaming, particularly on a display with high refresh rate support. Gaming screens invariably give you a control for the overdrive impulse in the OSD menu which can help you tweak things, but response time performance and overshoot levels can vary depending on the active refresh rate. This behaviour is often different depending on whether the screen is a traditional G-sync screens (with hardware module) or whether it’s an adaptive-sync screen as well, and not all screens behave in the same way. We always try to test each variable in our reviews but the key considerations you need to make are:
- Performance at 60Hz – this is important if you want to use an external games console (or other device like a Blu-ray player etc) which typically run at 60Hz. Response time performance may well be different than at the higher refresh rates supported, and you may need a different overdrive setting for optimal experience.
- Performance during VRR (Variable Refresh Rate) – bearing in mind that the refresh rate will fluctuate anywhere from 1Hz up to the maximum supported by the screen (e.g. 1 – 144Hz on a 144Hz display). It’s important to understand if the response times and overshoot will vary as the refresh rate changes. There may be a need to switch between different overdrive settings in some cases, depending on your usually attained refresh rate output and graphics card capability. This can sometimes become fiddly if your refresh rates fluctuate a lot, especially between different games, so it’s always easier if you can leave a display on a single overdrive setting which is suited to the whole range. Some screens also feature “variable overdrive” which helps control the response times and overshoot depending on the active refresh rate. This is particularly apparent with traditional G-sync module screens.
- Performance at fixed refresh rates including maximum – this is important for those who have a powerful enough system to consistently output a frame rate to meet the max refresh rate capability of the screen. They may want to run at max refresh rate without VRR active, or even is VRR is active they may know they will be consistently at the upper end of the range. Many gaming screens show their optimal response time performance at the maximum refresh rate. Knowing the performance at high fixed refresh rates may also be applicable if you want to use any added blur reduction backlight which typically operate at a fixed refresh rate.
- Whether the response times can keep up with the frame rate – you will also want to consider whether the response times of the panel can consistently keep up with the frame rate. For instance a 144Hz screen sends a new frame to the display every 6.94ms, so the pixel response times need to ideally be consistently and reliably under this threshold. If they are too slow, it can lead to added blurring in practice and sometimes make the higher refresh rates unusable in real life. We consider this in our analysis.


We measured the response times in the optimal ‘Fast’ mode across a range of refresh rates. Natively the screen has timings for 60, 100, 120, 144, 200 and 240Hz. You can see here that the response times were slowed a little as the refresh rate was reduced, for instance from 4.2ms G2G at the maximum 240Hz down to 5.7ms G2G at 60Hz. This helped ensure that the overshoot did not become a problem which was great news and is a result of the variable overdrive feature that is offered by the Native G-sync module. This performed well across the refresh rate range and we would recommend sticking with the ‘Fast’ mode for all fixed refresh rates and in VRR situations. Note that there is a slight oddity at 200Hz where the response times were a bit faster than the 240Hz mode but likely only due to the small sample set measured here.
Console Gaming
| Console Gaming | |
| Native panel resolution | 2560 x 1440 |
| Virtual 4K support | |
| Native TV timing modes detected over HDMI | 1080p at 120Hz |
| HDMI connection version | 2.0 |
| FreeSync over HDMI | |
| HDMI-org VRR (over HDMI 2.1) | |
| Display aspect ratio controls | |
| Auto Low Latency Mode (ALLM) |
We will also touch on support for the latest generation games consoles like the PS5 and Xbox Series X. You are limited on this screen to a maximum 1440p output, and unlike some screens this model does not offer Virtual 4K input support. With the PS5 currently lacking 1440p output support that means you can only use 1080p from that console, and the screen will scale it up to fill the 1440p panel resolution. The X box Series X can output at both resolutions but the screen does not have a native TV timing for 1440p, and so it is unclear if that would be recognised by the Xbox Series X or not. Some screens will be recognised by the Xbox Series X as 1440p even without this native TV timing (i.e. where it is included in the ‘PC’ section) but not always. If not, you’d be limited to 1080p again.

Supported “TV timings” of the AW2721D, missing 1440p over HDMI
The screen lacks any hardware aspect ratio controls, although this shouldn’t be any problem for modern consoles as the screen is natively 16:9 aspect ratio anyway. In addition many devices can control their own aspect ratio output anyway, not that it’s needed given the common 16:9 aspect ratio here. The screen has only an HDMI 2.0 input and so cannot support HDMI-org VRR, and unfortunately FreeSync over HDMI is also not supported. This means that neither console will be able to make use of their VRR features on this screen. You can at least output 120Hz at 1080p so you can make use of the high refresh rate capabilities of the latest consoles.
See our How to Buy a Monitor for Playstation 5 or Xbox Series S/X article for more information about this which we will also keep up to date on these elements.
Gaming Summary
| Recommended Settings | |
| Optimal Refresh Rate | 240Hz |
| Optimal Overdrive Setting (for above) | Fast |
| Optimal Overdrive Setting for 60Hz | Fast |
| Optimal Overdrive Setting for VRR | Fast |

We carried out some further response time measurements at 240Hz which is the maximum refresh rate of the screen, and stuck to the ‘Fast’ response time setting. We measured an average 3.6ms G2G response time here which was slightly better than the figure we had from our smaller sample set earlier (4.2ms G2G). There was a bit of overshoot on some transitions but this was not noticeable in practice at all. We would rate the overshoot as ‘good’ overall, and shouldn’t lead to any problems in real use. This was slightly less overshoot than on the AW3821DW incidentally, despite the response times being pushed slightly faster here to keep up with the higher refresh rate. The ‘super-fast’ response time mode was too aggressive and produces some noticeable pale halos. ‘Extreme’ mode should be avoided!
Thanks to the variable overdrive feature the response times are slowed a little as the refresh rate drops in order to limit any significant overshoot problems. That seemed to work well. This was a very good performance from the AW2721D with fast response times and excellent motion clarity thanks to the very high refresh rate. We should also mention here that there is no blur reduction mode available on this model unfortunately, so if that is something you like you won’t have that available sadly. We have provided some pursuit camera photos below of the AW2721D at 240Hz compared with the AW3821DW at 144Hz to demonstrate the small but noticeable improvements in motion clarity with the increased refresh rate. The moving image looks sharper and clearer thanks to this increase.

This is the first 1440p resolution IPS panel we’ve tested that offers a 240Hz refresh rate. There’s not actually many screens in the market of any panel technology yet with this combination, with most 240Hz capable screens offering only a lower 1080p resolution. It was great to see the two combined here, offering super high refresh rates and improved motion clarity as a result, while not having to sacrifice picture quality, resolution and desktop space.
Refresh Rate Compliance

In this section for our reviews we look at the response time behaviour across the range of supported refresh rates and consider whether they are sufficient to keep up with the frame rate demands of the screen. The grey line on the graph shows the refresh rate threshold, that being the average G2G response time that the panel needs to be able to achieve to keep up properly with the refresh rate and frame rate. For instance at a 60Hz refresh rate the response times need to be consistently and reliably under 16.67ms, while at 144Hz refresh rate the response times ideally need to be under 6.94ms to keep up with the frame rate demands. If they are not then this can lead to some additional smearing and blurring on moving content as the pixels can’t keep up. For these tests we will plot the average G2G figure at a range of measured refresh rates, while operating at the optimal overdrive control.
The table to the right then explains whether that overdrive control needs to be adjusted by the user depending on the refresh rate (not ideal), or whether adaptive overdrive is utilised to keep things simple. Ideally you’d want to be able to stick with a single mode for all refresh rates especially when you consider how these will vary during VRR. We also include a measurement of the % of the overall response time measurements that were within the refresh rate, as well as a slightly more lenient measurement of how many were within the refresh rate window within a 1ms leeway.
The response time behaviour of the AW2721D is very good across the entire refresh rate range. There is very good compliance to the refresh rate as a result, although at the very top end there are some transitions that can’t quite keep up. We measured 76.7% of the transitions within the refresh rate window, 90% if we allow a reasonable 1ms leeway. There may be some very minor additional smearing added as a result relative to if this was 100% but to be honest the motion clarity still looked very good. Variable overdrive helps control overshoot levels nicely as well, with only some small overshoot appearing on some measured transitions, but very hard to see in practice.
Gaming Comparisons

We have provided a comparison of the display against many other gaming screens we have reviewed in a similar size range and across a range of panel technologies. This table is now split by panel technology to make life a bit easier and for quicker comparison.

Additional Gaming Features

- Blur reduction mode – there is no blur reduction mode offered on this screen despite the high refresh rate. This is likely due to the KSF LED backlight which provides the wide gamut here, but has a slow red colour decay for strobing backlights unfortunately. Blur reduction was left off the other LG Nano IPS displays we’ve tested like the Dell Alienware AW3821DW (37.5″ ultrawide model) and the LG 27GL850 and 38GL950G as well, presumably for the same reason. ViewSonic had added it to their XG270QG display which used the same Nano IPS panel as the 27GL850 and we had seen some issues with the blur reduction because of the backlight in that review.
- Aspect Ratio Control – the screen offers has no options in the menu for aspect ratio control which is a strange omission. We feel like we’ve said that a few times in this review. You can control the aspect ratio from your graphics card to cater for PC gaming of course so it’s not really a problem there. But when connecting an external device it means that if it has no aspect ratio control of it’s own, you may find it an issue if the device is not natively 16:9 like the screen. For instance if it’s a legacy 4:3 or 5:4 device. We’re not sure why Dell have left off all aspect ratio controls to be honest.
- Preset Modes – There are quite a few gamer-oriented modes available in the preset mode menu including FPS, MOBA/RTS, Sports and then 3 customisable ‘Game’ modes. So it should be easy to set the screen up to your liking for different uses if you want.
- Additional features– there are a couple of added features in the OSD which are the dark stabilizer function (for adjusting gamma in dark scenes) and a frame rate counter and a timer function
Lag
Read our detailed article about input lag and the various measurement techniques which are used to evaluate this aspect of a display. The screens tested are split into two measurements which are based on our overall display lag tests and half the average G2G response time, as measured by our oscilloscope. The response time element, part of the lag you can see, is split from the overall display lag and shown on the graph as the green bar. From there, the signal processing (red bar) can be provided as a good estimation of the lag you would feel from the display. We also classify each display as follows:
Lag Classification
- Class 1) Less than 8.33ms – the equivalent to 1 frame lag of a display at 120Hz refresh rate – should be fine for gamers, even at high levels
- Class 2) A lag of 8.33 – 16.66ms – the equivalent of one to two frames at a 120Hz refresh rate – moderate lag but should be fine for many gamers. Caution advised for serious gaming
- Class 3) A lag of more than 16.66ms – the equivalent of more than 2 frames at a refresh rate of 120Hz – Some noticeable lag in daily usage, not suitable for high end gaming
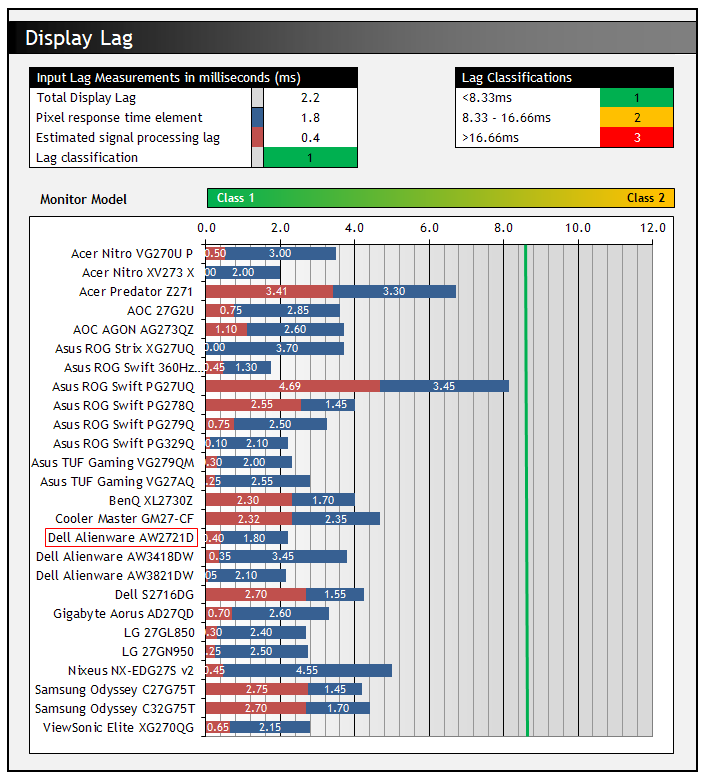
The total lag measured was a very impressive 2.20ms total. The pixel response times account for basically all of that, and so we can say that there appears to be around 0.40ms of signal processing lag on this screen which is super low. A solid result from this display and making it suitable for fast and competitive gaming.
Movies and Video
The following summarises the screens performance for videos and movie viewing:
| Category | Display Specs / Measurements | Comments |
| Size | 27″ widescreen | Fairly typical for a desktop monitor nowadays but smaller than TV’s by a lot |
| Aspect Ratio | 16:9 | Well suited to most common 16:9 aspect content and input devices |
| Resolution | 2560 x 1440 | Can support 1080p content natively, but not Ultra HD 4K |
| HDCP | Yes v2.2 | Suitable for encrypted content including the latest v2.2 |
| Connectivity | 1x DisplayPort 1.4 2x HDMI 2.0 | Useful additional 2x HDMI input for external Blu-ray players or games consoles. Does not feature the latest HDMI 2.1 though for next gen games consoles (no desktop monitor does yet) |
| Cables | DisplayPort and Mini DP > DP (no HDMI) | Would have been useful to include an HDMI cable too |
| Ergonomics | Tilt, height, swivel, rotate | Easy to use adjustments with a wide range, and with smooth movement. The stand remains very sturdy and stable |
| Coating | Light Anti-glare | Provides clear image with no graininess, but avoids unwanted reflections of full glossy solutions |
| Brightness range | 43 – 502 cd/m2 (SDR) 671 cd/m2 (peak HDR) | Good adjustment range offered including a high max brightness (SDR) and good darkened room adjustment range. Backlight dimming is free from PWM and flicker free. HDR discussed in the following section |
| Contrast | 939:1 after calibration | Decent enough contrast ratio for an IPS technology panel close to spec and better than some other Nano IPS panels we’ve tested before, although still not as high as you can get from VA panels of course |
| Preset modes | None | There are no specific preset modes for movie viewing in the menu but you can easily set up one of the other modes to your liking including the 3 customisable Game modes |
| Response times | 5.7ms G2G with low overshoot – fast mode (60Hz)3.6ms G2G with low overshoot in fast mode (240Hz) | Response times are very good on this panel. Fast mode is optimal at all settings, including for 60Hz external devices. |
| Viewing angles | Very good | Thanks to the IPS panel technology, suitable for viewing from a wide range of positions. Pale IPS glow on dark content could present a problem from some wider angles especially in darker room conditions |
| Backlight bleed | No bleed | No noticeable bleed or leakage on our sample. Will vary from sample to sample |
| Audio | Headphone and audio outputs | No integrated speakers on this model but a headphone jack is provided as well as an audio output |
| Aspect Ratio Controls | None | None included which is strange although the native 16:9 aspect ratio is very common so it’s unlikely to cause a problem for external Blu-ray players or DVD players anyway |
| PiP / PbP | Neither supported | n/a |
| HDR support | See below | see following section |
HDR (High Dynamic Range)

The screen can accept an HDR10 input signal and supports the moderate HDR 600 standard. Thankfully unlike the pretty pointless HDR400 level, this does necessitate some form of local dimming, so it is at least capable of improving the dynamic range (contrast) when used in some ways. The number of dimming zones is limited though so don’t expect miracles. Once HDR is enabled from Windows the screen automatically enters the HDR mode. In the OSD menu you still have access to a few of the options but many are not available including the brightness control. We measured the setup with HDR activated and confirmed gamma was pretty good at 2.3 average (6% deviance from our 2.2 target) and white point was only slightly too cool at 6633k (2% out). That was in the ‘standard’ preset mode, but you can also switch to the ‘custom color’ mode and use the RGB settings from our calibration section that nicely corrects the white point.
The AW2721D looks fine with HDR enabled in Windows when you enable it, at least in our testing, with other screens often looking terrible. You probably only want to enable it for HDR content though as it is too bright otherwise and you cannot change the brightness control in this mode.

Anyway, we then tested the HDR function and local dimming. There is a setting for ‘variable backlight’ in the OSD which is always enabled in HDR mode and you cannot turn it off. There are modes 0, 1 and 2 available in HDR mode. Mode 0 is supposedly ideal for games, mode 1 for hybrid uses of gaming and desktop (and this is the default mode) and mode 2 is for desktop usage and photo editing. Really if you’re not playing an HDR game or viewing an HDR movie we don’t see any reason why you’d want this enabled for desktop usage to be honest. In fact mode 2 didn’t seem to work like local dimming and instead looked more like global dimming of the whole backlight at once, like old dynamic contrast ratio options. In SDR mode you can at least turn it off fully though which we would recommend.
There are a limited number of local dimming zones on this screen so the HDR effect is pretty limited. They are arranged in 32 vertical zones as far as we can tell. This means you can can easily see each zone light up, particularly from the bottom edge it seems as content on the screen changes, and certainly during local dimming tests like this one. It creates large vertical bands of brighter regions and doesn’t really produce a very pleasing HDR effect to be honest. You can get large “blooms” of pale areas and it makes large areas of the screen appear more pale even when there’s very little bright content on a dark background.
We measured a peak brightness up to 671 cd/m2 which was decent and a reasonable way beyond the 600 cd/m2 spec, and a good way beyond the max 502 cd/m2 in SDR mode. Note that our measurement was very close to the factory measurement of 672.76 cd/m2 reported in the monitor EDID information. The screen can reach high peak brightness for HDR content at least, even if the local dimming doesn’t offer massive improvements to overall contrast or appearance. It’s better than no dimming, but don’t expect miracles.
Because the dimming zones are large and limited in number the “local HDR contrast ratio” (i.e. measuring a black area next to the white test area) was not much better than the native screen contrast ratio at 1123:1. If you measured a black area further away from the white test area, where the dimming zones could dim it a lot more, the black depth reached 0.1 cd/m2 and the contrast ratio was therefore quite a lot better reaching up to around 8388:1 which was better, although still not exactly great. The local dimming isn’t sufficient enough to make a big difference in local HDR contrast, but it helps a bit across the screen as a whole if you can ignore the large dimming zones and areas of blooming that they cause. The screen does also features the necessary colour enhancements for HDR content including a very wide DCI-P3 colour gamut, and support for 10-bit colour depth content. You can only use 10-bit colour depth up to 144Hz max refresh rate though, and would need to drop to 8-bit for anything higher.
Conclusion
If you enjoy our work and want to say thanks, donations to the site are very welcome. If you would like to get early access to future reviews please consider becoming a TFT Central supporter.
| Overall Recommended Settings | |
| Refresh Rate (Graphics card) | 240Hz |
| Overdrive Setting (for everything) | Fast |
| Preset mode | Custom Color |
| Brightness | 22 |
| Contrast | 75 |
| RGB values | 95, 96, 99 |
| Ambient light sensor | On or Off (to taste) |
| Dark stabilizer | Set to taste in gaming |
| Variable backlight mode | Off in SDR/normal Mode 1 in HDR |
The Alienware AW2721D was another solid new addition to the Dell gaming display line-up. There’s no denying that one of the key benefits of this screen is the combination of a 1440p resolution with a high native 240Hz refresh rate, and it was certainly great to not have to sacrifice down to 1080p to make this refresh rate viable. This provides sharp and crisp images for gaming, and makes the screen far better for other non-gaming uses, office work etc thanks to the added screen area.
The screen is primarily aimed at gamers and it delivered very nicely in this area. We had very good response times across the refresh rate and VRR range, aided as ever by the use of the Native G-sync module and its support for variable overdrive. The high refresh rates provided noticeable improvements in motion clarity and appearance in practice, even with some small but noticeable benefits over 144Hz-type screens. There is reliable and certified variable refresh rate support for both NVIDIA and AMD graphics cards which is great, even though the screen is using the NVIDIA G-sync module. Input lag was super low, again thanks to the G-sync module. Our only gripe with the gaming side of things is that it might have been nice to have a blur reduction backlight option too, as some people like those technologies.
Away from gaming the screen provided solid all round performance thanks to its IPS panel. Default setup was decent enough, although we were again disappointed that there is no sRGB emulation mode offered to tame the wider colour gamut if you wanted to. The lack of that on this AW2721D and the AW3821DW we tested recently was a shame. Brightness range is good, viewing angles are wide, there’s a flicker free backlight and 10-bit colour depth support too if you need it. We also liked the design and style of this screen like we had the AW3821DW.
The Dell Alienware AW2721D is available from Amazon in some regions including the US, UK and several European areas (affiliate link). It is proving popular already in the market and it’s a very good option in the 27″ gaming space.
- Further reading – if you’re after a different gaming screen you should also check out our TFTCentral Recommendations List for Gaming Monitors
| Pros | Cons |
| Good response times, reliable VRR, variable overdrive and very good motion clarity | Missing an sRGB emulation mode |
| Combination of 1440p resolution and 240Hz is great | HDR isn’t really up to much due to limited zones |
| Nice design and aesthetics | Games console support is limited |
| Check Availability and Pricing – Affiliate Links |
|---|
| Amazon |
| TFTCentral is a participant in the Amazon Services LLC Associates Programme, an affiliate advertising programme designed to provide a means for sites to earn advertising fees by advertising and linking to Amazon.com, Amazon.co.uk, Amazon.de, Amazon.ca and other Amazon stores worldwide. We also participate in a similar scheme for Overclockers.co.uk. |