Motion Blur Reduction Backlights
Originally published 21 March 2013, Last updated 17 March 2015. With input from Mark Rejhon from BlurBusters.com

Introduction
Manufacturers have been trying for years to improve the gaming experience for users of LCD displays. When they first became widely available and affordable as a desktop monitor solution there were certainly limitations in many areas with the technology. One area which has always been a focus for buyers has been the response time of the display, how quickly the individual pixels can change from one colour to another. For a long time this had a major impact on how the screen can handle fast moving scenes in movies and games and has for a long time been seen as one of the most important specs buyers should look at. Slower panels can suffer from issues like ghosting (trailing images) and high levels of motion blur and smearing. Over the years manufacturers have managed to drive down pixel response times significantly, helping to eliminate a large part of the problem. The advent of overdrive (Response Time Compensation) several years ago signified a step change in pixel response times, driving down grey to grey (G2G) changes and helping to ensure all panel technologies including IPS, VA and TN Film variants could offer decent response times where it was used well.
More recently manufacturers have improved gaming again with the arrival of native support for 120Hz+ refresh rates. This has significantly helped improve smoothness and the perceived motion in practice for users, as well as allowing support for higher frame rates and 3D content.
One area which has not been as easy to address over the years is the sample-and-hold nature of LCD, which affects the way the human eye perceives the image from an LCD monitor. This is an area which has seen some investment over the years and in this article we will have a look some relatively new technique which can greatly reduce motion blur from LCD’s.
If you appreciate the article and enjoy reading and like our work, we would welcome a donation to the site to help us continue to make quality and detailed reviews and articles for you.
The Sample-and-Hold Problem
LCD displays are sample-and-hold displays and are continuously illuminated, unlike a CRT. The following high-speed camera video of LCD versus CRT being refreshed in real-time gives you a view of how the two differ:
- The LCD display is continuously illuminated even during refreshes
- The CRT display is only illuminated for a short period during refreshes
Phosphor illumination is measured in microseconds, upon electron beam excitation. However, phosphor decay takes much longer than that, and can affect ghosting. CRTs can have shorter persistence phosphor which can lead to dimmer images but reduces ghosting, or CRTs can have longer persistence phosphor which can lead to brighter images but more ghosting. On this specific CRT, the phosphor decays within 1-2 milliseconds (to the point where it is mostly dark), so the remainder of the CRT is dark for most of a refresh cycle. The CRT phosphor is many times brighter than the LCD backlight, but for a very short period. The scanning is cycled every refresh very rapidly, 60 times a second on most CRT displays (60 Hz), so it appears as a continuous image to the human eye.
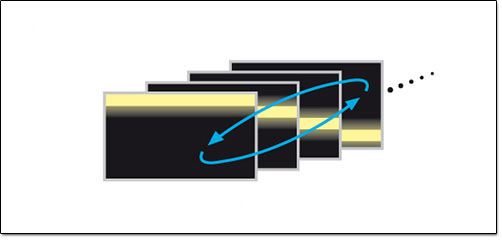
Since LCD’s are a hold-type display the images are “held” on the screen for the entire refresh. When your eyes are tracking a moving object on a display, your eyes are continuously moving. This means that on a sample-and-hold display, your eyes are continuously moving across static refreshes, which creates the perceived motion blur. This applies even if response times were instantaneous (0ms) and even at 120Hz/144Hz high refresh rate. With modern low response times at a pixel level (1 – 2ms), the actual speed of colour changes is now very fast. Higher 120Hz refresh rates also help drastically with the perceived smoothness of motion and aid the reduction of motion blur. However the issue of motion blur is still there as a result of eye-tracking based motion.
Past Motion Blur Reduction Techniques


Various techniques have been tested in the past by manufacturers in an effort to eliminate this perceived motion blur. Instead of using extra Hz, motion blur can also be reduced by inserting black period between refreshes, using various technologies such as Black Frame Insertion (BFI), scanning backlights, and/or full-screen stroboscopic backlights. Some televisions create extra Hz by using frame interpolation (e.g. 120 Hz HDTV’s). This is the process of artificially generating intermediate frames, that are displayed between actual frames. However, this is not used for computer monitors due to the input lag and artefacts that frame interpolation creates.
Early attempts in reducing motion blur within computer monitors have included some ideas such as BenQ’s Black Frame Insertion (BFI) which was first discussed back in 2006. The idea was to insert intermediate black frames in between the normal frames to reduce motion blur. When models sporting BFI were introduced (e.g. BenQ FP241WZ) it seemed the technology had evolved and was instead a scanning backlight system instead, similar to that of a CRT. This refreshed the image at a certain interval from top to bottom to try and help eliminate the motion blur.
Other manufacturers also had a go at similar technologies, including efforts like Samsung’s Motion Picture Acceleration (MPA). We tested this in fact in the Samsung SM245T where the CCFL tubes were turned off in sequence one at a time. While the results are pretty subjective, we didn’t feel it helped much in practice really with moving images. On static images a visible flicker was introduced and contrast was impacted somewhat. We felt the same when we tested NEC’s version in their Motion Picture (MP) mode.
These early attempts at reducing motion blur were good on paper, but didn’t really deliver a workable solution which helped users in practice. Most commercially available displays with scanning backlights use a longer illumination duration than CRT phosphor due to insufficient brightness. In addition, many of these technologies do not produce a sufficiently long enough black period between refreshes, since CRT’s are dark for a longer period than illuminated. Backlight leakage within scanning backlights can interfere with motion blur reduction – this is the leakage of light between on-segments and off-segments of backlight.
The Theory – Ideal Scanning Backlights
To achieve decent motion-blur elimination with a scanning backlight system like this three main pre-requisites are necessary as outlined below. If all 3 were achieved then in theory you could have an LCD display which behaved far more like a CRT, and was able to deliver CRT-like motion quality.
1) Very Fast Pixel Response Times
Until recently pixel response times were not sufficiently low to eliminate pixel persistence factors from the motion blur equation. However with modern 120Hz LCD’s manufacturers have needed to improve response times further to support their fast refresh rates and active shutter glasses operation. LCD display manufacturers have been working hard to clean up as much pixel response trace as possible before the next refresh. As a result, minor ghosting on such new LCD panels no longer leaks noticeably into the next refresh cycle. Thus, 3D-compatible panels are excellent candidates for scanning backlight designs. In theory the scanning backlight could be implemented during a ghost-free moment during the LCD refresh, once per refresh. As a result, pixel response would no longer be the absolute barrier for motion blur reduction.
2) Very Short Backlight Strobes With No Leakage Into Black Period
One very short strobe is needed for each point in the display per refresh, similar to the whole phosphor illumination-and-decay cycle in a CRT display. Different CRT displays have different phosphor decay cycle times. Common CRT computer monitors typically have approximately 1 to 2ms of phosphor decay. During a typical CRT refresh, a small fraction of a CRT, such as one-tenth (1/10) of the screen, is visibly illuminated at one time during a 1/60th second refresh. For a scanning backlight operating at the same scanning rate, it would need to be similar. The shorter the illumination is, the better the motion quality is.
Backlight diffusion also must be well-controlled, to prevent too much leakage of light from on-segments of backlight, leaking to the off-segments of backlight. A different solution to reduce or eliminate backlight diffusion from being a limiting factor to motion blur elimination, is to use a more rapid scanning backlight pass per refresh, or to use full-panel backlight strobes where the whole backlight is turned off at once, as opposed to a scanning backlight which turns it off in portions from top to bottom. Full backlight strobes are also more practical on newer LCD panels that do individual refreshes more rapidly. The important motion-blur elimination factor is that each point in the display is flashed as briefly as feasibly possible, only one strobe per refresh. This strobing would need to be able to operate at various refresh rates from 60 to 144Hz potentially, and steps in between.
3) A very Bright Backlight
If you were to have a very fast scanning backlight with a high portion of off-time to on-time, the very short on-time will normally result in a darker image. The backlight needs to be very bright (at least 10 times brighter than normal) to compensate for the very short on-time. Phosphors on a CRT illuminate extremely brightly for a very short time period – at least 10 times brighter than a typical LCD backlight. The extreme amount of extra brightness can be very expensive to engineer into a backlight system. Fortunately, the prices of LED’s have fallen dramatically. LED’s are well suited for scanning backlights due to their fast switching speed and brightness.
Strobe Backlights and LightBoost

We’ve already discussed the theory of scanning backlight systems and what would be required to produce a high quality image, greatly reducing motion blur issues. We also touched on the fact that a full strobe backlight, where the whole backlight is flashed on and off very quickly, could also be even more efficient and could work very well in this application.
The ‘LightBoost’ technology, found in new monitors supporting NVIDIA 3D Vision 2, is a form of a strobe backlight. This was introduced as part of NVIDIA’s 3D Vision 2 system to help boost the brightness of 3D content and improve performance in 3D gaming. Note that this helps improve brightness in 3D uses compared with older non-LightBoost capable displays. However, enabling LightBoost as a feature makes the screen darker than with the feature turned off which we will talk about later on in the article.
An interesting secondary benefit has been studied during 2012 – 2013 with LightBoost. Studies have been conducted by Mark Rejhon at http://www.blurbusters.com/ based on using this system to reduce motion blur as well in 2D applications and games. In many respects, LightBoost manages to simultaneously meet all three critical criteria of an ideal scanning backlight design. It seems that the LightBoost system can be used as a modern-day strobe backlight and from many user testimonials, it seems to work very well. This is accomplished by turning off the backlight completely for the whole screen between refreshes, while waiting for pixel transitions. The backlight is strobed only on fully-refreshed frames, bypassing pixel persistence as the motion blur limiting factor. There is no backlight diffusion, unlike within a scanning backlight. In this case, strobe backlights can be superior to scanning backlights, and according to the work at BlurBusters can “allow LCD displays that have the motion clarity of a CRT.”
This is an unofficial technique for LightBoost systems but has been found to help reduce trailing, reduce motion blur and improve the overall gaming experience on LCD’s further. Given its popularity and success, manufacturers have since found ways to implement this kind of system natively (see following sections). This allows far easier operation for the user, and the feature actually being advertised as a selling point.
Tests have been conducted by Mark over at BlurBusters and a very high speed camera has been used to capture the results in slow motion. The following is a video of the Asus VG278H (not the newer VG278HE model) recorded at 1000 frames per second (fps).

You can see that the backlight strobing occurs directly between LCD refreshes.
Pursuit Camera Tests for LightBoost
Using their own response time testing tool, similar to PixPerAn, BlurBusters were able to take some measurements of the level of motion blur visible on a monitor, running at different refresh rates and with LightBoost enabled and disabled. These UFO objects in the test image were moving horizontally at 960 pixels per second, at a frame rate matching refresh rate, on an ASUS VG278H LCD. These pictures were captured using a pursuit camera using a 1/30sec exposure (exposing multiple refreshes into same photo). Pursuit cameras are used by display manufacturers for testing (e.g. MotionMaster, and other MPRT pursuit cameras). This is simply a camera that follows on-screen motion. These expensive cameras are extremely accurate at measuring motion blur and other artefacts, since they simulate the eye tracking motion of moving eyes.

60 Hz Refresh rate:
Each refresh is displayed continuously for a full 1/60 second (16.7ms)
120 Hz Refresh rate:
Each refresh is displayed continuously for a full 1/120 second (8.3ms)
This creates 50% less motion blur. This includes regular and overclocked 120Hz.
120 Hz with LightBoost
The backlight is strobed briefly, once per refresh, eliminating sample-and-hold.
With LightBoost, 120fps @ 120Hz has 85% to 92% less motion blur than 60Hz.
At 120fps@120Hz, a 1/30second camera exposure captures 4 refreshes. All 4 refreshes are stacked on each other, because the pursuit camera is moving in sync with the 120fps@120Hz moving object at a 1/30second camera exposure.
The brief backlight flash prevents tracking-based motion blur. There is extremely little leftover ghosting caused by pixel transitions (virtually invisible to the human eye), since nearly all (>99%+) pixel transitions, including overdrive artefacts, are now kept unseen by the human eye, while the backlight is turned off between refreshes.
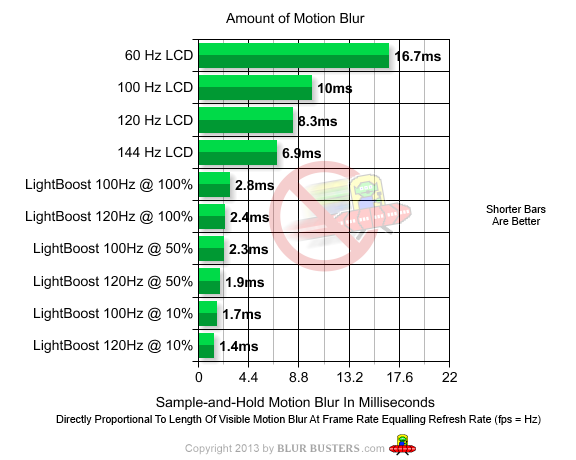
Using a pursuit camera, BlurBusters were able to measure and compare the differences in motion blur between different refresh rates, with and without LightBoost enabled. In the best case scenario, a blur of 1.4ms (120Hz refresh with LB enabled) is 92% less than 16.7ms (60Hz without LB). This also corresponds to the amount of motion blur perceived by human vision, and pursuit camera photography.
The comparison graph was created from motion tests & oscilloscope measurements, including PixPerAn and Blur Busters Motion Tests, and cross-checked with TFTCentral oscilloscope tests (for 120Hz LightBoost = 100%) – see following section. Accuracy +/- 0.1ms, assumes TN panel technology with optimized RTC, motion tests done with VSYNC ON with frame rate matching refresh rate.
Our Own Tests and Findings – LightBoost

We have in the past reviewed the Asus VG278HE monitor (manufacturer rated 2ms G2G response time, 144Hz refresh rate support) which provided us with the opportunity to test this system for ourselves. We followed the process outlined later in this article to set up LightBoost activation in 2D desktop mode. We used the ‘hack’ method (see following sections) to test how easy it was to set up and following the steps worked fine and was quick and easy to activate. This allowed us to carry out tests with our oscilloscope system, PixPerAn and other visual tests outside of games. The screen is tricked into thinking its running in 3D mode when it isn’t, but LightBoost remains active from the backlight. LightBoost only works with refresh rates between 100Hz and 120Hz (not the full native 144Hz support) since 3D and LightBoost is designed to work at 100Hz through 120Hz at the moment (e.g. 120Hz results in 2 x 60Hz, for each eye).

On the VG278HE once you activate this tweak the desktop changes appearance slightly. The image appears a darker and colours have changed a little to the naked eye. The brightness control from the OSD is not available any more and is instead a control over the LightBoost intensity. This controls how bright the display is and can also have an impact over the motion clarity.

An easy way to tell that this is activated on the VG278HE is the appearance of a “3D-mode” red label at the top of the OSD menu as shown above. You will notice that most of the other OSD options are now disabled when LightBoost is active as well.

The LightBoost control option is now available as well within the OSD ‘Color’ section. Contrast is still available as an option, but colour temp, RGB channels etc are now greyed out.

Interestingly the Trace Free option is now locked as well when LightBoost is enabled.
Oscilloscope Tests

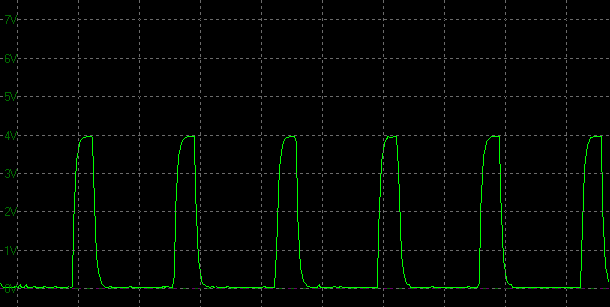
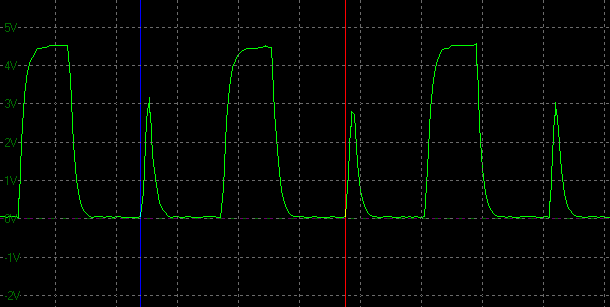
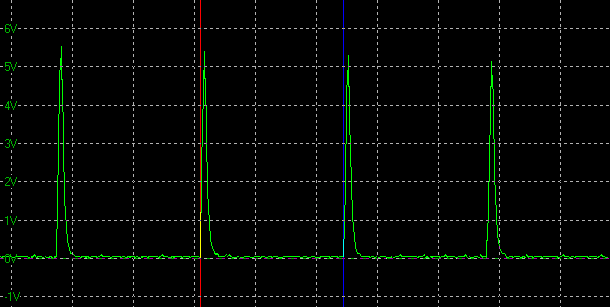
We took some measurements with our oscilloscope and photosensor equipment. Above is the resulting oscillograph with LightBoost enabled at its maximum setting. Each horizontal grid unit is 20ms. We can confirm from this that the LightBoost is operating at a 120Hz frequency in sync with the refresh rate of the screen.

If we zoom in on the scale a little you can see the peaks and troughs more clearly. Each horizontal grid unit is 5ms in this graph now.

The base line of the graph is the time when the backlight is turned off by the strobing of the LightBoost backlight system. The upper peaks are the time for which the backlight is turned on for each cycle.

As you lower the LightBoost brightness setting from the OSD menu, the upper peaks become shorter, as the backlight is on for shorter amounts of time; accounting for the reduction in the perceived brightness. The period for which the backlight is off becomes longer. The feature still operates at 120Hz, but there are now longer dark periods and shorter bright periods (only be a few milliseconds keep in mind).
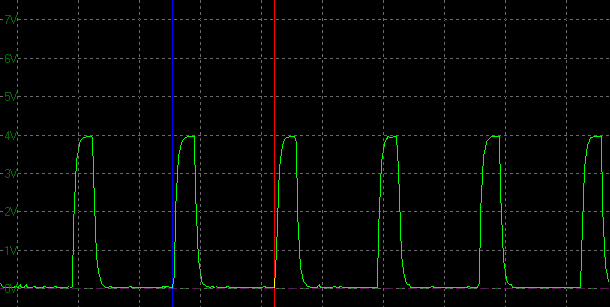
It is possible to measure the length of time for each “on” period and each “off” period at each of the LightBoost settings. For the purposes of this we can zoom in on the scale of the graph to allow for more accurate measurements as shown below.

On the above graph each horizontal grid is now only 1.25ms. We measure from the point at which the brightness starts to change and increase (red line) to the point at which it changes again and decreases (blue line). This is the “on” period.

Likewise we can take the measurement for the “off” period as shown above. The length of time at each of the 10 LightBoost settings is listed in the table below. Keep in mind this is an example based on the Asus VG278HE screen.
| LightBoost Setting (Higher is Brighter) | Time “on” (ms) | Time “off” (ms) |
| 100% | 2.375 | 6.000 |
| 90% | 2.250 | 6.000 |
| 80% | 2.250 | 6.125 |
| 70% | 2.000 | 6.250 |
| 60% | 2.000 | 6.375 |
| 50% | 1.875 | 6.500 |
| 40% | 1.750 | 6.500 |
| 30% | 1.625 | 6.625 |
| 20% | 1.625 | 6.750 |
| 10% | 1.500 | 6.875 |
| 0% (Off) | 2.500 | 5.875 |
As you can see, when you lower the LightBoost setting each step results in either a shorter “on” time, a longer “off” time or both. This leads to a progressively darker image, but also clearer motion if you are more sensitive to motion blur. We will look at the motion blur tests in a moment. The reduced brightness may be an advantage or disadvantage, depending on your needs. For people who prefer a reduced brightness in an excessively bright LED monitor, it also provides another means of dimming the display. The lower LightBoost settings produce a much dimmer image than non-LightBoost mode configured to a brightness setting of 0%. Although LightBoost is a stroboscopic backlight, there are no PWM motion artefacts to create a distraction, due to the single-strobe-per-refresh nature of LightBoost. This is an advantage if you are not sensitive to PWM or CRT flicker, but is sensitive to the PWM artefact problem.
LightBoost also functions at 100Hz. The strobe lengths are proportionally longer during this mode (about 20% longer). However, 100Hz LightBoost is not tested in depth for this article.

At the lowest LightBoost (LB) setting in the menu it seemed that the brightness boost was quite significantly reduced. You could notice a drop in this to the naked eye as well and you can see that the peaks in the graph are now much lower. LightBoost is turned off but the backlight is still being strobed on and off. The grid line here are 5ms, and there is a 2.5ms “on” time and 5.875ms “off” time. While the “on” time is longer than LB = 10%, the voltage is lower on the graph signifying that the actual brightness is lower. There seems to be no real reason to use LightBoost=”OFF” instead of LightBoost=”10%”; since the shorter strobes of LightBoost=10% results in the clearest possible motion.
Motion Blur Tests
Now that we’ve looked at how the LightBoost (LB) backlight is working we wanted to test the impact it had on motion blur in practice. We used some of the tests in the PixPerAn tool to help here.

With LB enabled you could certainly notice a difference in practice, even in the basic moving car test of PixPerAn. The image moved as smoothly and quickly as it had before (in normal 120Hz mode without LB enabled) but tracking of the image with the naked eye was much easier. As you followed the image it remained sharper and more easy to follow, and there was less smearing and blurring to the naked eye.
As a side issue which is linked to this specific screen it does seem that with LB enabled the overdrive impulse seemed to have been turned up to its maximum level. We no longer had access to the Trace Free setting in the OSD to turn this back down, and so the moving image did show more overshoot than we’d seen in our other tests (with TF of 60). This was a result of the pixel response times and overshoot caused by the aggressive overdrive impulse necessary to synchronize the LCD panel with the strobe backlight. The default contrast setting on the VG278HE was 80% and to compensate for the overdrive artefacts during LightBoost, we you can reduce the contrast down to 60% which helps to eliminate some of the overdrive artefacts, but also reduced the screen brightness. In fact from our review we’d already changed to a contrast setting of 70% during the calibration stages. Remember that if you adjust contrast, you may also need to re-calibrate your display. Of course the artefacts here are a result of the specific panel and the overdrive impulse being used, and so will be different from one display to another anyway.
Even regardless of the overdrive artefacts, the actual perceived motion blur was much less. We were suitably impressed, to be honest. User reports are that the LightBoost motion blur reduction is even better on some other compatible screens and the VG278HE shows some faint after image artefacts as we’ve seen above, although somewhat reduced if contrast is reduced specifically on the Asus VG278H/HE. Even though these artefacts were visible, the improvement to perceived motion blur was significant to our eyes and we were pleased with the results.
The shorter strobe lengths at lower LightBoost settings produced a slight further improvement in motion clarity. Some subjective observations can be made, but may depend on how sensitive you are to motion blur. We visually tested the 100% LightBoost setting versus the 10% LightBoost setting, to get the biggest possible comparison. In PixPerAn, this is just about noticeable in the “I NEED MORE SOCKS” text when scrolling at high tempos (Tempo 8 and higher). At LightBoost=100%, the text is fully readable (which can’t be said for non-LightBoost LCD) but retains about one pixel’s width of motion blur. At LightBoost=10%, the pixels are clearer; the one-pixel gap between the letter “N” and “E” in “NEED MORE SOCKS”, becomes very sharp. For most people, it is extremely difficult to notice the difference between different LightBoost settings except for brightness. However, some users reports have remarked they clearly see a difference, while others could not. At this point, we are starting to reach diminishing point of returns that depends on the person. A compromise LightBoost setting value can be chosen, such as 50% or 60%, as a balance between brightness and motion clarity.

Progressing into some of the other tests in the software we tried the ‘readability test’ in which a row of random letters is scrolled across the screen. You can control the speed of this and the idea is to identify the fastest scrolling setting possible while the text remains readable to the naked eye.
First of all we tried this test at 120Hz without LightBoost. The maximum level we could reach sensibly was 8 in this test on the VG278HE. After this, anything faster just became a blurry mess and you couldn’t focus on the text or make out the individual letters as you tracked the movement across the screen.

With LightBoost enabled there was another marked improvement and again we were impressed. Even at the maximum setting of 30, you could pick out the individual letters clearly as they scrolled across the screen and as you tracked the movement with your eyes. It was moving too fast to really tell what they were, but they were visible and not lost in a blur. Some users have reported that they were able to pass a PixPerAn score of 30 completely, by also turning their head while reading the text, especially when using LightBoost = 50% or less. The backlight strobing did seem to be doing a very good job of making images sharper during motion and reducing blurring. Note: the above image is just an example of the text clarity at a setting of 30.

We also conducted some motion blur tests using the BlurBusters motion test tool. This includes a moving image test a bit like that in PixPerAn as shown above. With the screen running at 120Hz without LightBoost we saw smooth moving images running at a high 120fps frame rate. However without LightBoost there was still noticeable motion blur to the user. When LightBoost was enabled the blur was reduced dramatically again, and it was much easier to track the moving object across the screen where it remained sharper and clearer as well. Comparing the LightBoost settings (100% vs. 10% again), it is also observed that the three pixel eyes of the alien in the moving UFO at 960 pixels/second have about one pixel of motion blur at LightBoost=100%, while the three eyes of the alien are razor-sharp at LightBoost=10%.
Colour and Image Tests
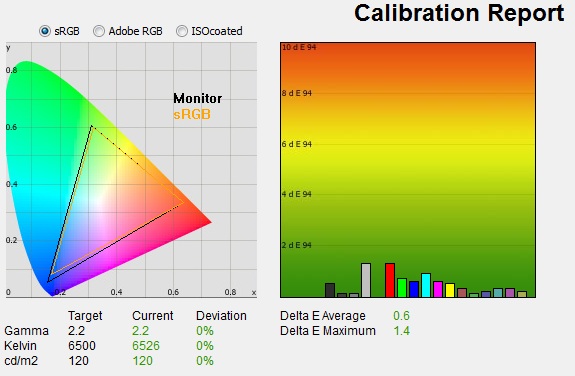
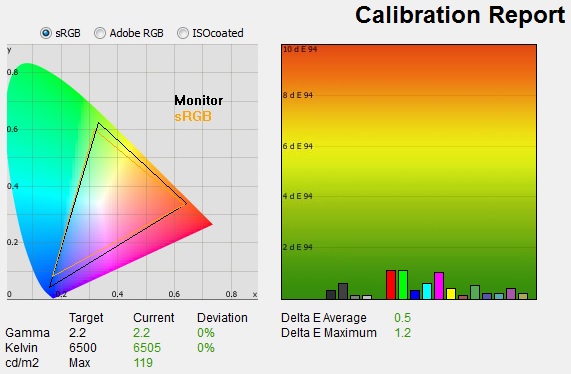
We had already observed the visual change in the image when you first switch the LB feature on. We took some measurements and reports using the X-rite i1 Pro spectrophotometer with LB disabled and enabled but after a calibration had taken place. First of all we had calibrated the screen based on the steps and settings in our VG278HE review.
Asus VG278HE – Calibrated Settings, LightBoost OFF
| Calibrated Settings LightBoost Off | |
| luminance (cd/m2) | 120 |
| Black Point (cd/m2) | 0.15 |
| Contrast Ratio | 799:1 |
As you can see this was the optimal calibrated state with gamma, white point, luminance and colour accuracy all corrected nicely. We had a static contrast ratio of 799:1 as well after this process. We then switched LB on and took a measurement again without any further calibration process being completed.
Asus VG278HE – Calibrated Settings, LightBoost ON

| Calibrated Settings LightBoost ON | |
| luminance (cd/m2) | 88 |
| Black Point (cd/m2) | 0.13 |
| Contrast Ratio | 670:1 |
After LB was enabled the image became noticeably darker (even with the LB setting on maximum) and appeared to be a slightly different temperature. This was confirmed with the i1 Pro where luminance had dropped a fair amount to 88 cd/m2. White point was also cooler now at 7777k, moving it 20% away from the calibrated target of 6500k. Contrast ratio was also impacted somewhat with a figure of 670:1 now achieved. It seems that with LB enabled the strobing backlight causes:
1) A reduction in screen luminance
2) A slightly cooler colour temperature by about 1277k (20%)
3) A reduced contrast by about 129:1
We wanted to look at the luminance range a little more with LB enabled so took measurements of luminance, black point and the resulting static contrast ratio at each setting as you got progressively brighter.
| LightBoost Brightness Setting | Luminance (cd/m2) | Black Point (cd/m2) | Contrast Ratio ( x:1) |
| Off | 48.21 | 0.08 | 603 |
| 10% | 51.52 | 0.08 | 644 |
| 20% | 55.22 | 0.09 | 614 |
| 30% | 59.00 | 0.09 | 656 |
| 40% | 62.64 | 0.10 | 626 |
| 50% | 66.18 | 0.10 | 662 |
| 60% | 69.48 | 0.11 | 632 |
| 70% | 73.13 | 0.12 | 609 |
| 80% | 76.66 | 0.12 | 639 |
| 90% | 80.23 | 0.13 | 617 |
| 100% | 87.14 | 0.13 | 670 |
You can see the the luminance range of the screen is now much lower with LB enabled, ranging up to a maximum of only 87.14 cd/m2 and with an adjustment range of only 38.93 cd/m2. The average contrast ratio was 634:1. The limited brightness range of the screen was an obvious limitation of enabling LB on this screen and is a common pattern on models using the LightBoost hack method.
What You Need for LightBoost
To take advantage of this technology for your own gaming needs you will need a few ingredients.

1) Monitors – you need an LCD monitor which supports the LightBoost technology. Most new NVIDIA 3D certified monitors now have LightBoost support and it is normally listed in the spec and product description. From user reports, the best-performing LightBoost monitors are the 1ms rated monitors, because of reduced crosstalk between refreshes. Ghosting tests have shown less than 0.5% leakage of frames between refreshes; and there is less 3D crosstalk on these panels than for polarized 3D. At the moment only some TN Film based monitors feature NVIDIA 3D Vision support and therefore LightBoost backlight systems. There are no VA or IPS-type panels with LightBoost.
Some examples of models known to feature LightBoost are shown below. See the BlurBusters list of Motion Blur Eliminating monitors for further examples:
Updated 17 Sept 2013
- Acer HN274HB
- Asus VG248QE
- Asus VG278H
- Asus VG278HE
- Asus VG278HR
- BenQ XL2411T
- BenQ XL2420T
- BenQ XL2420T rev 2.0
- BenQ XL2420TE
- BenQ XL2420TX
- BenQ XL2720T

2) Graphics Card – Presently, you need an NVIDIA graphics card which can support 3D Vision, because LightBoost is an NVIDIA technology. You should preferably have a GeForce GTX 680 or faster; something that can do at least 120fps at 120Hz in many games. The technology can work with lower end graphics cards of course but frame rates would not be optimal in fast gaming. The LightBoost effect diminishes and disappears at half frame-rate (60fps @ 120Hz). Repeated refreshes lead to a momentary sample and hold effect, so frame rates should ideally at least match the refresh rate in order to minimize motion blur. LightBoost also functions at 100Hz as well, to allow 100fps at 100Hz which is easier for newer video games with more demanding graphics.

3) NVIDIA 3D Vision kit – you don’t actually even need the 3D Vision kit (glasses and emitter) to get the LightBoost working, but of course if you wanted to play any 3D gaming then you would need that! It does also make life a bit easier since it is easier to enable LightBoost if you have the emitter.
Samsung 120Hz Monitors Note
Samsung’s 120Hz monitors have gone the other route for 3D gaming, being aimed more at AMD users and not being certified for NVIDIA 3D vision. However, some of these screens do feature a LightBoost-style strobe backlight feature, although this is not advertised within the spec. Most Samsung 700D, 750D and 950D models seem to have this feature (BlurBusters have tested the S23A700D, S23A950D, S27A750D, S27A950D) so can be used in a similar way to reduce motion blur. The good news is that the Samsung strobe backlight works with both AMD Radeon and NVIDIA graphics cards. The bad news is that according to reports the input lag is worse than official LightBoost monitors, so this is not as useful for competition online gaming as official LightBoost monitors. See BlurBusters for more information about Samsung monitors and how to enable the strobe backlight feature for 2D blur reduction.
How to Enable LightBoost Strobed Backlight

There are various methods for using the LightBoost strobe backlight hack, although the simplest has got to be ToastyX’s Strobelight utility. If you want to have a play round with LightBoost for motion blur reduction we would recommend following these steps:
- First, Download ToastyX Strobelight.
IMPORTANT: You must have a supported 120Hz ASUS or 120Hz BENQ monitor!
IMPORTANT: LightBoost will not work with NVIDIA Optimus (laptops).

- Next, run strobelight-setup to install strobed video modes. Then reboot.
IMPORTANT: To easily turn ON/OFF LightBoost, you must install at least one strobed refresh rate AND at least one non-strobed refresh rate. - Finally, after reboot, run strobelight to initialize LightBoost for the first time.
NOTE: You can add strobelight.exe to the Startup Folder, so it starts up every time you starts Windows. - Test LightBoost using a motion test. View Moving Photo Test at TestUFO.com.
Turn ON/OFF LightBoost while viewing this motion test to see the big difference.
Test in Chrome or other 120Hz-friendly web browser (FireFox 24+, Opera 15+).
Natively Supported Blur Reduction Methods
Since the LightBoost method was uncovered there have been various new and improved methods for providing a blur reduction backlight. A few manufacturers now feature an added blur reduction mode built in to the screen, operated with a simple click of a button or option in the OSD. This allows you to use a blur reduction backlight regardless of your graphics card, and without the need for third party hacks or utilities. These features are still reserved for gaming screens as they require a refresh rate support of at least 85Hz, operating typically at 100Hz or 120Hz. We will discuss some of the blur reduction methods now available, including several we have tested at TFT Central already.
Support for blur reduction varies depending on panel technology as well. Here is a brief summary of what is available for reference:
| Panel Technology | Blur Reduction Type | Example Displays |
| TN Film | LightBoost | Acer VG278HE, BenQ XL2420T |
| BenQ Blur Reduction | BenQ XL2420Z, XL2720Z | |
| LG Motion 240 | LG 24GM77 | |
| ULMB | Asus ROG Swift PG278Q | |
| VA-type (MVA) | Eizo Turbo 240 | Eizo Foris FG2421 |
| IPS-type (AHVA) | ULMB | Acer XB270HU |
BenQ Blur Reduction
Back in 2013 when we first wrote this article we brought it to the attention of BenQ’s development team as an interesting development and something we felt could really be of benefit to users if BenQ could come up with a way to properly integrate it as a feature. Their answer was the XL2420Z, XL2720Z and subsequent models featuring their new built-in ‘Blur Reduction’ mode. This is provided still on other gaming monitors in their range and has evolved into a very useful feature. It is available via a simple OSD menu option, and sometimes also as a quick access option from the control buttons. It is very easy to turn on and off.
In March 2014 we reviewed the XL2720Z in detail, and these were the relevant tests of the Blur Reduction mode at the time from that screen. This should give you an idea of performance of the feature, but results may vary from one model to another:
BenQ Blur Reduction – Operation
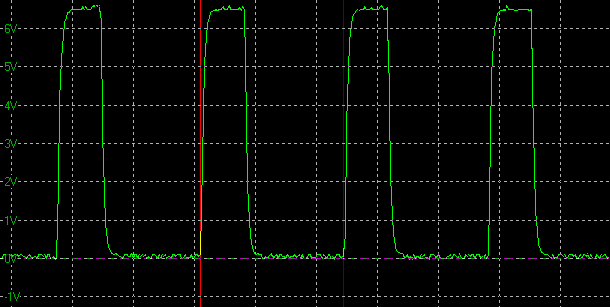
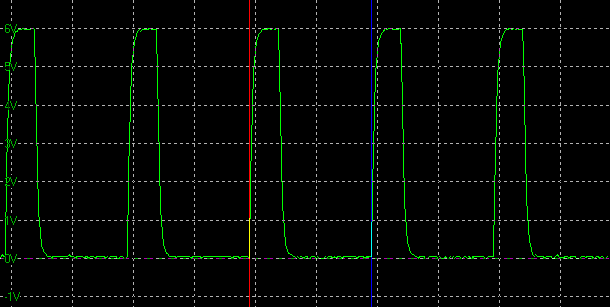
Blur Reduction backlight cycling, 60Hz (scale = 5ms)
The BenQ Blur Reduction mode works at a wide range of refresh rates from 60Hz all the way up to the maximum 144Hz refresh rate supported by the screen. LightBoost was only available up to a maximum of 120Hz so there is an added benefit there from this built-in function. We measured the screen using our oscilloscope when viewing a solid white image, with blur reduction feature turned on and with refresh rate set at 60Hz. Normally the oscillograph would show a flat straight line when measuring a static white image (as no PWM is being used for backlight dimming), but here the Blur Reduction feature is cycling the backlight off and on rapidly.
Blur Reduction backlight cycling, 60Hz and 120Hz refresh rate (scale = 5ms)
The time for each cycle is ~8.3ms which shows that in this case the backlight is being cycled at a frequency of 120Hz, i.e. 120 times per second. This is double the 60Hz refresh rate, but matches up as an even number. Cycling at 60Hz to mirror the refresh rate would be too slow and would produce a visible flicker, which is why 120Hz cycling has been used. The same result is seen when switching to a 120Hz refresh rate as well. The ‘on’ period lasts ~1.625ms, with the ‘off’ period lasting ~6.7ms. This pattern doesn’t change, regardless of your brightness setting in the OSD menu.

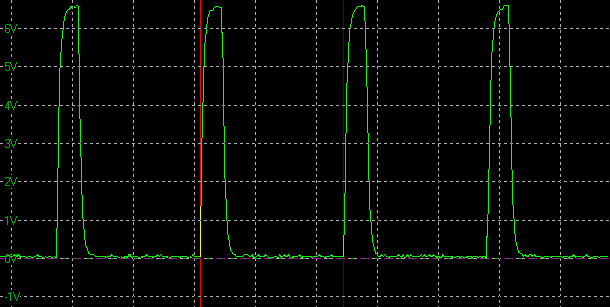
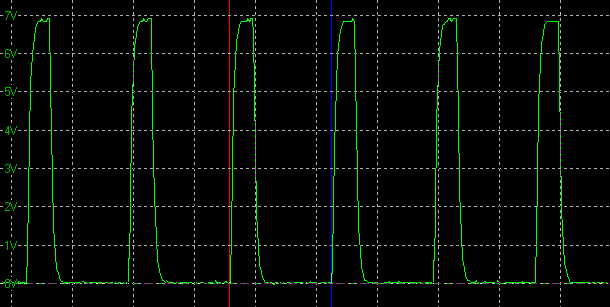
Blur Reduction backlight cycling, 144Hz refresh rate (scale = 5ms)
If we then change the refresh rate to 144Hz which is the maximum supported by the screen, the Blur Reduction cycling syncs with this refresh rate. It is now cycled every 6.94ms to mirror each frame at 144 fps. The ‘on’ period lasts ~1.375ms, with the ‘off’ period lasting ~5.625ms. This pattern doesn’t change, regardless of your brightness setting in the OSD menu.
BenQ Blur Reduction – Brightness Adjustment Range
| OSD Brightness | Luminance (cd/m2) | Black Point (cd/m2) | Contrast Ratio ( x:1) |
| 100 | 118.60 | 0.12 | 988 |
| 80 | 107.45 | 0.11 | 977 |
| 60 | 95.80 | 0.10 | 958 |
| 40 | 83.22 | 0.09 | 925 |
| 20 | 70.13 | 0.07 | 1002 |
| 0 | 56.16 | 0.06 | 936 |
With the Blur Reduction feature on we measured the luminance adjustment range of the XL2720Z display. With the feature turned off the screen was adjustable between ~282 (100%) and 66 cd/m2 (0%). With the feature enabled the range was far more limited. At a setting of 100% brightness the screen only reached up to 118.6 cd/m2 maximum, that being the recommended luminance for LCD screens in normal lighting conditions. The lower maximum luminance is a limitation of these kind of strobed backlights, although they are higher than what is achievable when using third party LightBoost tweaks on older screens at least. Still, the limited upper brightness remains a gripe with a lot of users despite the obvious blur reducing benefits.
BenQ Blur Reduction – Colour and Other Setup Characteristics
We wanted to test the impact on the setup of the screen when enabling the Blur Reduction feature to see whether it has a knock-on effect to white point, gamma or colour accuracy. You can see straight away that it impacts the luminance of the screen, which we measured above.
BenQ XL2720Z – Calibrated Settings, Blur Reduction OFF
| Calibrated Settings | |
| luminance (cd/m2) | 119 |
| Black Point (cd/m2) | 0.13 |
| Contrast Ratio | 950:1 |
Above is our calibrated state from the relevant review, with the Blur Reduction feature turned off.
BenQ XL2720Z – Calibrated Settings, Blur Reduction ON

| Calibrated Settings | |
| luminance (cd/m2) | 71 |
| Black Point (cd/m2) | 0.08 |
| Contrast Ratio | 940:1 |
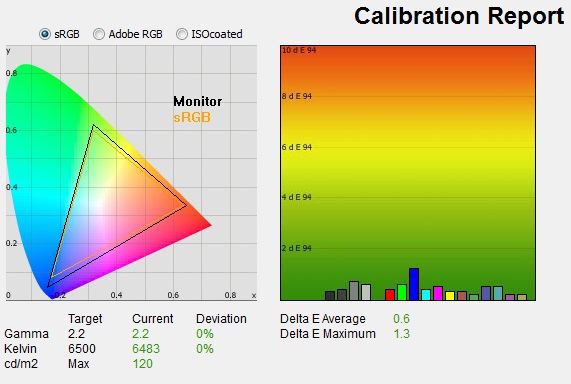
When you turn Blur Reduction on you are left with a fairly similar setup thankfully, and there isn’t any major impact to the image other than the reduced luminance. When we’d tested LightBoost we’d seen a fairly big impact to the white point but that was not a problem here with the natively supported Blur Reduction mode. The white point has strayed slightly from the calibrated 6505k point, now being slightly cooler at 6608k and leaving a 2% deviance. Gamma and colour accuracy remain very comparable to before although there is a slightly higher dE in the blue shades now. The luminance has dropped from 119 cd/m2 to 71 cd/m2 now though which we know is the main difference when enabling Blur Reduction.
BenQ Blur Reduction – Blur Reduction Tests
Of course the main thing we wanted to test is what improvements the Blur Reduction mode offers when it comes to motion clarity and gaming. So we were keen to understand if BenQ had achieved something similar to the results we’d seen from our LightBoost tests to further enhance their popular XL gaming series. We found the blur reduction feature to work well, eliminating a lot of the perceived motion blur for the user and making tracking of moving images much easier. It provided the blur reduction benefits of LightBoost systems, but maintained a more stable image without impacting the colour, contrast and white point of the display too much at all. That had been a gripe with LightBoost systems, and it was good to see BenQ have ironed that out here with their natively supported Blur Reduction mode. Maximum luminance remains an issue as it had on LightBoost options, but a necessary sacrifice of strobing the backlight unfortunately.

On the BenQ models there is no built-in user control over the strobe timing (which impacts cross-talk, discussed later) or the strobe length (which can impact blurring to a small degree). However, BlurBusters have created a useful utility tool compatible with several of BenQ’s Blur Reduction enabled screens which allows the user some further control over these features. Useful for those who like to tweak things, especially when it comes to controlling the strobe cross-talk.
Eizo Turbo 240

Turbo 240 was another natively supported strobe backlight system first added by Eizo to their popular Foris FG2421 gaming screen which we tested in November 2013. Despite the name, the screen is still operating at 120Hz, but now with a strobed backlight in sync with the refresh rate. This is actually the only VA-type panel on the market with a blur reduction mode at this time.
The Eizo FG2421 uses the first VA panel on the market to support a native true 120Hz refresh rate. Interestingly the FG2421 isn’t the first screen to use this panel, as Eizo had already released a very niche (and expensive) model aimed at satellite imagery a couple of months prior. Their FDF2405W uses the same panel and technology, but the FG2421 is certainly the first gamer-orientated screen to use a 120Hz VA panel, and also the first to more “affordable” alternative to the FDF2405W. The panel is manufactured by Sharp and is MVA in technology.
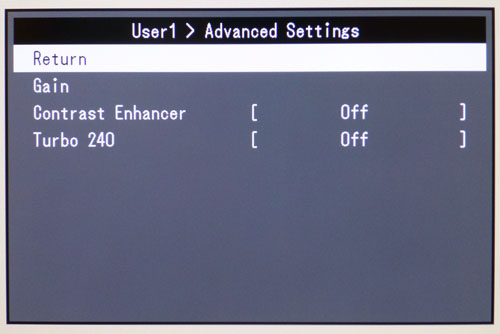
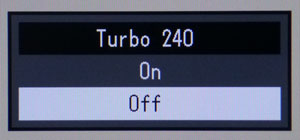
This Turbo 240 Blur Reduction mode is available in the OSD menu ‘color’ section, in the ‘advanced settings’ as shown above. In some preset modes (FPS1 and 2) the Turbo 240 is enabled by default and cannot be turned off. In the user modes you can choose whether to have it enabled or not.
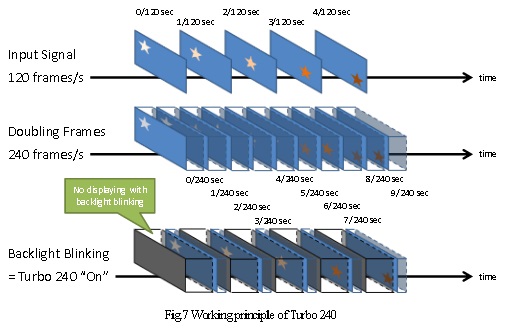
Turbo 240 involves doubling the frames of the input signal (replicating each frame) and then blinking the backlight off and on in sync with these new frames like an impulse-type display. This should help reduce perceived motion blur much like the LightBoost backlight strobing does on TN Film screens.
- Further Reading: Eizo’s whitepaper talks more about 120Hz refresh rate support and their Turbo 240 mode
Turbo 240 – Operation
Scale: each horizontal grid = 5ms
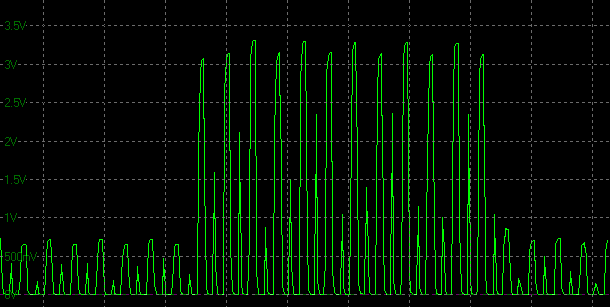
These tests are taken from the Eizo Foris FG2421 review. If we measure a static white image using our oscilloscope when Turbo 240 is enabled you can see the backlight blinking in action. The screen is set at 120Hz here.
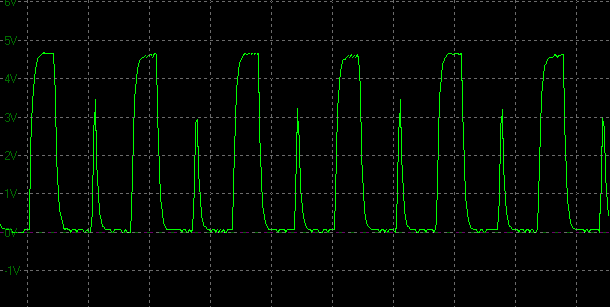
Scale: each horizontal grid = 2.5ms
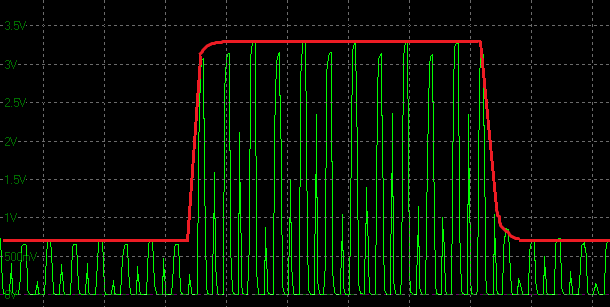
We can zoom in on the oscillograph to see what is happening more clearly. The blue > red section represents one frame at 120fps (i.e. 8.33ms). You can see that the backlight is being turned on and off twice during each frame, which fits in with Eizo’s description of the frame doubling element. The first “frame” is very short and the image does not reach the desired luminance. The second flash is longer and reaches the desired luminance. The backlight flashes seem to be the same length no matter what the brightness is set to. The first flash lasts about 0.250 ms and the backlight is then turned off for ~3ms. It is then turned on for ~2.125ms for the second longer flash before being turned off again for ~3ms.
Transition: 50-200-50, Turbo 240 on
(scale = 20ms)
If we measure an actual pixel transition as we had earlier we can see the operation of the backlight blinking again here. Above is the oscillograph for the 50-200-50 transition. We can compare the graph with and without Turbo 240 on as shown below:
Turbo 240 off Turbo 240 On
Transition: 50-200-50
(scale = 20ms)
The underlying pixel transition response times remain constant for the panel, as the Turbo 240 feature has no bearing on those. What it does control is what you as the user actually see and so has a direct impact on perceived motion blur (more on that in a moment).
Transition: 50-200-50
(scale = 20ms)
It’s a bit hard to make out what the graph should show, so we’ve superimposed the original response time curve in red on the graph where Turbo 240 is enabled to make it a bit clearer.
It should be noted that the Turbo 240 system does not offer the user control over the strobe timing or strobe length.
Turbo 240 – Brightness Adjustment Range

When this feature is enabled the luminance of the FG2421 display is reduced. At maximum 100% brightness the luminance now reached 257 cd/m2 maximum, instead of nearer 400 cd/m2 which we’d seen when it was turned off. There was still a very good range of adjustment possible, all the way down to 41 cd/m2. Even though the maximum luminance was reduced a lot, it should still be more than adequate for most users and for gaming one would hope. It was also a lot higher than the maximum luminance we’d seen from screens using LightBoost systems and BenQ’s Blur Reduction mode. The Eizo FG2421 can clearly offer much brighter images when using its integrated motion blur reduction system (Turbo 240) than models using LightBoost as a third party tweak/hack.
Turbo 240 – Motion Blur Tests
Of course the main concern with Turbo 240 is how it performs in practice and can it live up to the expectations of those who have used a LightBoost strobing backlight system for motion blur reduction before? We carried out several motion blur tests including PixPerAn to see how the screen performed. Some of this is hard to capture in images as a lot of the improvement is perceptual. Below are sample photos which we believe show the fairest representation of what the user actually sees. We will explain…
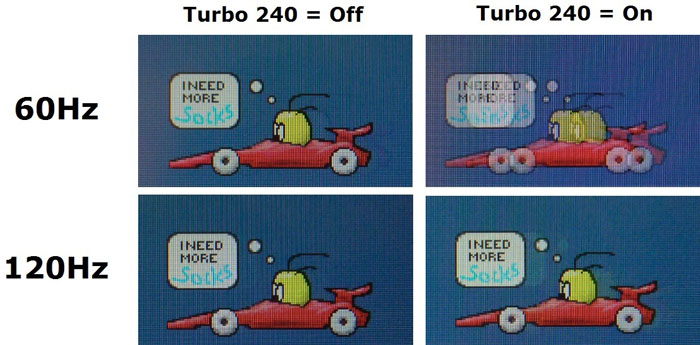
Firstly it should be noted that the Turbo 240 mode can operate when you are running at both 60Hz and 120Hz refresh rates (and steps in between for that matter). We first tested the screen at a 60Hz refresh rate.
(Top left image). The moving car in PixPerAn was pretty smooth and showed very low levels of blurring, and no ghosting issues at all. Taking that on its own for a second, that is a very good performance for any panel and certainly a marked improvement over what we’ve seen from other VA matrices in the past. If we ignore the few very slow transitions we measured with our oscilloscope then we already know the average G2G response time is a very good 6.9ms G2G. This puts it faster than other VA panels we’ve tested and even a bit ahead of most IPS panels. The blur was a little stronger than we’d seen on some very fast TN Film panels still, but a very impressive performance from a VA panel here. It should also be noted that there were no overshoot problems at all, something we’d also confirmed with our oscilloscope measurements.
(Top right image). We went ahead and switched on the Turbo 240 mode while running at 60Hz refresh rate. Here we were actually less impressed with the resulting image. The picture shown is the fairest representation we could get of what you see as a user when using Turbo 240 at 60Hz. A rather obvious ghost image appears as part of the moving object, and the image doesn’t look right. Perhaps the frames are being duplicated too many times here (from 60 frames to 240 frames?) and then operating along with the backlight blinking, but it is resulting in an odd appearance to the image. Probably not advisable to use Turbo 240 if you’re running only at 60Hz refresh rate we felt.
(Bottom left image). Switching to 120Hz produced a noticeable improvement to the image smoothness and clarity. First of all with Turbo 240 off, the image became a little sharper than we’d seen at 60Hz. There was still some blurring noticeable to the naked eye, but this is a result of the sample and hold effect of an LCD display.
(Bottom right image). When switching Turbo 240 on there was a significant improvement in the clarity of the moving image. It’s very hard to capture with the camera, but we’ve done the best we can, again giving what we believe to be the fairest view of what the user sees. What you can’t capture though is the perceived improvement in motion blur as that is perceptual to the user. The moving object is noticeably sharper and easier to track across the screen with the eye. It appears sharper and nearly all the motion blur you saw before is eliminated. A very pleasing result and similar to what we’d seen from LightBoost backlight systems in the past. The only slight niggle is that there appears to be a slight pale trail introduced behind the moving car. It’s hard to pick up with the camera and it doesn’t appear to be a result of overshoot, since we know the pixel transitions and overdrive impulse do not produce any of that. It seems to be related to the frame doubling and backlight blinking method, but it’s quite slight really. In normal uses you probably won’t see this much, and the motion blur reduction benefits of Turbo 240 certainly out-weigh that slight negative for us.
LG Motion 240

Motion 240 is a strobe backlight system introduced by LG. To date we have only seen this available on their 24GM77 monitor. We have not tested it ourselves but it looks to operate in a similar way to Eizo’s Turbo 240. It is available at either 100Hz or 120Hz refresh rates only, and we believe it to artificially double every frame and use a strobe backlight to reduce perceived motion blur. It’s actual operation and results we have not been able to test.
Ultra Low Motion Blur (ULMB)
Ultra Low Motion Blur is a feature linked intrinsically to NVIDIA’s G-sync technology. It is an additional feature provided by the G-sync monitor module and operates as a blur reduction method. To date, all G-sync enabled displays we have seen feature this ULMB mode, although there are some G-sync enabled screens being produced with normal refresh rates only (60Hz) which subsequently may not feature ULMB. While it is provided along side G-sync, it cannot be used at the same time as G-sync. G-sync involves dynamically controlling the refresh rate of the screen, whereas ULMB operates at a fixed frequency. At the moment at least, it’s one of the other. The ULMB screens we have seen so far also feature an additional extra option, allowing you to control the “Pulse Width” of the strobe, which is the length of time for the “on” period of the strobing. By reducing the strobe length you can reduce blurring a little bit more, but at the cost of a further reduced brightness. There is no control so far on ULMB screens for the strobe timing though which can influence cross-talk.
We first saw ULMB when we tested the Asus ROG Swift PG278Q in July 2014, a TN Film based screen. We have more recently seen ULMB featured in the IPS-type (AHVA) Acer Predator XB270HU which is the first of this panel technology to support 144Hz natively, and the first to support a blur reduction method.
The tests below were taken from the Asus ROG Swift PG278Q review. See our Acer Predator XB270HU review for all the same ULMB tests on that IPS-type panel.
ULMB – Operation at 85Hz
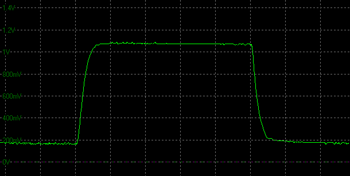
ULMB backlight cycling, 85Hz (scale = 5ms)
pulse width setting= 100
We measured the screen using our oscilloscope when viewing a solid white image, with ULMB feature turned on and with refresh rate set at 85Hz. This is the lowest refresh rate at which you can operate the ULMB mode. It should be noted that it works at 85, 100 and 120Hz only on the Asus ROG Swift PG278Q. On the Acer XB270HU it only works at 85 and 100Hz. Normally the oscillograph would show a flat straight line when measuring a static white image (as no PWM is being used for backlight dimming), but here the ULMB feature is cycling the backlight off and on rapidly.
The time for each complete cycle is 11.76ms which shows that in this case the backlight is being cycled at the same frequency as the refresh rate, 85 times per second. The strobe is in time with the refresh rate of 85Hz.
ULMB backlight cycling, 85Hz (scale = 5ms)
pulse width setting = 50
ULMB backlight cycling, 85Hz (scale = 5ms)
pulse width setting = 10
If you manually reduce the pulse width setting you are adjusting the ‘on’ period of the strobe. As you reduce the setting the strobe ‘on’ time gets progressively shorter as you can see from the above 2 graphs, the first at a setting of 50 and the second at a setting of 10 (the minimum setting available). This impacts the perceived blur somewhat, with the shorter ‘on’ times resulting in a clearer image. At the same time though the brightness of the image is affected and it becomes very dark, the lower you go with the setting. More on that in a moment. There will be a point where the user does not see any further benefit to their eyes of reducing the strobe length further, but you can have a play around with the setting to find your personal preference to balance perceived motion blur and brightness of the image.
ULMB – Operation at 100Hz
ULMB backlight cycling, 100Hz (scale = 5ms)
pulse width setting = 100
When running the screen at a 100Hz refresh rate the behaviour is exactly the same. The only difference is that the strobe is now synced with the new refresh rate, with a new strobe every 10ms (100 times per second).
ULMB – Operation at 120Hz
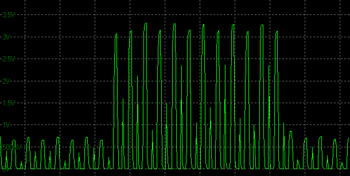
ULMB backlight cycling, 120Hz (scale = 5ms)
pulse width setting = 100

ULMB backlight cycling, 120Hz (scale = 5ms)
pulse width setting = 10
Again when set at 120Hz refresh rate the strobes are in sync again, with a new strobe every 8.33ms (120 times per second). As you can see, as you reduce the pulse width setting (strobe length) in the OSD menu, the ‘on’ period gets shorter, reducing perceived motion blur, but also impacting brightness.
ULMB Pulse Width Setting – Strobe Length
We measured the strobe length at a variety of the Pulse Width settings, while running at the maximum 120Hz refresh rate mode. You can adjust the setting in steps of 1 incidentally. Each complete strobe lasts a total of 8.33ms (120 strobes per second):
| Pulse Width Setting | On period (ms) |
| 100 | 1.875 |
| 75 | 1.375 |
| 50 | 0.875 |
| 25 | 0.500 |
| 10 (min) | 0.250 |
ULMB Pulse Width Setting – Brightness Range
| Pulse Width Setting | Luminance (cd/m2) | Black Point (cd/m2) | Contrast Ratio ( x:1) |
| 100 | 122.67 | 0.14 | 876 |
| 75 | 92.59 | 0.11 | 842 |
| 50 | 62.3 | 0.07 | 890 |
| 25 | 31.4 | 0.04 | 785 |
| 10 (min) | 12.76 | <0.02 | – |
We tested the brightness output of the ROG Swift PG278Q when ULMB was turned on. You can independently control the brightness setting as well if you want, but we left it at the default 100 and just changed the pulse width (PW) strobe length setting to establish the brightness range when using this option. With the PW setting at 100 the maximum achievable luminance of the screen was a moderate 123 cd/m2. This should be enough for a lot of uses, but you cannot get a brighter display when using ULMB if you wanted to. This is a typical performance from a strobe backlight anyway and represented a decent enough luminance level. As you reduce the PW setting the luminance drops significantly, at the lowest setting probably being far too dark for any practical use. At least you can control a reasonably wide range here, so you can find a level which suits your needs. We suspect a setting of 100 will probably be adequate for most normal users anyway, as the ULMB mode certainly brings about positive improvements to the perceived motion blur.
ULMB Brightness Range (PW at 100)
| Brightness Setting | Luminance (cd/m2) | Black Point (cd/m2) | Contrast Ratio ( x:1) |
| 100 | 122.67 | 0.14 | 876 |
| 75 | 102.86 | 0.11 | 935 |
| 50 | 74.47 | 0.08 | 931 |
| 25 | 43.87 | 0.05 | 877 |
| 0 | 10.65 | <0.02 | – |
We also wanted to test the brightness range when leaving PW at its default 100, and changing the brightness control of the screen instead. The table above confirms the range available through that control. Again much like LightBoost systems the maximum brightness is far more limited with ULMB enabled. We had measured a maximum luminance of 385 d/m2 from the Asus ROG Swift PG278Q with ULMB turned off, but once you turn it on the maximum luminance you can achieve is 123 d/m2.
——————————————————————————————————-
See our Acer Predator XB270HU review for all the same ULMB tests on that IPS-type panel.
——————————————————————————————————-
ULMB – Colour and Other Setup Characteristics
We wanted to test the impact on the setup of the screen when enabling the ULMB feature to see whether it has a knock-on effect to white point, gamma or colour accuracy. You can see straight away that it impacts the luminance of the screen, which we’ve already looked at above.
Asus ROG Swift PG278Q – Calibrated Settings, ULMB Off
| Calibrated Settings | |
| luminance (cd/m2) | 120 |
| Black Point (cd/m2) | 0.14 |
| Contrast Ratio | 858:1 |
Above is our calibrated state from earlier on in the review, with the ULMB feature turned off.
Asus ROG Swift PG278Q – Calibrated Settings, ULMB On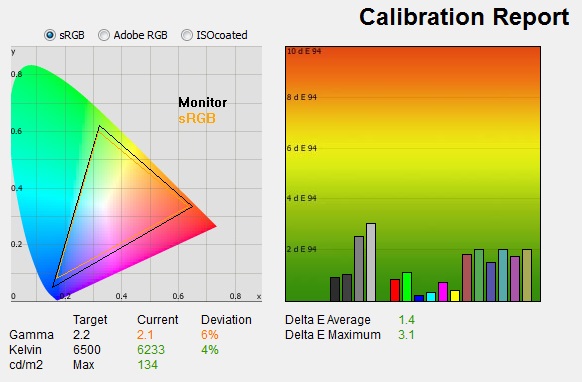
| Calibrated Settings ULMB On | |
| luminance (cd/m2) | 134 |
| Black Point (cd/m2) | 0.15 |
| Contrast Ratio | 888:1 |
We turned the ULMB mode on, but left the PW option at 100 here, and with the default maximum 100 brightness as well. We left our calibrated ICC profile active from our initial calibration to see what immediate impact the ULMB setting had on the colour performance. The gamma and white point were skewed slightly here, with gamma now a little lower at 2.1 average (6% deviance), and white point being a little warmer at 6233k (4% out). The contrast ratio remained very similar at 888:1. The colour accuracy was also a little off with average dE of 1.4 now, maximum of 3.1. No major impact really to the appearance of the screen of the colour rendering other than the reduction in achievable luminance of course. This was pleasing as we know from testing older LightBoost strobed backlight systems that they can really impact the colours and white point of a screen when enabled.
ULMB – Blur Reduction Tests
Our pursuit camera tests in the following section give you a good indication of perceived motion blur with and without ULMB enabled. We were very pleased with the results though here with a marked improvement in perceived motion blur experienced. Tracking of moving objects became much easier and the image looked sharper and clearer. We used the BlurBusters full-screen TestUFO online motion test (all ULMB supported refresh rates) as well to put the feature through its paces and were pleased with the results. Having the ability to alter the strobe length through the PW setting was also very useful, and you could tweak it to your preference to reduce even more of the persistence if you wanted, as long as you didn’t mind sacrificing some brightness. A very good implementation of a strobe backlight system here, we were impressed. We suppose the only minor quibble is the inability to operate the feature at 144Hz or in an ideal World, at the same time as using G-sync.
Pursuit cameras are used to capture motion blur as a user might experience it on a display. They are simply cameras which follow the on-screen motion and are extremely accurate at measuring motion blur, ghosting and overdrive artefacts of moving images. Since they simulate the eye tracking motion of moving eyes, they can be useful in giving an idea of how a moving image appears to the end user. It is the blurring caused by eye tracking on continuously-displayed refreshes (sample-and-hold) that we are keen to analyse with this new approach. This is not pixel persistence caused by response times; but a different cause of display motion blur which cannot be captured using static camera tests. Low response times do have a positive impact on motion blur, and higher refresh rates also help reduce blurring to a degree. It does not matter how low response times are, or how high refresh rates are, you will still see motion blur from LCD displays under normal operation to some extent and that is what this section is designed to measure. Further technologies specifically designed to reduce perceived motion blur are required to eliminate the blur seen on these type of sample-and-hold displays which we will also look at.
We used the Blurbusters.com Ghosting Motion Test which is designed to be used with pursuit camera setups. The pursuit camera method is explained at Blurbusters as well as covered in this research paper. We carried out the tests at various refresh rates, with and without ULMB enabled. These UFO objects were moving horizontally at 960 pixels per second, at a frame rate matching refresh rate of the monitor.
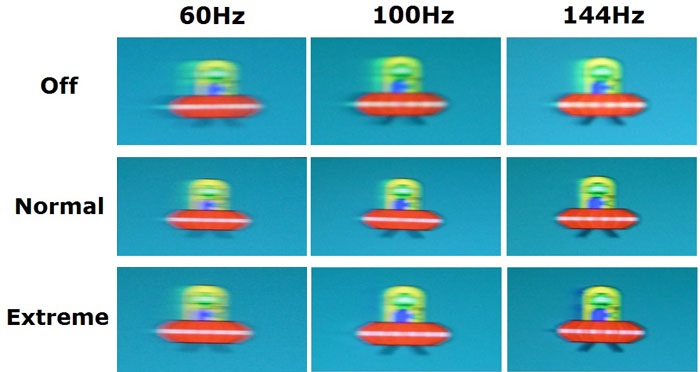
We carried out pursuit camera tests under each of the 3 OD (overdrive) settings on the Asus ROG Swift PG278Q first of all with the ULMB mode disabled. They were carried out at 3 different refresh rates between 60Hz and 144Hz. These tests can give you a good idea of actual perceived motion blur in practice on the monitor under normal operation, without any blur reduction backlight being used.
With OD first of all turned off there is a significant amount of motion blur perceived by the user when tracking moving objects across the screen. The pixel response times come in to play here as well as the refresh rate. With OD off at 60Hz, the response times were pretty slow with a 12.2ms G2G average recorded with our oscilloscope. This manifests itself with a significant motion blur in practice. Switching up to 100Hz and then 144Hz brings about positive changes in response times when OD is off and with the higher refresh rate. By the time you are running at 144Hz with OD off, the average G2G figure has improved to 6.9ms. The blurring is reduced at higher refresh rates (OD off) as a result of both the improved response times, and the improved refresh rate.
Switching the OD setting up to the optimal ‘normal’ mode, there are noticeable improvements in response times and in resulting motion blur. At all refresh rates there is a marked improvement in blur compared with OD off, as you would expect. We had measured a consistent 2.9ms average G2G response time with OD normal at all refresh rates. As you increase the refresh rate with OD set to normal the blurring is reduced each time. It is not eliminated entirely due to the nature of the sample-and-hold LCD display and the tracking of your eyes. No matter how fast the refresh rate and pixel response times are, you cannot eliminate the perceived motion blur without other methods (which is where ULMB comes in).
With OD set to the maximum ‘extreme’ setting there is again an improvement in blurring as you increase the refresh rate. We had measured a consistent 2.4ms G2G average response time at all refresh rates in this mode, but you can see that some of the overshoot artefacts become clear by the time you reach 144Hz. There is a dark halo behind the moving object which is distracting. Remember also that these UFO tests are only testing a few sample colour transitions, but we had measured some significant overshoot across many different G2G changes with OD set to extreme. We will reiterate that OD normal is optimum on this screen.
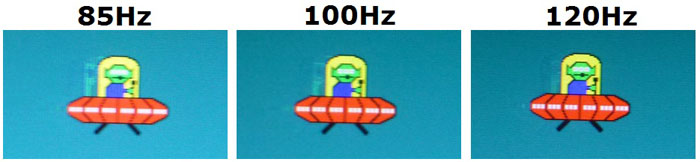
ULMB Enabled (PW = 100)
We left the strobe pulse width length at maximum setting here as it has an impact on brightness if you lower it, in an attempt to reduce motion blur even further. We felt the results were very good without needing to reduce the strobe length anyway here. With ULMB enabled the backlight is strobed briefly, once per refresh, for low persistence. The brief backlight flash prevents tracking-based motion blur and the moving object is far easier to see when tracking it across the screen with your eyes (or by the pursuit camera). There is extremely little leftover ghosting caused by pixel transitions (virtually invisible to the human eye), since nearly all (>99%+) pixel transitions, including overdrive artefacts, are now kept unseen by the human eye, while the backlight is turned off between refreshes.
The clarity of the moving image is improved significantly and tracking across the screen with your eye is much easier and clearer. You will note there is some cross talk evident here in the form of the trailing image, and a result of the strobe timing. These images were taken at the centre of the screen vertically, so it gives you a good indication also of the strobe cross-talk levels on this display, in the central region. In the middle region of the screen it is at low/moderate levels but is not too bothersome in practice. The cross-talk is reduced as you increase the refresh rate as well which is pleasing. Again you can see the effects of some overshoot on the Asus screen with a bright halo behind the moving image being apparent. These tests give you a good visual indication of the improvements which ULMB can bring in perceived motion blur.
——————————————————————————————————
See our Acer Predator XB270HU review for all the same ULMB tests on that IPS-type panel.
——————————————————————————————————
Strobed Backlights for Other Uses

Scanning and strobed backlights are also found in many newer HDTV’s. However, many of them create far more input lag than computer monitors due to them combining motion interpolation along with scanning backlights. That said, a scanning backlight does benefit live fast-motion material. There is much less motion blur elimination for movies and low frame rate material (non-interpolated) though.
The best material for scanning and strobed backlights, is material that has a frame rate matching the refresh rate, and contains no source-based blur. This include fast live action taken using video cameras utilizing a fast shutter speed and without over-compression (which can introduce blur). Examples include fast pans in sports like football, hockey, NASCAR racing, ski racing, bike racing, Red Bull air races, etc.
Video games running at high frame-rates also benefit significantly, as already covered in this article. Other computer operations, such as smooth-scrolling of text and web browsers, can also benefit noticeably from a scanning/strobed backlight that allows crystal-sharp moving text. It is also worth noting that LightBoost has far less input lag than the vast majority of these existing HDTV-based scanning backlights.
Disadvantages and Issues
While scanning backlights and the new strobe backlights can certainly help with motion blur reduction, there are some issues which go along with them which you should be aware of.
Flicker
Because the backlight is being constantly strobed on and off there is of course the chance that the user will see flicker from the screen. This is more apparent at lower refresh rates and when you switch the feature on we detected a faint flicker to the naked eye. It wasn’t particularly obvious or distracting we felt during dynamic content and gaming. For general desktop and day to day use you do not want to have any blur reduction backlight enabled as it is not useful at the Windows desktop. For games the moving images are changing so fast that you’re unlikely to see any flicker anyway and the benefits of the reduced motion blur are likely to out-weigh any flicker. For displays which support blur reduction backlights at higher refresh rates, the flicker is reduced somewhat. For instance a backlight strobing at 85Hz will show more visible flicker than one strobing at 144Hz.
Reduced Brightness
This may or may not be a disadvantage, depending on whether you were already reducing the brightness of your monitor in the first place. It’s certainly a limitation of most strobe backlight systems. To reduce motion blur, the dark periods of the image need to be sufficiently long and in doing so, the overall perceived brightness is greatly reduced. It is probably still adequate for some users, and we expect that as displays develop we will see brighter backlight systems used which will help overcome this limitation more and more. The upper brightness limits of LightBoost and most blur reduction backlights are certainly much lower than the maximum brightness without the feature, but in a lot of cases they should still be fine for normal or darkened lighting conditions. If in doubt, check a review where the brightness range has been measured under the blur reduction mode like we do in our reviews. Also keep in mind that contrast ratio seems to be impacted by a small amount when some strobe backlights are enabled, certainly with older LightBoost methods.
Impact to Colours
We’ve already seen from our tests that LB seems to impact colour temperature but about 20% (on the VG278HE at least), making the image overall a bit cooler. Furthermore without access now to the OSD controls in most areas, this may be hard for some users to correct. Picture adjustments are still accessible in NVIDIA Control Panel, and calibration with a colorimeter tool can help overcome this and correct offset gamma and white points, but if you’re wanting to switch between LB off and on for different uses, it may become a pain having different profiles required. Some manual by-eye calibration using various online or software based tools may help get a screen looking more to your liking perhaps. Natively supported blue reduction backlights seem to do a better job at maintaining the same picture quality (apart from the reduced brightness) which is pleasing.
Strobe Cross-Talk
Strobe cross-talk is the appearance of a ghosting trail image on the screen behind moving objects. It is a side-effect of the strobe timing and cannot be avoided. However, it can be reduced and sometimes the user is able to control whereabouts on the screen the issue manifests itself. Increasing the refresh rate, and therefore frequency of the strobing can help reduce the cross-talk visibility somewhat. Depending on the timing of the strobe, the cross-talk may appear at different points on the screen. You are normally reliant on how the manufacturer has set up the blur reduction mode and that in turn dictates where on the screen you might see this issue. You would need to have control over the strobe timing as the user to be able to influence where on the screen the cross-talk appears.
Since the centre of the screen is most important for gaming as it is where the player is most commonly focusing, it is important to ensure this section is blur free and does not suffer from ghosting problems caused by the strobe cross-talk. In an ideal World the user would have some control over the strobe phase setting which if adjusted basically would allow the user to choose where on the screen is clearest and to suit their taste, whether that’s providing the blur improvement at the top, middle or bottom region. Some degree of cross-talk is unavoidable and it’s important to understand we’re only really talking about being able to “move” where the clearer regions are.
The BlurBusters strobe utility provided user control over the strobe timing to allow you to move this cross-talk and improve certain areas of the screen to suit your needs. As yet, we’ve not seen it provided as an option direct from any monitor. If you use the following BlurBusters TestUFO online motion test (full screen) you can more easily identify the position of any cross-talk on a screen using a blur reduction backlight.
Further Reading
- BlurBusters.com
- BlurBusters list of Motion Blur Eliminating monitors
- Thread on Overclock.net
- Thread on Overclockers.co.uk
- Thread on [H]ard|Forum
- Thread on esreality
Conclusion
Original Article Conclusion 21/3/13: We went into this article with an open, but quite sceptical mind about motion blur reduction backlights. We’d tested several scanning backlight systems in the past and never been very impressed at all. We’ve talked in this article about the different techniques used and what a good scanning backlight system would need to look like to offer decent results, and older attempts in the desktop monitor market had certainly never really delivered in our opinion.
We expected similar mixed results from the new LightBoost method which we’d read about with interest. We weren’t expecting much but all in all we were suitably impressed to be honest with the performance we saw. There’s a few limitations with the technology in its early days at the moment (limited brightness and possible flicker mainly), but there are certainly some big benefits for anyone wanting to improve their gaming experience on an LCD screen. We were very impressed by the improvements it brought to moving images, providing greatly reduced motion blur in practice and making eye-tracking much clearer and easier. This brings obvious advantages for any kind of gaming or fast moving content, where the hold-type nature of LCD’s has really been a problem for manufacturers for a long time. We always recommend fast response time screens for high end gaming, preferably with 120Hz+ refresh rates to bring about obvious smoothness and frame rate benefits. The fact that many of these screens support stroboscopic backlights is an added bonus and really does add another level of performance improvements. If you’ve got a LightBoost capable monitor, give this method a go as in our opinion it really is worth it.
Updated Conclusion 17/3/15: Since this article was originally published we’ve seen a fairly decent uptake of blur reduction backlights by some of the main manufacturers. Natively supported blur reduction modes like those BenQ, Eizo and LG have introduced make using them so much easier. They also seem to offer better performance than LightBoost ‘hack’ methods, helping maintain a more reliable colour and picture setup. More recently still we’ve seen NVIDIA’s new ULMB mode coupled with their G-sync technology, offering blur reduction options for quite a few new G-sync enabled displays. There are still some issues inherent to blur reduction strobed backlights, most notably their limiting brightness and the appearance of strobe cross-talk. We hope more manufacturers will adopt blur reduction modes in the future, and also figure out a way (like Eizo did in fact) to provide high brightness possibilities when they are being used. We would also like to see more user control over not only the pulse width (provided fairly often), but also the strobe timing, to give users that bit more control over the feature.
 | If you appreciate the article and enjoy reading and like our work, we would welcome a donation to the site to help us continue to make quality and detailed reviews and articles for you. |