There's been some fairly
significant developments in the World of LCD monitors in the last 18 months when
it comes to gaming. We're not talking about changes in
response time either. For
years, this was the spec which everyone looked at and which was used to help
determine whether a screen was a suitable model for fast paced gaming. People
wanted images which were free of ghosting, trailing and motion blur, and
response time was, for a long while, very important in determining this. TN Film
was always the fastest, with VA and IPS panels struggling to keep up due to
their different pixel structures and electronics. Then came
Response Time Compensation (RTC) technology which significantly improved responsiveness
of the panels across the board, and had an impact not only with TN Film panels,
but with the previously slow VA and IPS offerings. Nowadays all panel
technologies are capable of offering some fairly decent responsiveness but
top-level response times have reached a fairly good point now. You can easily
find models with 2ms G2G rated TN Film panels. In the middle of last year we
even saw the World's first 1ms rated screen, the
Viewsonic VX2739wm which we tested at the time. This 1ms response time isn't
quite there yet and has some issues, and overall response times have remained
fairly static for quite a while now.
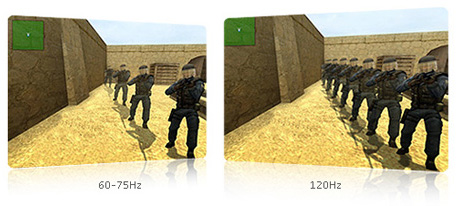
What has changed in the last 18 months though are
three things - the support of improved frame rates, increased frequencies and 3D
stereoscopic gaming. We have seen the introduction of LCD monitors which
support a true 120Hz refresh rate, one of the first being the
Samsung 2233RZ which we tested back in September 09. This 120Hz allows for
improved frame rates above the previously limits of 60 / 75fps from regular
models. The 120Hz frequency also allows for the support of 3D gaming using
NVIDIA's 3D Stereoscopic graphics cards, shutter glasses and a whole range of
supporting games from many software companies. Gaming on LCD monitors has
changed a lot and monitor manufacturers are becoming increasingly concious of
the shift.

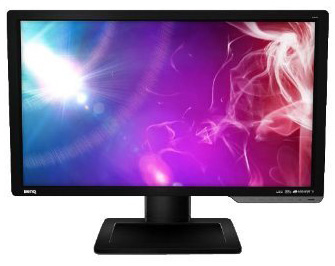
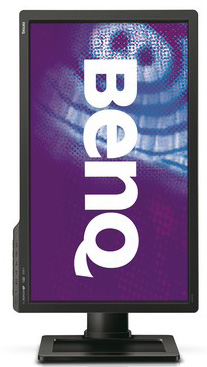
We have BenQ's latest offering with us at the
moment for testing. The BenQ XL2410T is their first 120Hz monitor, offering a
big 23.6" screen size and also being combined with the ever-popular (and somewhat
over-hyped)
W-LED backlighting technology. We'll talk about this more a little
later on. BenQ's XL2410T is attracting a lot of attention in the gaming world
for other reasons as well. It has been made for professional gamers with input
from two famous Counter Strike (CS) players by the names of HeatoN and
SpawN. BenQ's online material states that "BenQ – the world's leading LED monitor brand – has again successfully taken the
lead to launch LED monitor for gaming! Such technological revolution is bound to
bring a whole new visual experience and enjoyment to the world of gamers."
Let's take a look at the specs for the first:
|
Size |
23.6"WS |
Colour Depth |
16.7m (6-bit+FRC) |
|
Aspect Ratio |
16:9 |
Colour Gamut |
sRGB / ~72% NTSC colour gamut (W-LED) |
|
Resolution |
1920 x 1080 |
Viewing Angles |
170 / 160 |
|
Response Time |
2ms G2G + 120Hz |
Panel Technology |
TN Film |
|
Contrast Ratio |
1000:1 and 10 million:1 DCR |
Interfaces |
DL-DVI (HDCP), D-sub, HDMI |
|
Brightness |
300 |
Colour |
Black bezel and stand |
|
Special Features |
Tilt, height, swivel and rotate adjustments.
Headphone jack, 120Hz and 3D support |
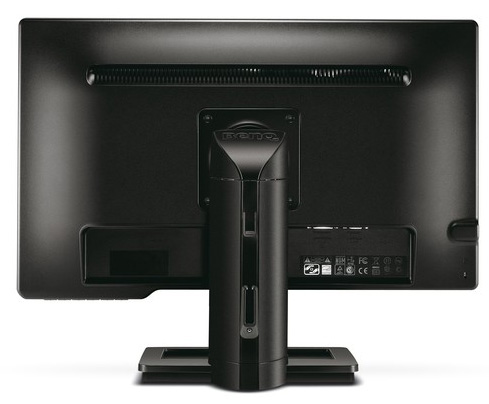
Above: front and
rear views shown. click for larger versions.
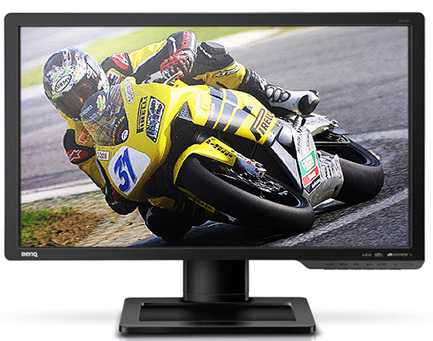
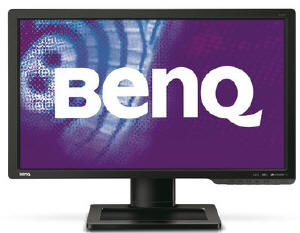
The XL2410T is 23.6" in size and is in a 16:9
aspect ratio. The bezel and stand are a matte black finish all over. The bezel
is reasonably thin at ~20mm top and bottom, and 23mm on the sides. There is a
small silver BenQ logo in the bottom left hand corner. In the bottom right hand
corner the bezel extends to be a little thicker at about 32mm.
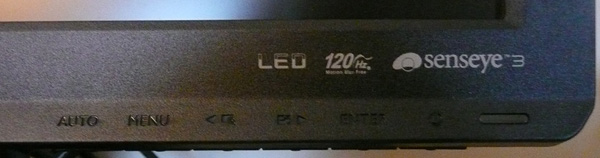
This corner
features the control buttons for the screen and OSD menu which are situated
along the bottom edge of the screen. There are logos for LED, 120Hz and Senseye
3 located just above the buttons. In the far corner there is an elongated power
light which glows a subtle green colour during normal operation, and an orange
colour when in standby.
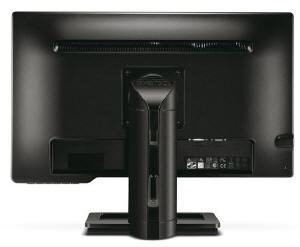
The back of the screen is an all-black finish as
well and everything is tucked nicely out of the way. The back of the screen
becomes ever so slightly warm after prolonged use, but nothing bad at all. There is a
very faint electronic buzz if you listen very closely to the screen.
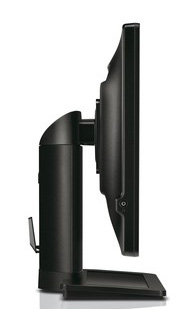
Above: side
views of the screen.
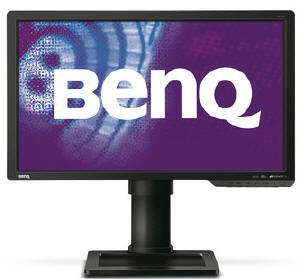
From the side, the screen itself is pretty thin
thanks to the use of W-LED backlighting. The overall profile of the monitor is
fairly thick though since the stand is big and sturdy as you can see in the
images above. You will notice the cable clip provided on the back of the stand
for keeping all those cables nicely out of the way. The left hand edge of the
screen also provides an easy access headphone jack (for HDMI audio). It would
have been nice to see some USB ports available on this model as there are none
at all. That's a bit of a shame.
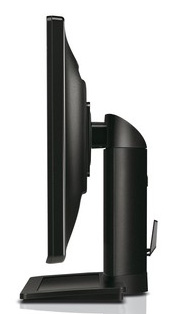
Above: screen
showing swivel and rotate adjustments
The screen offers a decent range of ergonomic
adjustments thanks to the high end stand being used. The tilt adjustment between
-5 / 20° is smooth and easy enough to use and offers a good range to find a
comfortable viewing position. The height adjustment offers a 130mm range and
although a little stiff, it is easy to operate. At the lowest setting the screen
actually clicks and locks into place and you have to press a release button on
the back of the stand to move it again.
There is a side to side swivel offering a -45 /
45° movement. This is quite stiff though and does result in the whole base being
moved in many cases when you change the angle. The 90° portrait / landscape
rotation feature is easy to use and not too stiff. The screen actually comes
packaged in portrait mode so you will quickly get accustomed to this operation
when you set up the screen. Materials are of a good standard and the screen
feels pretty well built. There is a slight side to side wobble of the panel if
you shake the screen on the stand but nothing severe.
Above: height
range shown. Click for larger versions
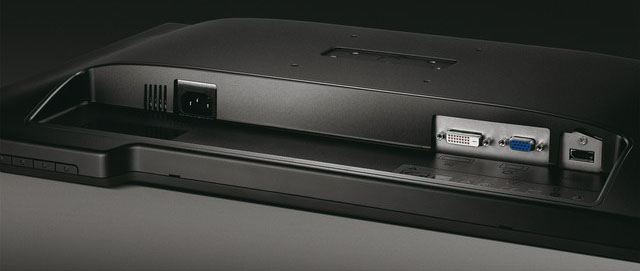
Above: interface
connection options shown
The back of the screen offers connections for
power, Dual-link DVI (with HDCP support), D-sub and HDMI as shown above. As I've mentioned already
it would have been nice perhaps to see some USB ports included. DisplayPort is
also absent which might influence some buyers. The power supply is built in so
you only need a kettle lead to power the screen.

Some background about the collaboration with other
developers comes from BenQ's website:
"HeatoN and SpawN rocked the gaming world as the core of Ninjas in Pajamas (NiP)
and SK Gaming teams that created a legend with their many triumphs at
Cyberathlete Professional League (CPL) tournaments and the World Cyber Games
(WCG). As two of the brightest stars in the Counter-Strike universe, they know
what gamers really need and what they really crave in their gear. That’s why
BenQ invited HeatoN and SpawN to join forces and develop an LED display just for
hardcore gamers like themselves.
The aim was to create a display mode that
provides gamers with a totally accurate representation of each scene in a
virtual world so they're never put at a disadvantage in a key encounter with the
enemy because of hardware shortcomings. There are also two user-configurable
modes that let gamers set and save the exact brightness, contrast, sharpness,
and : Red/Green/Blue color tint that they prefer and that let them be at their
best in a pitched battle with a crafty enemy."
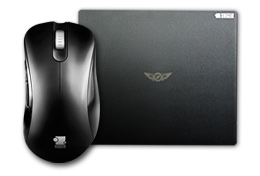

BenQ is also working with famed competitive gaming equipment manufacturer ZOWIE
on gear like the ZOWIE EC Series Gaming Mouse and SWIFT Gaming Mouse Pad. This
was provided in the package we received for review, although does vary by
country. Check with the retailer if you want to be sure whether you will receive
it.

The OSD menu is accessed using the 'menu' button
control. The other controls do give you quick access to interface selection (the
'enter' button), display modes (aspect ratio control - via the 'right' arrow),
and auto adjustment when in analogue mode.
Once in the menu there is a pretty decent range of
options available. You navigate through each sub-section using the left/right
arrows and enter into specific sections using the 'enter' button (and back out
using the 'menu' button). The OSD is fairly easy to use although not as
intuitive as some others we have used. You can sometimes find yourself pressing
the wrong buttons or going into the wrong sections. The above 'picture' sub-menu
gives you control over the brightness and contrast and also provides different
gamma modes, access to the colour settings menu and control over the
AMA
(advanced motion accelerator) function which we will test a little later.
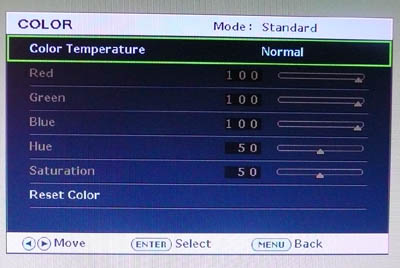
The colour menu alows you to choose between a
series of preset colour temperatures or set into a mode where you can control
the RGB settings yourself.
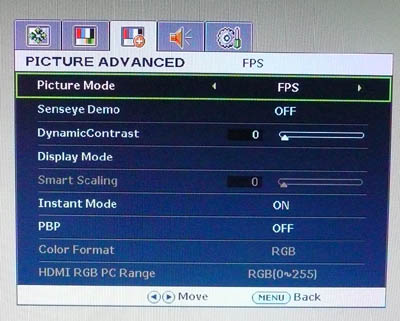
The 'picture advanced' sub-menu gives you access
to some other features including the preset Senseye modes, dynamic contrast
ratio, display mode (aspect ratio control), instant mode (for reducing input
lag) and the Picture By Picture (PBP) setting. We'll take a look at some of
these later on in the review.
The Picture-by-Picture (PBP) display mode provides
side by-side display of video from two independent video sources. It supports a
variety of interfaces—including D-sub, DVI, and HDMI.
In terms of power consumption the spec states
maximum usage of 40W during operation and 28W in ECO mode.
|
 |
|
State |
Power Usage
(W) |
|
Factory Default |
32.1 |
|
Calibrated Settings |
24.6 |
|
ECO Mode |
20.0 |
|
Standby |
1.7 |
|
We tested this ourselves and found that out of the
box the screen used a very low 32.1W of power. This was reduced a little to 24.6W
once calibrated
(see calibration section)
since we had reduced the OSD brightness control. If you enter the ECO preset,
the brightness control is locked at 20% and you have a power consumption of
20.0W. In standby, the screens power
consumption was only 1.7W.

On a side note, I was also able to access the BenQ
factory menu (hold menu button while powering on > press menu) to confirm that
the panel being used here is the M236H3-L05 panel from Chi Mei Innolux (formerly
Chi Mei Optoelectronics / CMO). You can also disable the big purple BenQ screen
boot-up logo if you want which is handy.

Colour
Accuracy, Black Depth and Contrast
The Panel and Backlighting Unit
The BenQ XL2410T utilises a Chi Mei Innolux
(formerly Chi Mei Optoelectronics / CMO) M236H3-L05 TN Film panel. It is
capable of producing 16.7 million colours with 6-bit colour depth and Frame Rate
Control (6-bit+FRC). Being
W-LED backlit the screen can offer a colour gamut covering
approximately 72% of the
NTSC colour space. Since this is a white-LED
backlight, the gamut does not extend beyond this colour space like RGB LED, or
indeed like W-CCFL backlighting would. This colour space is approximately the
same as the sRGB reference.
Testing Methodology
An
important thing to consider for most users is how a screen will perform out of
the box and with some basic manual adjustments. Since most users won't have
access to hardware colorimeter tools, it is important to understand how the
screen is going to perform in terms of colour accuracy for the average user.
I
restored my graphics card to default settings and disabled any previously active
ICC profiles and gamma corrections. The screen was tested at default factory settings using the DVI interface, and analysed using
an X-rite i1 Pro spectrophotometer (review coming soon) combined with
LaCie's Blue Eye Pro software suite. An X-rite i1 Display 2 colorimeter was
also used to verify the black point and contrast ratio since the i1 Pro is less
reliable at the darker end.
Targets for these tests are as follows:
-
CIE Diagram - validates the colour space
covered by the monitors backlighting with the black triangle representing the
display
-
Gamma - we aim for 2.2 which is the default
for computer monitors
-
Colour temperature / white point - we aim
for 6500k which is the temperature of daylight
-
Luminance - we aim for 120
cd/m2, which is
the recommended luminance for LCD monitors in normal lighting conditions
-
Black depth - we aim
for as low as possible to maximise shadow detail and to offer us the best
contrast ratio
-
Contrast ratio - we aim
for as high as possible. Any dynamic contrast ratio controls are turned off here
if present
-
dE average / maximum -
as low as possible.
If DeltaE >3, the color displayed is significantly different from the
theoretical one, meaning that the difference will be perceptible to the
viewer.
If DeltaE <2, LaCie considers the calibration a success; there remains a
slight difference, but it is barely undetectable.
If DeltaE < 1, the color fidelity is excellent.
Default settings of the screen were as follows. It should be noted that dynamic
contrast ratio is disabled by default, but AMA is active (see
response time section for
more info)
|
Monitor OSD Option |
Default Settings |
|
Brightness |
100 |
|
Contrast |
63 |
|
Gamma |
1.8 |
|
Picture Mode |
FPS |
BenQ XL2410T - Default Factory Settings

|
|
Default Settings |
|
luminance (cd/m2) |
206 |
|
Black Point (cd/m2) |
0.21 |
|
Contrast Ratio |
981:1 |
There's quite a lot I want to say about the
default settings of the screen really. Out of the box the screen is set in the
"FPS" preset mode, probably because this is a gamer-orientated screen. This has
a default (and locked) gamma setting in the OSD of 1.8 and the color menu is
also locked. Brightness is set at 100 as well which is too high for comfortable
office use. The screen looks very bright and the colours look a little washed
out. Another thing to note in this preset is that the sharpness seems to be a
little bit off. Maybe this is deliberate as some "advantage" for gaming and for
playing FPS games, but it's a bit odd. The actual OSD sharpness control is
greyed out as well, so you can't change it (it's set at 3). It's a bit of a
strange feature, and not ideal for day to day use. See the
general and office use
section for some more information. We'll test the other preset
modes in a moment.
Testing with the i1 Pro spectrophotometer revealed the above
results. The gamut triangle confirmed that the monitor is indeed a standard
gamut screen as we knew from the specs and the use of W-LED backlighting and
covers the sRGB reference very well. Gamma
was measured at 1.9 which is bad in the sense that it is a considerable way off
our target of 2.2 (13% out), but good in the sense that it at least closely matched the locked OSD
1.8
setting for gamma. It actually ranged from 2.01 in the dark shades down to 1.66
in light greys, but averaged at 1.9 overall.
Colour temperature was recorded at 7438k which is
a little way out (14%) from our target of 6500k. Luminance was recorded at 206
cd/m2 which
although a little higher than we'd like, was not too mad. Considering the OSD
brightness control was set at 100, this was actually pretty low. Black depth was
recorded at a very respectable 0.21 cd/m2, giving us an excellent static
contrast ratio of 981:1. This was only very slightly off the specified 1000:1
figure, so was a very good result.
Colour accuracy was sadly very poor at default
settings. Average dE was 6.3, ranging up to 10.7 maximum. This mode is clearly
not designed to return accurate and realistic colours, but perhaps this is
because the FPS mode is aimed at gamers who commonly want bright, vivid and
cartoony colours for their games. We will test some of the other modes to see if
they return more accurate colours.
BenQ XL2410T - Standard Preset, default
|
Monitor OSD Option |
Default Settings |
|
Brightness |
100 |
|
Contrast |
50 |
|
Gamma |
2.2 |
|
Picture Mode |
Standard |
|
Colour temperature |
Normal |
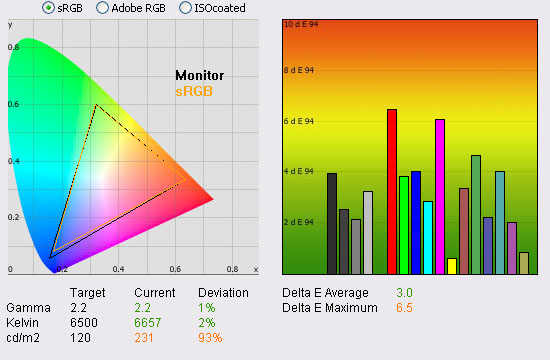
|
|
Default Settings,
Standard preset |
|
luminance (cd/m2) |
231 |
|
Black Point (cd/m2) |
0.23 |
|
Contrast Ratio |
1007:1 |
We switched to the 'standard' preset mode which
changed the appearance of the screen quite a lot. Thankfully the strange text
issue had gone and the image felt sharp and crisp again. The sharpness setting
was still at 3 in the OSD (although you could change it now if you wanted), so
it was not this that was set wrongly in the FPS mode. There must be some other
strange setting which is causing some slightly blurred and shadowed text in that
mode. The gamma mode reverted to 2.2 in the OSD which was our target in these
tests.
I ran the same LaCie reports using the i1 Pro and returned the
above results. Gamma was very close now to the target, being measured at 2.2
average and with only 1% deviance. This ranged from 2.37 in dark grey down to
2.08 in light grey so there
was still some fluctuation across the different shades. Colour
temperature was now 2% out from the target, being recorded at 6657k. Luminance
was now even higher than the default FPS preset and was recorded at 231
cd/m2. This was
uncomfortable for prolonged use. Black depth was an excellent 0.23 and we even
had a higher static contrast ratio now of 1007:1 which was impressive. The colour
accuracy was improved a fair amount as well just by switching to this mode, with
average dE now 3.0 and maximum 6.5. This was better than the FPS mode but still
a fair way off if you are doing any colour critical work. I would advise using
this mode as a starting point for any calibration or to return you slightly
better settings from your screen. Casual users may also find this adequate for
day to day use but you will probably want to turn the brightness setting down to
around 25 - 30%.
BenQ XL2410T - sRGB Preset, default
|
Monitor OSD Option |
Default Settings |
|
Brightness |
90 |
|
Contrast |
50 |
|
Gamma |
2.2 |
|
Picture Mode |
sRGB |
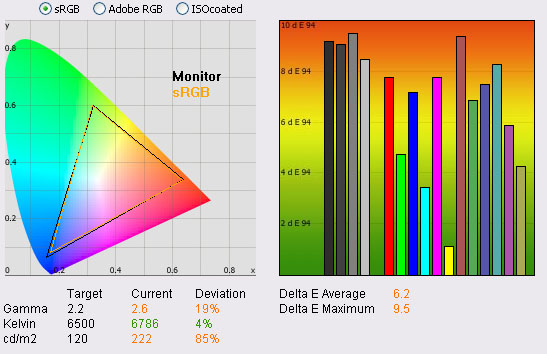
|
|
Default Settings,
sRGB preset |
|
luminance (cd/m2) |
222 |
|
Black Point (cd/m2) |
0.22 |
|
Contrast Ratio |
1011:1 |
I switched then to the sRGB preset mode. Gamma was
now a bit too high at 2.6 (again ranging from 2.74 in dark grey down to 2.58 in
light grey). Colour temp remained pretty accurate at 6786k (4% out) and
luminance remained at a very similar level to the standard mode, being recorded
at 222
cd/m2 now,
again too high really.
Colour accuracy was not as good as the standard mode sadly, with average dE of 6.2 / maximum of 9.5. I'd still stick with the standard mode for the best
results and as a good starting point for calibration.
Calibration Results

I wanted to calibrate the screen in each of the
main preset modes to determine what was possible with optimum settings and
profiling. I used the X-rite i1 Pro spectrophotometer combined with the LaCie Blue Eye Pro software package to
achieve these results and reports. An X-rite i1 Display 2 was used to validate
the black depth and contrast ratios due to lower end limitations of the i1 Pro
device.
BenQ XL2410T - Calibrated Settings - Standard Mode
|
Monitor OSD Option |
Adjusted Setting |
|
Brightness |
27 |
|
Contrast |
50 |
|
Preset |
Standard |
|
Colour Temperature |
User Mode |
|
RGB |
99, 100, 99 |
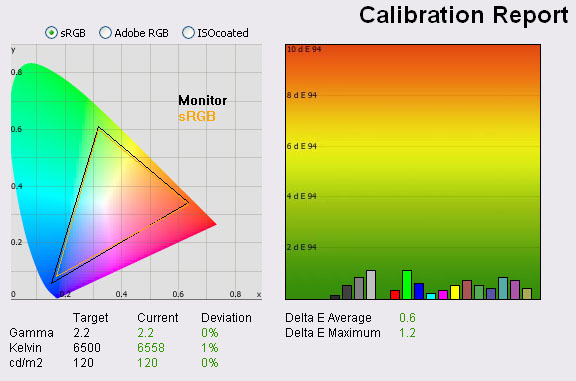
|
|
Calibrated Settings,
Standard preset |
|
luminance (cd/m2) |
120 |
|
Black Point (cd/m2) |
0.12 |
|
Contrast Ratio |
996:1 |
I reverted back to the standard preset mode but
within the OSD I changed the 'colour temperature' setting to 'user mode'. This
allowed me access to the RGB channels as part of the calibration process. I
followed LaCie's calibration process through, adjusting the OSD settings in line
with the recommendations made in the process, and then letting the software
carry out the LUT adjustments at a graphics card level and create an
ICC profile.
The screen does not feature a hardware LUT calibration option so other than the
OSD alterations, the rest of the process is carried out at a graphcis card level
in profiling the screen.
The calibration was a success. Gamma had been
corrected now to 2.2 average, with 0% deviation from our target. Colour temperature remained pretty much spot on to
our target at 6558k (1% deviance), something which we had already found accurate when switching to this
'standard' preset, even before calibration. Luminance was now spot on at 120
cd/m2, and with
an excellent black depth of 0.12 cd/m2 we had a static contrast ratio
of 996:1 which was impressive. This maintained the high contrast ratio we'd seen
from the default profiles as well, but relative to the calibrated 120 cd/m2
luminance.
Colour accuracy was also
improved drastically, from the defaults of 6.3 dE average / 10.7 maximum in this
preset, now down to 0.6 dE average / 1.2 maximum. On average, colour fidelity
could be considered excellent. The setup had
been improved a lot and gamma, white point and colour fidelity were now much
better. Limitations of the technology in terms of viewing angles and lack of
some advanced features do not make this ideal for colour critical work. However,
it should be sufficient still for an average user who wants a gaming screen but
might do a bit of sRGB photo work from time to time. With calibration the screen
can perform pretty well.
Testing the screen with colour gradients showed
smooth transitions with only slight gradation in darker tones. There was no
obvious banding present which was good. A
black level test revealed that the first four shades were crushed on this screen
and could not be distinguished. Step 5 could just be detected in this test and
of course the grey shades afterward were all visible. If you looked very closely
at the panel you could spot the
Frame Rate Control mechanism with some slight twinkling, but nothing that
you would spot in normal use.
You can use our settings and calibrated ICC
profile on your screen as well if you want. See
our ICC profile database for more information.
BenQ XL2410T - Calibrated Settings - sRGB Mode
|
Monitor OSD Option |
Adjusted Setting |
|
Brightness |
31 |
|
Contrast |
50 |
|
Preset |
sRGB |
|
Colour Temperature |
n/a |
|
RGB |
n/a |
|
|
Calibrated Settings, sRGB
preset |
|
luminance (cd/m2) |
120 |
|
Black Point (cd/m2) |
0.13 |
|
Contrast Ratio |
923:1 |
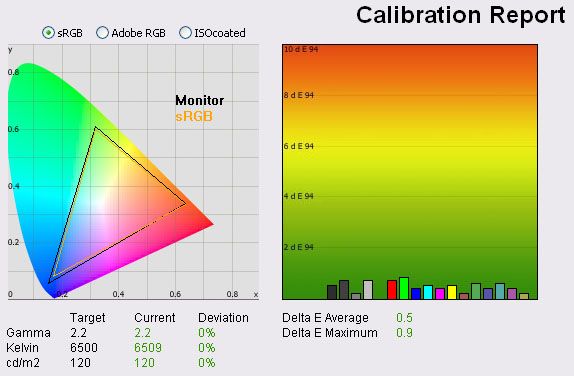
I also calibrated the screen in the sRGB preset
mode as well to see what was possible. In this mode, there is no access to the
colour temperature menu or RGB controls. The only adjustments made to the
hardware would be to change the brightness control. All other corrections were
carried out at a graphics card LUT level by the spectrophotometer.
The results were again very good. Gamma was
corrected nicely to 2.2 average with 0% deviance. Colour temperature was almost
exactly 6500k, being measured only 9k out. Black depth was again very good at
0.13, and gave us a static contrast ratio of 923:1. Colour fidelity was very
similar to the standard preset, and even ever so slightly better. dE average was
now 0.5, maximum of 0.9. Either mode can be used to obtain a decent setup and
improve colour accuracy. Again, you can use our settings and calibrated ICC
profile on your screen as well if you want. See
our ICC profile database for more information.
Calibration
Performance Comparisons
I've plotted these measurements on the above
graphs in comparison with some of the other screens we have tested in a similar
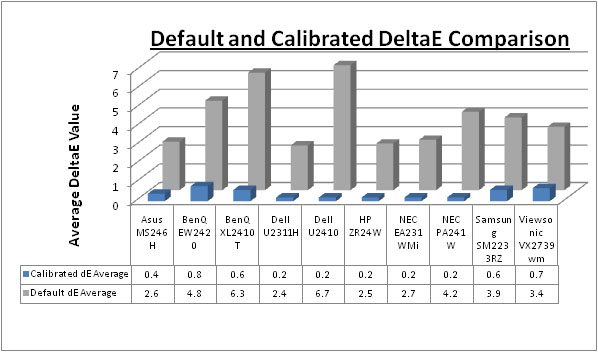
size and market segment. Out of the box, the XL2410T performs badly when it
comes to colour accuracy with a dE average of 6.3. The screen is set in it's
gamer orientated 'FPS' preset, with gamma set at 1.8 and brightness on full.
It's not really a suitable preset for obtaining accurate colours and so the
XL2410T is one of the worst in this comparison. Simply switching to the
'standard' preset gives you an average dE of 3.0 which is far more reasonably
and in keeping with some of the better performers out of the box. In fact the
similarly spec'ed 23.6" TN Film
Asus MS246H gave an out-of-the-box dE average of 2.6. The 27"
Viewsonic VX2739wm and 22"
Samsung 2233RZ are also gamer screens (TN Film based) and had a default dE
of 3.4 and 3.9 respectively.
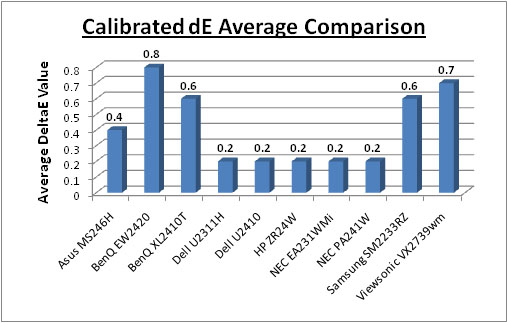
Once calibrated the XL2410T offered an improved
colour accuracy with dE average now 0.6. This left it in a similar position to
the other TN Film models, with the Samsung 2233RZ (0.6) and Viewsonic VX2739wm
(0.7) being very close. The other BenQ model we have tested recently,
the EW2420, features a 24" AMVA panel but performed to a similar level after
calibration (0.8). The other 23.6" TN Film Asus model was a little better in
this test at 0.4. The TN Film models cannot compete with the IPS based screens
which all reached a very low dE average of 0.2 after calibration. Don't forget
that these models also offer further advantages when it comes to colour critical
work thanks to their wide viewing angles, 8-bit panels etc. Of course
professional grade monitors like the NEC PA series also offer other high end
features which separate them from some of these other models, including extended
internal processing, 3D LUT's and hardware calibration. These comparisons are
based on a small selection of tests, so it should be remembered that other
factors do come into play when you start talking about professional use.
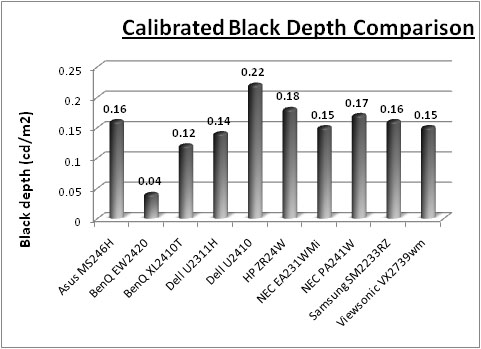
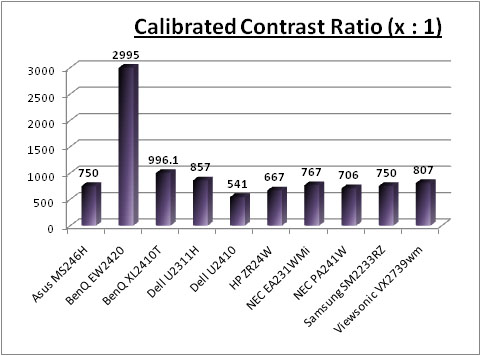
I've included a comparison of the black point and
contrast ratio above as well. The XL2410T was actually the second best in this
comparison with a black depth of 0.12 and contrast ratio of 996:1. This was a
very impressive result and ahead of the best IPS models here by a small amount
(Dell U2311H - 0.14 / 857:1). The BenQ EW2420W had a staggering black depth from
its modern AMVA panel so is miles ahead of the others here (0.04 / 2995:1). A
very good performance from the XL2410T though in this test.
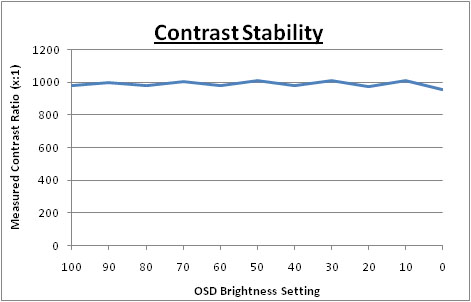
Contrast
Stability
I wanted to see how much variance there was in the screens contrast as we
adjusted the monitor setting for brightness.
In theory, brightness and contrast are two independent parameters, and good
contrast is a requirement regardless of the brightness adjustment.
Unfortunately, such is not the case in practice. We recorded the screens
luminance and black depth at various OSD brightness settings, and calculated
the contrast ratio from there. Graphics card settings
were left at default with no ICC profile or calibration active. Tests were
made using an X-rite i1 Display 2 colorimeter. It should be noted that we used the BasICColor
calibration software here to record these, and so luminance at default
settings varies a little from the LaCie Blue
Eye Pro report.
These were measuered in the
'standard' preset mode rather than the default FPS preset. Colour settings
were not altered at this stage however.
|
OSD Brightness |
Luminance
(cd/m2) |
Black Point (cd/m2) |
Contrast Ratio
( x:1) |
|
100 |
235 |
0.24 |
978 |
|
90 |
220 |
0.22 |
999 |
|
80 |
206 |
0.21 |
980 |
|
70 |
191 |
0.19 |
1004 |
|
60 |
176 |
0.18 |
979 |
|
50 |
162 |
0.16 |
1010 |
|
40 |
147 |
0.15 |
979 |
|
30 |
131 |
0.13 |
1010 |
|
20 |
117 |
0.12 |
973 |
|
10 |
101 |
0.10 |
1011 |
|
0 |
86 |
0.09 |
958 |
|
Luminance Adjustment Range = 149 cd/m2
Black
Point Adjustment Range = 0.15 cd/m2
Average
Contrast Ratio = 989:1
|
The luminance range of the XL2410T was pretty
reasonable but not staggering. At the top end the maximum luminance reached at
100% brightness was 235
cd/m2. This is
a little way off the specified maximum brightness of 300 cd/m2 but
should be adequate for most users. 3D gaming will normally require a higher
setting than our standard 120 cd/m2 so at least this brightness
control gives you a reasonable range if you need to set it higher. At the lowest
end, the luminance ranges down to 86 cd/m2 at 0% setting. A setting
of about 25 - 30% should return you a luminance of around 120 cd/m2
for comfortable day to day use in this 'standard' preset mode.
Black depth is very good
ranging from 0.24
cd/m2 down to
0.09 cd/m2 at the lower end. This is very good and a testament to the
strengths of modern TN Film panels. Contrast ratio was an average of 989:1
across the range of adjustments which was excellent, and was pretty stable. The
stability is shown in the graph below:
Dynamic Contrast
|
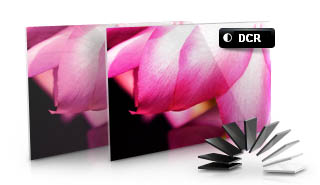 |
The BenQ XL2410T features a dynamic contrast ratio
(DCR) control, which boasts a spec of 10,000,000:1 (10 million:1).
Dynamic contrast ratio involves controlling the
backlight of the screen automatically, depending on the content shown on the
screen. In bright images, the backlight is increased, and in darker images, it
is descreased. For this test I would use the colorimeter to record the
luminance and black depths at the two extremes. Max brightness would be
recorded on an all white screen once the DCR has caught up. Black depth would
be recorded on an all black screen. |
The DCR feature can be selected through the
OSD when you are in most of the modes, including the gaming and movie presets.
It is not available in the sRGB, standard and ECO modes. When the function is
active you can actually control its level from 1 to 5. While this mode is in
use, you cannot manually adjust the brightness or contrast settings in the OSD
without it turning this feature off. The changes are smooth but are very fast
and you can spot a sudden change in the brightness as you switch between a
dark screen and a light screen. They are probably a bit too fast in fact,
although perhaps that is designed with sudden gaming changes in mind. The settings 1 to 5 all seemed pretty similar.
So where does this 10 million:1 figure come
from? - As opposed to gas-discharge lamps (CCFL), LEDs can be lit up instantly
or turned out completely. This can lead to extremely high levels of dynamic
contrast. Figures in the millions are very common now. But in real
applications, for example when watching a movie, there are no absolutely black
frames even in the credits. Most of the time there is something on the screen
besides blackness and a monitor with a huge specified dynamic contrast will
never have the chance to deliver it in practice. As a result, there is no real
practical point in increasing the dynamic contrast higher than about 10,000:1
which has already become standard for many monitors, including those with a
backlight based on CCFL lamps. Keep in mind that DCR figures are often
exagerated as a result, and since you will probably never get to utlise the
full figure in practice, don't be fooled into buying into the hype too much!
|
|
FPS
Preset Mode, DCR level 5 |
|
Max luminance (cd/m2) |
210 |
|
Min Black Point (cd/m2) |
0.14 |
|
Max Dynamic Contrast Ratio |
1500:1 |
The dynamic contrast ratio control worked a little
but in these tests it didn't have a great impact to be honest. As I've already
mentioned, the transitions seemed very fast and in our test we are working with
a 95% black /white screen. This should give you a good indication of the DCR's
use in real applications. On a white screen the luminance ranged up to 210
cd/m2 maximum which was only a little
bit off the maximum luminance we had achieved in our contrast stability tests of
235 cd/m2. On a black screen the black point reached 0.14 cd/m2
which was again only a little off the minimum we had acheived before of 0.09
cd/m2. Overall this gave us a modest dynamic contrast ratio of
~1500:1.
Even if we took
our maximum and minimum luminance values we'd seen from the contrast stability
tests (100% brightness and 0% brightness) we would only be able to reach 235
cd/m2 max and 0.09 cd/m2 minimum. This would only give us a DCR
of around 2611:1 as well, so still nowhere near the specified 10 million:1. Even
if we assumed the screen could reach its maximum specified luminance of 300 cd/m2,
which it can't, you would need to be able to get a black depth of 0.00003 cd/m2
to get this massive DCR. Really it means the LED's need to be turned off
completely to reach this massive figure, which in normal use they never are. If
you're turning them off completely to achieve this black point, you might as
well assume the black reachs 0 cd/m2 so you could really choose a
spec for DCR of anything up to inifinity:1! These modern DCR figures on paper
are meaningless really.
Viewing Angles
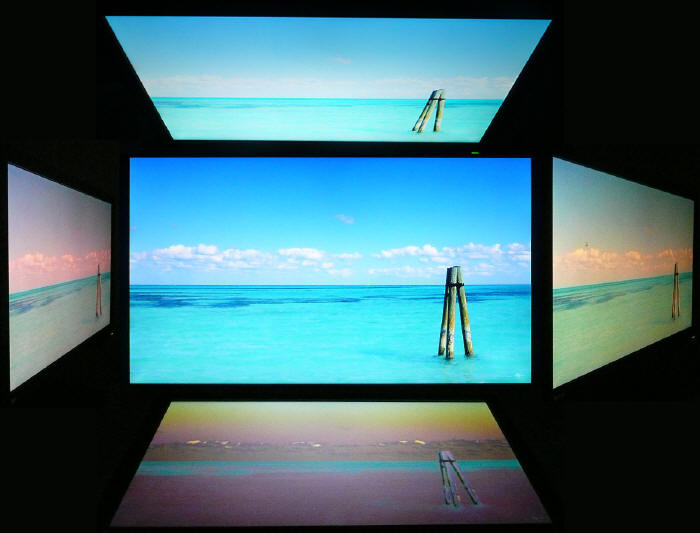
Above: Viewing
angles shown from front and side, and from above and below. Click for
larger image
Viewing angles of the screen were as you might
expect from a
TN Film panel. Moving your head horizontally away from a central point
introduced a rather noticeable contrast shift at even a small angle. As you
moved further a yellow and a pink colour tone shift was introduced which was a
shame. The horizontal angles are not nearly as good as modern IPS panels of
course. Vertically there was again a contrast shift from above, leading to a
whitening of the image from a fairly small angle. From below, the screen showed
the characteristic TN Film darkening which is pretty severe. You will need to
ensure the screen is positioned carefully for a head on view. Unfortunately
there are some fairly obvious shifts in contrast if you move your head even
slightly in a vertical field, and so viewing websites or content with solid
colours can give you an issue. This is more noticeable on darker backgrounds
where some detail can get 'crushed' as you move your head. If you aren't aligned
centrally, there is a difference in the darkness of the colour and the contrast
as you look across the screen. Viewing angles are not a strong point of this
screen, nor indeed TN Film technology as a whole.
Panel Uniformity
Measurements of the screens luminance were taken
at 35 points across the panel on a pure white background. The measurements were
taken using BasICColor's calibration software package, combined with the X-rite
i1 Display 2 colorimeter. The above uniformity diagram shows the difference, as
a percentage, between the luminance recorded at each point on the screen, as
compared with the reference point of a calibrated 120 cd/m2. This is
the desired level of luminance for an LCD screen in normal lighting conditions,
and the below shows the variance in the luminance across the screen
compared with this point. It is worth noting that panel uniformity can vary from
one screen to another, and can depend on manufacturing lines, screen transport
and other local factors. This is only a guide of the uniformity of the sample
screen we have for review.
Uniformity of Luminance

The overall uniformity of the panel was
moderate here. Only at a central point (calibrated) did the screen reach the
desired 120
cd/m2 luminance. The rest of the screen
was darker to varying degrees, and the luminance did not range above this
central point. Only 25% of the screen was within a 10% deviance of the
target value which was a little disappointing. Approximately 57% was within
15% deviance, but in some areas the variance was higher. In the worst cases,
the luminance ranged down to 95 - 99 cd/m2 in the top right and
left hand corners. This is where there was most variation from the target.
In practice, the viewing angle contrast shifts were perhaps more of an issue
than any uniformity variance you could detect from the panel, so it wasn't a major problem
in this regard.

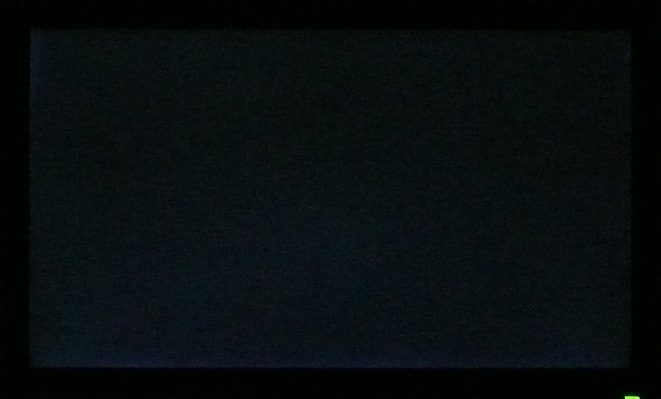
Above: All black
screen in a darkened room. Click for larger version
As usual we also tested the screen with an all
black image and in a darkened room. A camera was used to capture the result. The
uniformity of the backlighting was pretty good in this test. There was some very
very slight leakage in the corners as you can just about pick out in the image, but
it was not too severe and you will not pick it out easily with the naked eye. There was
a little bit more leakage along the bottom edge, but again not too severe.
General and Office Applications
The BenQ XL2410T offers an adequate
solution for general office and internet applications. The 1920 x 1080
resolution and 23.6" screen size offer a good screen real estate to work with, and
side by side splitting of the screen is perfectly useable. The slightly reduced
vertical resolution (1080 pixels) compared with a 16:10 format screen (1200
pixels vertically) means you do lose a bit of height however. I personally
prefer a 1920 x 1200 screen for office work.
The 0.2715mm pixel pitch offers a comfortable text
size for day to day use, a little bigger than some of the modern ultra-high
resolution models like the 2560 x 1440 res 27" models for instance. Default
luminance of the screen was recorded at 206
cd/m2 which is too high for
prolonged office use. You will want to turn the screen down to about 25 - 30%
brightness to achieve a luminance of around 120 cd/m2. In doing so
you also reduce the power consumption of the screen which is a positive thing.
Being W-LED backlit, the screen is already very eco-friendly, so you are doing
your bit for the environment by using a screen like this. This is even more
important if you are working in an office environment with many screens in use
daily. Of course this isn't really a screen aimed at office users, but gamers! The inbuilt ECO mode preset can also help you
reduce energy consumption a little more than a calibrated profile which is
handy. There are no specific 'text' or 'internet' presets available from the
Senseye menu, so you will probably want to calibrate the standard or sRGB modes
to a lower luminance, or just use the ECO mode option for office use or in low
light conditions.
I tested the
screen using both the analogue D-sub and digital DVI-D interfaces. The DVI
offered a slightly sharper image and better picture quality, and the D-sub was
a little blurry I found. Text was still readable of course, but some
clarity was lost. I would definitely recommend using the digital interface
wherever possible.
Standard Preset
FPS Preset

Above: Senseye
Demo showing standard mode (left) vs FPS mode (right)
You will also
want to switch out of the 'FPS' preset mode as this introduces an odd text blur
I found as I talked about in the
calibration section. It's very slight and quite hard to detect, but I could
certainly 'feel' it when using the FPS mode. Maybe the different gamma setting
and overly bright and vivid appearance of the FPS preset accentuates it.
However, I used the Senseye demo mode to compare side by side the standard
preset with the FPS preset. You can see from the above image that the text is
slightly more jagged in the FPS mode. It's noticeable on the curved edges of the
letter 'e' and 't', but is very slight. For office use, I'd recommend using the
standard, sRGB or ECO presets anyway.
Ergonomically the
screen was very good, with a decent tilt, height, pivot and swivel adjustment
available. You should be able to obtain a comfortable position for your use and
desk. It would have been useful to see USB ports (and perhaps even a card
reader) included here as they are nice to have for connecting cameras, printers
etc. The built-in audio pass-through might be useful for headphone connection in
an office environment or for general 'office / Windows' sounds if youre' using
an HDMI connection.
Responsiveness and Gaming
The BenQ XL2410T is a screen designed by gamers,
for gamers. While it might be used for other uses from time to time, the screen
is primarily targetted at those wanting to play fast moving games and first
person shooters. The screen was designed with input from two well-known Counter
Strike players and has a whole range of features which should make this a good
option for the hardcore gamers out there. The screen even comes packaged with
Zowie mouse hardware in some countries as pictured above.
Advanced Motion
Accelerator (AMA)
Above: OSD menu
showing the AMA option
Before we get into the side by side screen
comparisons I wanted to talk about the
Advanced Motion Accelerator (AMA) mode. A modern TN Film panel would
typically be rated with a 5ms ISO response time. This would be the standard
response time of the panel without any form of
response time compensation
technology
active, and
representing the best case black > white pixel transition. A panel without
RTC can perform quite differently in practice to a model with RTC, often showing
more blurring and trailing of a moving image. RTC technology was introduced to
improve pixel transition times across the full range of changes, and models with
RTC enabled are usually given a 'G2G' (grey to grey) response time figure. BenQ
have allowed you to control this RTC application via their OSD and using the
'AMA' function. With this set to off, the screen behaves like a panel without
RTC, but once enabled an RTC impulse is applied to the pixels to help reduce
motion blur. The AMA function can be turned on and off via the 'picture' section
of the OSD menu as shown above. Once enabled, the manufacturers 2ms G2G response
time spec is relevant.
The BenQ XL2410T was tested using the chase
test in PixPerAn, a good bit of software for trying to quantify differences in
real terms responsiveness between monitors. As a reminder, a series of pictures
are taken on the highest shutter speed and compared. The images below show the
best case example on the left hand side, and the worst case example on the right
hand side. This should only be used as a rough guide to comparative
responsiveness but is handy as a way of keeping a constant test of each screen.

23.6"
5ms ISO CMO TN Film (60Hz)

23.6"
2ms G2G CMO TN Film (60Hz)
I thought it would be useful first to test this
technology while operating the screen at a standard 60Hz refresh rate. This
model supports a full 120Hz refresh rate which we will test in a moment. As you
can see from the PixPerAn test images, the monitor does behave quite differently
depending on whether you activate this technology. With AMA turned off there is
a moderate motion blur and slight ghosting to the moving image but it is not too
bad. The screen behaves like most 5ms rated TN Film models out there not using
RTC. The 27"
Viewsonic VX2739wm and 23.6"
Asus MS246H for instance showed us similar results when their overdrive
impulses were turned off. Both these models are TN Film based and so would be
5ms rated under the ISO response time scheme if RTC is not being used.
When you enable the RTC control via the AMA
function, the results are not as good as you might hope unfortunately. The
blurring is reduced a little and the trailing image is removed in the best case
image as you can see above. However, the RTC impulse is applied too aggressively
and so there is a fairly obvious overshoot introduced. This takes the form of
white halos and trails behind the moving car, and a dark trail behind the moving
speech bubble and driver. This overshoot is down to a poor control of the RTC
impulse, with the pixels changing state too far before reaching their desired
orientation. Unfortunately these artefacts can be quite common on heavily
overdriven screens where the RTC is not controlled well. In my opinion, this
mode is not really any better than the AMA = off setting, since the overshoot is
just as noticeable as any blur was before.
120HZ Support
One of the main selling points of the XL2410T for
gamers is its support of a true 120Hz refresh rate. This is not an interpolated
refresh rate like many modern LCD TV's, but the screen can support a genuine
120Hz input from the graphics card.
BenQ's website describes the reported advantages
as follows: "With a screen image that’s redrawn 120 times every single second, there’s never
a lag between what’s happening in the virtual world of your favorite game and
what you actually see on screen. Drawing on hyper-speed video processing
technology, the XL2410T gives on-screen action a captivating realism. You can
spot your opponents the instant they make their move, and track their movements
accurately, so victory or defeat always comes down to your skill and not a
sluggish display that leaves you frustrated."
You can simply select 120Hz refresh rate from your
display settings as shown above. Even in Windows, the movement feels faster and
smoother and dragging around text boxes and browser windows feels snappier.

Of course one of the main reasons for wanting this
120Hz support is that the screen can then give you a higher frame rate of 120
frames per second (fps) as opposed to the 60fps when using 60Hz. Any serious
gamer will tell you that frame rates are very important for fast action and so
here's a screen which can support double the frame rate of most LCD panels. With
120Hz support, the screen is also able to handle 3D stereoscopic content using
an NVIDIA graphics card and their 3D glasses and games. Unfortunately at this
time we do not have the necessary hardware to test all the 3D performance and so
instead we will concentrate on the performance of the panel in terms of
responsiveness and then later, input lag.

23.6"
5ms ISO CMO TN Film (120Hz)

23.6"
2ms G2G CMO TN Film (120Hz)
I ran the same PixPerAn tests as before, but this
time with refresh rate set at 120Hz. I tested the screen with and without the
AMA function enabled and the results are captured above. With AMA disabled the
screen performs almost identically to 60Hz mode, with perhaps a very slightly
less pronounced motion blur evident. The 120Hz mode does not alter the response
time of the panel, since the operation of the pixels and their electronics
remains unchanged. With AMA enabled, the RTC overshoot appeared again, although
it was to a slightly lesser degree than in 60Hz mode. When we tested the
Samsung 2233RZ we found that the 120Hz mode did eliminate the artefacts we
had seen in 60Hz mode which was very pleasing. There's a small reduction in the
overshoot here as well, although you can still see the dark trail behind the
driver/ speech bubble. The white halo behind the moving car has been reduced
quite a lot though. This perhaps gives this mode (120Hz + AMA = on) the slight
edge in terms of practical use I think, and seems to be the best set up for fast
gaming. Certainly the 120Hz mode is desirable given the 3D support and 120fps
possible frame rate. The AMA function is down to preference, but I think with
the reduced overshoot in 120Hz, it's probably desirable to have it turned on.
This reduction in RTC artefacts seems to be
related to the frame rate of the screen, which sends a new images to the display
at twice the frequency of before. As the image moves across the screen, an
artefact trails behind it due to the agressive overshoot of the RTC impulse. The
next frame sent to the display causes the image to update and the pixels change
again. In 120Hz mode, the time between each frame being sent is half that of at
60Hz (i.e. twice as many frames per second). As a result, the trailing image is
reduced by half, and the moving image is refreshed at twice the speed. In
practice this eliminates some, but not all, of the RTC issues common at 60Hz on
this screen.
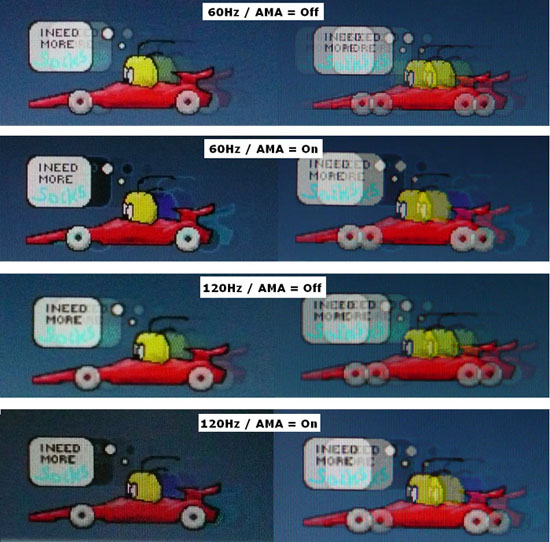
To save you scrolling up and down, above is a side
by side summary of the PixPerAn results in each of the four modes for reference.
Display
Comparisons
As usual, we have provided a comparison below of
the XL2410T against some of the popular models in this range that we have
tested. We have selected the 120Hz / AMA = on as the best case example for the
XL2410T here:
23.6"
2ms G2G CMO TN Film (120Hz)

24" 6ms
G2G LG.Display H-IPS

23"
8ms G2G LG.Display e-IPS

24" 5ms G2G LG.Display e-IPS
As you can see, the BenQ XL2410T is quite similar
to these other popular 23 - 24" models in terms of pixel responsiveness. There
is slightly less blur from the XL2410T as compared with the Dell U2410 and HP
ZR24W as you can just pick out from the trail image behind the moving car. It's
very slight of course. However, while the pixel transitions have been improved
with the response time compensation AMA function, it has introduced some
overdrive artefacts in the form of dark trailing. The pale trailing we saw in
the 60Hz tests is largely eliminated when you use the screen in 120Hz mode but
overall the issue is still apparent. The Dell U2311H is perhaps the best
compromise here, with a slight motion blur and only minimal pale overshoot being
evident. Of course, the 120Hz technology gives the XL2410T the edge when it
comes to gaming as it is the only model of the four which can support a 120 fps
frame rate and 3D gaming.
23.6"
2ms G2G CMO TN Film (120Hz)

22" 3ms
G2G Samsung TN Film + 120Hz

27" 1ms G2G CMO
TN Film (Response time mode = Advanced @ 60Hz only)
For comparison I have also included the results from
the other gamer orientated displays we have tested. The
Viewsonic VX2739wm was the 'World's First' 1ms rated screen, although
putting that into practice introduced a pretty severe overshoot. The best option
was to use the 'Advanced' response time mode which made the screen perform more
like a 2 - 3ms G2G rated screen. This model is a bigger panel size to the
others, but does not support 120Hz refresh rates. The Samsung 2233RZ is still
our reference screen from this test. It offers a 120Hz refresh rate like the
BenQ does but any overshoot which is evident in 60Hz mode is pretty much
completely eliminated in the 120Hz mode. We'd seen an improvement in the BenQ in
this regard too, but it had not removed all of the artefacts. The Samsung still
holds the edge here I think.
Further Features
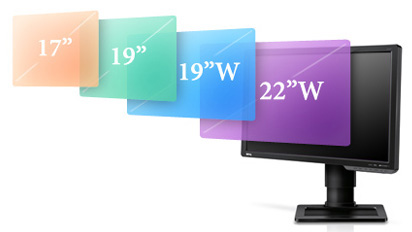
Apsect Ratio Control - The XL2410T supports
a decent range of
aspect ratio control options through the OSD, and through the right arrow as
a hot-key when not in the menu.
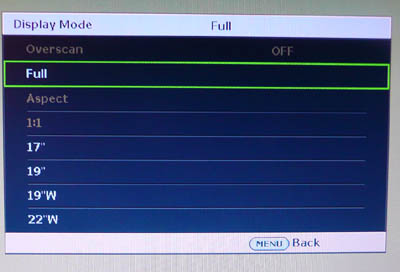
Above: the
various display modes available
There are options for the usual full, aspect and
1:1 that you might find on many other screens with a decent scaler. There are
also options which simulate the native resolution of other popular screen sizes
as shown in the menu image above. BenQ's website describes the feature a little
more: "The display mode
hotkey makes changing the size of the screen content as simple and quick as a
button press. Instantly switch among 17”, 19”, 19” widescreen, and 22”
widescreen formats so you get the best possible view of whatever you happen to
be watching. You can also take advantage of the Smart-Scaling button, added
especially for the benefit of gamers. You can adjust the size of the screen
content until your avatar’s actions precisely correspond to your expectations
based on your control movements, so you can perform with peak effectiveness."
Preset Modes - There are two customisable
preset modes designed for gaming as well which are 'User game-1' and 'User
game-2'. These allow full adjustment to brightness, contrast, gamma and colour
modes. The 'FPS' mode (First Person Shooter) has a limited range of adjustments.
Dynamic Contrast - The screen does feature a dynamic contrast ratio control if you want
to use it and it can be used in all three of these game preset modes. From our
tests, it works to a degree, giving you DCR's of around 1500:1 in practice. Some gamers like this as a
feature, some do not so that's down to preference.
Above: instant
mode can be selected within the 'picture advanced' menu
Instant Mode - like some other modern
screens, the XL2410T features a 'thru mode' type technology which, once enabled,
bypasses some of the internal electronics to reduce input lag. We will look at
this feature and its effectiveness in the next section.
Input Lag
As usual I tested the
screen in clone mode with a CRT to determine the level of
input lag. This is
something which can put off some gamers and is a delay between graphics card and
monitor output. By hooking up a CRT you can show that the LCD lags behind
somewhat, which can affect users in some situations where they rely on the
screen image being as fast as their inputs (e.g. fast FPS shooting games).
Often, input lag is very low and probably wouldn't represent too much of a
problem in real terms.
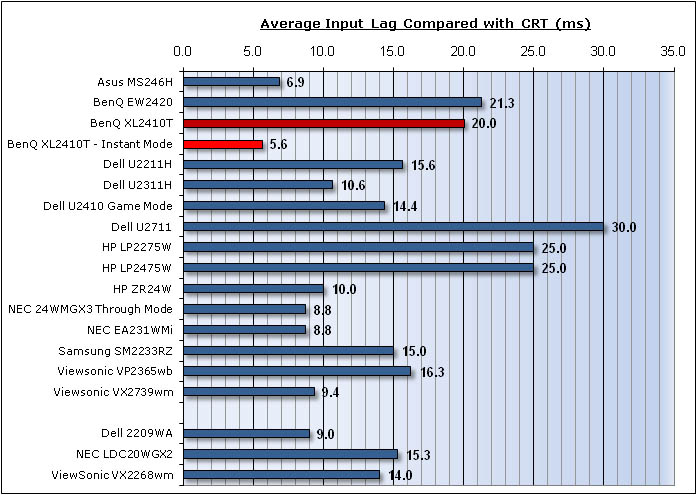
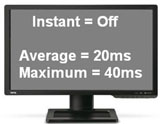
I first tested the screen with
the 'instant mode' setting off. The input lag was typically 10 - 20ms, with the
very occasional higher lag shown as 30 or 40ms. Across all the measurements this
averaged out at 20ms which was pretty reasonable to be fair. This was a very
similar figure to the BenQ EW2420W (21.3ms) which although it doesn't use the
same scaler and electronics (according to the service menus), must presumably be
quite similar in operation.
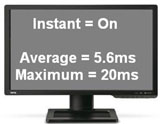
With the instant mode enabled,
input lag was reduced quite significantly. Average lag was now a very low 5.6ms
and was typically measured between 0 - 10ms. There was the very occasional lag
of 20ms recorded but this was a great performance. This is the best screen we
have ever tested for input lag. The Asus MS246H was also quite close (6.9ms) as
was the Viewsonic VX2739wm (9.4ms). A great performance from the BenQ here.
Gamers will want to enable this instant mode for hardcore gaming certainly.
Movies and Video

The following summarises the screens performance
in video applications:
-
23.6" screen size makes it a reasonable option for
an all-in-one multimedia screen, although quite a bit smaller than modern LCD
TV's of course
-
16:9
aspect ratio is more suited to videos than 16:10 format screens, leaving
smaller borders on DVD's and wide screen content.
-
1920
x 1080 resolution can support true 1080 HD resolution content
-
While not listed in the spec for some reason, I have confirmed with BenQ that
the digital interfaces support HDCP for any encrypted and protected content
-
Fairly decent interface options available with 1x DVI, 1x D-sub and 1x HDMI.
Useful for connecting external devices including blu-ray players. Would have
been nice to see DisplayPort and perhaps another HDMI.
-
Black depth and contrast ratio are excellent and some of the best we have seen. Detail
in darker scenes should not be lost due to these measurements.
-
Dynamic contrast ratio is available in some preset modes and extends the
static contrast ratio to ~1500:1 in practice. If you like this feature, it can
control the contrast for you quite well, although transitions are quite fast.
It is available in the movie and various game presets but not the
standard/sRGB/ECO.
-
Movie preset mode is available. This makes the colours more vivid and cartoony. You will lose some accuracy using this
mode, but this may be desirable for the sake of the bright colours in videos.
You cannot control the colour modes or RGB channels in this preset, and you
will probably want to reduce the default 100% brightness to a comfortable
level.
-
Good
pixel responsiveness which should be able to easily handle fast moving scenes.
If any overdrive artefacts are obvious, you may want to disable the AMA
function which still leaves you with a good response time.
-
Poor
viewing angles due to TN Film technology. Contrast shifts are very apparent
horizontally and a significant problem vertically. Even a slight movement up
or down can cause a change in contrast. You will need to be able to align the
screen perfectly for movie viewing. This limitation means it is not really
suited for viewing by more than one person. Shadow detail may well be lost in
dark scenes as a result of the viewing angles.
-
Good
range of ergonomic adjustments available so you should be able to obtain a
comfortable angle and position.
-
There was only very slight backlight leakage from the bottom edge, which was
not obvious to the naked eye. Not a problem in practice which is
good as that issue has the potential to become distracting when watching
movies, especially where black borders are present.
-
Headphone jack available for audio pass-through from HDMI if needed. No
integrated speakers on this model
Conclusion
Performance wise
I found the XL2410T to be quite good, but it needed some tweaking to get there.
The out of the box settings of the screen perhaps don't do the screen justice.
Gamma, colour accuracy, luminance and even the 'feel' of the screen aren't very
good when you first plug in the screen and start using it. There's a slightly
odd text blur and even the enabled AMA mode brings with it some issues with RTC
overshoot and artefacts which is a shame. These poor default settings combine
with the very restrictive viewing angles to give a disappointing first
impression I think.
With a bit of
playing around, you can soon improve things and the performance is much better.
The standard preset immediately gives you a better setup in terms of gamma,
colour temperature and colour accuracy. This is a reasonable performance even
without calibration in fact and should be adequate for most casual users.
Turning the brightness control down to around 20 - 30% makes the screen more
comfortable, and changing your graphics card to output at 120Hz brings with it
an improvement in frame rate and a reduction in the RTC overshoot. You can even
switch the instant mode 'on' to reduce the input lag which is a great feature.
As a gaming
screen the XL2410T is very strong. The 120Hz support speaks for itself really
and you won't get this from standard screens. Certainly an advantage for fast
gaming and a prerequisite if you want to do 3D gaming at all. Responsiveness is
very good and input lag is very low indeed with instant mode enabled. The RTC
overshoot is a little disappointing, and although it is partially resolved in
120Hz mode, it is still there. Some of the other 120Hz gaming screens still hold
the slight edge I think, although this is a bigger screen with a higher
resolution than models like the Samsung 2233RZ.
Price wise, the
XL2410T is reasonable I think. At the time of writing the RRP is ~£300 (without
the Zowie kit which bumps it up to ~£340). On one hand there are plenty of other
TN Film 24" models with 2ms and 5ms response times for between £150 and £180
which would save you a fair amount. Obviously those models will not support
120Hz or 3D content though. Other 120Hz models like the 23" LGW2363D and Asus
VG236HE retail for around £285 and £275 respectively so are a very similar cost.
The IPS based Dell U2410 is still a bit more expensive though at ~£460 but is a
higher end model with a lot of other features and technologies.
If you're looking
for a gaming screen with 120Hz support, a good responsiveness and a very low
input lag this is well worth a look. The decent ergonmics and interface options
help make this a strong contender, but it is let down somewhat by some of the
poor default setup and ultimately the limitations of TN Film technology.
|
Pros |
Cons |
|
120Hz support for high frame
rate and 3D support |
Restrictive viewing angles
from TN Film panel |
|
Very good pixel responsiveness
and very low input lag |
Uniformity of the panel is not
great (may vary) |
|
Excellent black depth and
contrast ratio |
Some RTC overshoot with AMA
enabled, not quite as good as we might have hoped |
Discuss this
review in our forum. For further information and reviews of the BenQ
XL2410T, please visit
Testfreaks