It's been a while since we took a look at any
monitor calibration devices but in the past we have
reviewed software and packages from LaCie, X-rite and popular models from
the Pantone and Spyder series. We've also taken a look at some specific
calibration software such as Samsung's
Natural Color Expert and NEC's
SpectraView II. This time around we wanted to take a look at a piece of
calibration software from Integrated Color Corporation which has been talked
about a fair bit across the net, that being ColorEyes Display Pro.

While ColorEyes can be provided with a hardware
device in a package, the software is aimed at anyone who has a mainstream
colorimeter already, simply being a piece of software for calibrating your
screen and even testing colour accuracy and results. The
software works with most colorimeters and spectrophotometers on the market
today, meaning users can simply upgrade their current software rather than
purchasing additional hardware. And, with the addition of support for Apple
monitors, ColorEyes Display Pro fits into virtually any workflow. We wanted to
see what this software package had to offer and how effective it was in
producing decent results in practice.

Their website states:
"Created by ICS, the makers of Remote Director, the industry’s most
sophisticated remote proofing system, in cooperation with Integrated Color,
ColorEyes Display Pro continues to be on the cutting edge of the science of
monitor calibration."

Package Contents
The ColorEyes software itself is a simple download
of about 30.5Mb and they even offer a
full 10-day
trial for free via the website. If you like the software you can purchase a key and simply activate your installaiton. Nice to see they have some
faith in their product and are willing to offer a free trial with no obligation.
Thankfully the software is also not full of adverts or pop-ups, just a genuine
fully working version for 10 days.
You can purchase the software from their
online store at a cost of $175 USD for the download of $185 for a disc hard
copy. They also offer bundled packages with a hardware colorimeter with options
available to include the X-rite DTP-94 or Spyder3 device at an extra cost as
shown below (prices correct as of time of publishing)
|
 |
 |
 |
 |
 |
 |
|
Software
Download
$175 |
Disc Software
$185 |
Bundle with
DTP-94
$325 |
Bundle wth
Spyder3
$299 |
DTP-94 Device
only
$150 |
Spyder3
Device only
$125 |
Calibration Methods
The aim of this review is really to discover how
effective the ColorEyes Display Pro software is at calibrating monitors. We will
be pairing the device with the X-rite i1 Display 2 hardware colorimeter (as
provided with the LaCie Blue Eye Pro package) so we know the hardware is of a
very high standard. Results may vary if used with a different device, but we are
looking at the potential of the software here and its standard.
We shall use the
highly regarded and effective
LaCie Blue Eye Pro software package as a control in these tests.
This will allow us to verify and compare the results of the calibration process. I will
use the reporting feature of LaCie's software, which will show us several
things, including luminance, gamma and colour temperature values reached by
calibration. Perhaps most importantly, it will also show us the DeltaE (dE94) values for 16 colour shades,
helping to show us how accurate the colours shown on the screen are. While the
ColorEyes software does include its own test and report feature, we will use
LaCie's as well for comparative purposes.
Initial Control Tests
The calibration process and tests will be
conducted on the Dell 2405FPW display, and we will use the LaCie Blue Eye Pro
software as a control. First of all, I calibrated the screen with LaCie's
device and
software to get an idea of what was achievable with this screen and their
package. The calibrated results are shown below:
Dell 2405FPW - Calibrated Results


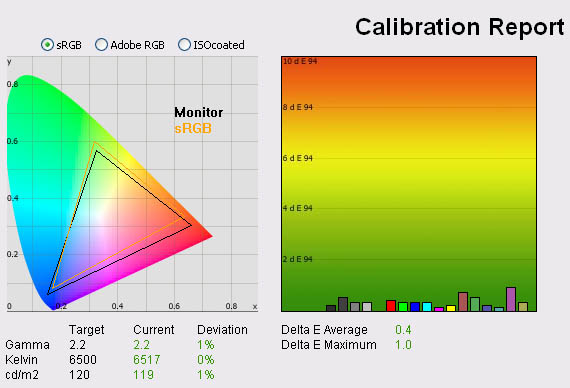
|
|
LaCie Blue Eye Pro Calibrated Settings |
|
luminance (cd/m2) |
119 |
|
Black Point (cd/m2) |
0.18 |
|
Contrast Ratio |
661:1 |
During the calibration process, the RGB settings
in the OSD were altered to 14, 34 and 28 respectively, and brightness / contrast were set at
35% and 50% respectively. The automatic calibration process alters values at a
graphics card Look Up Table (LUT)
level and produces the above report to validate the results. On the left hand
side the CIE diagram shows a triangle representing the monitors colour space,
its gamut. In this case the Dell 2405FPW covers pretty much the sRGB colour
space and represents a coverage of about 72% of the NTSC colour space. Most modern
displays offer enhanced W-CCFL backlighting capable of offering a larger colour
space, typically covering 92% or more of the NTSC gamut.
Below the CIE diagram the gamma, colour
temperature and luminance of the screen are shown in turn. We aim for a gamma
value of 2.2 which is the
default for computer
monitors, and the standard for the Windows operating system and the
Internet-standard sRGB colour space. After calibration, the screen matches this
within 1% deviation. The colour temperature we aspire to is 6500k, the temperature of 'day
light'. The screen is correctly calibrated to 6517k, less than 1% variation from
the desired value. Lastly we aim for a luminance of 120 cd/m2 which
is the recommended luminance for an LCD display in normal lighting conditions.
Again, the screen is corrected within 1% of this luminance, and is calibrated to
119 cd/m2.
Black depth was also recorded at a decent level of 0.18 cd/m2
and this gave a static contrast ratio of 661:1.
The
graph on the right shows the DeltaE (dE94) values for colours tested by the LaCie Blue
Eye Pro. This shows us how accurate the colour shown on the screen is, compared
with the colour being requested. As a reminder, the lower these bars down the Y-axis, the better, in
terms of colour accuracy. For reference, LaCie describe the DeltaE readings as:
-
If DeltaE >3, the color displayed is significantly different from the
theoretical one, meaning that the difference will be perceptible to the
viewer.
-
If DeltaE <2, LaCie considers the calibration a success; there remains a
slight difference, but it is barely undetectable.
-
If DeltaE < 1, the color fidelity is excellent.
After calibration, the Dell 2405FPW showed
very good colour accuracy with an average DeltaE of only 0.4, and a maximum of
1.0. LaCie would consider the colour fidelity to be excellent.
So the above shows what the screen is capable
of with correct calibration. I then returned the screen and graphics card to
their default settings and tested again. The RGB levels in the 'user' menu of
the OSD colour control were now all set at 50, and the ICC profile created
during our initial calibration was discarded. Brightness in the OSD was also now
back at a level of 50%.
Dell 2405FPW -
Default Settings
|
|
Default Settings |
|
luminance (cd/m2) |
202 |
|
Black Point (cd/m2) |
0.20 |
|
Contrast Ratio |
1010:1 |
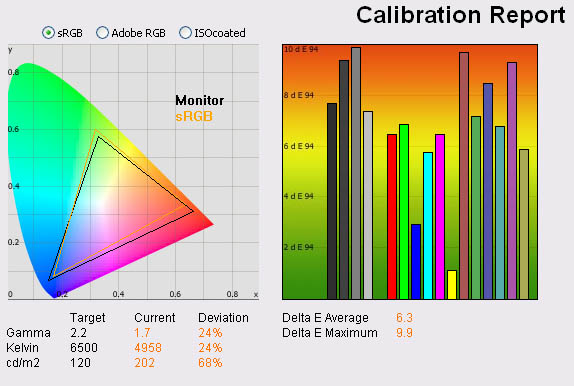
At default settings, the performance of the screen
was far from ideal! Gamma was poorly adjusted to 1.7, colour temperature was
recorded as 4958k and luminance was too high at 202 cd/m2. With a
black depth of 0.20 cd/m2, this gave a contrast ratio of 1010:1 at
least, which was even a little over the specified 1000:1 for this display.
The DeltaE graph shows that colour accuracy was
now very poor, with an average dE of 6.3 and a maximum of 9.9. Clearly the
screen is capable of so much more, but this goes to show you need correct
calibration to achieve it. Let's see how successful calibration with the
ColorEyes software is.
Options and Settings
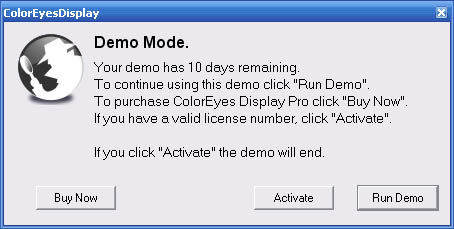
When you first load the software up you are
presented with the options to buy, activate or run the demo. The free demo
lasts 10 days and is fully functional. You need to purchase a key from their
online store if you want to activate the product.
The software takes around 15 seconds to load up
while it checks compatibility and various monitor options as shown above.
|
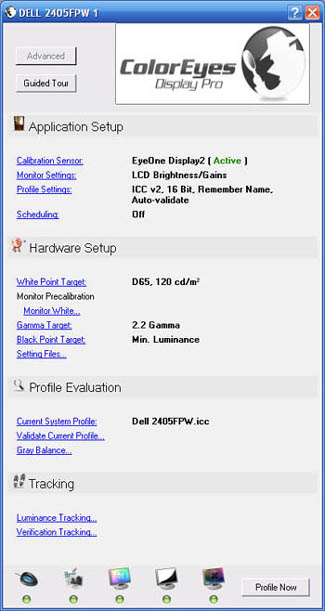 |
When the software loads up you
are presented with a settings panel down the left hand side as shown here
(left).
Clicking on each of the blue links takes you to a settings window where you
can change relevant options.
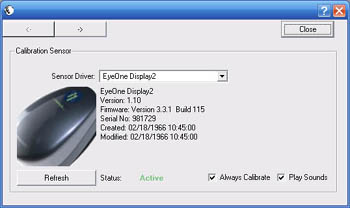
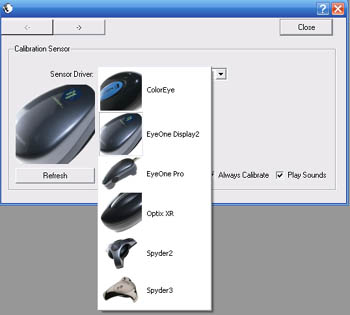
You
can select which sensor you want to use with the software, and as you can
see we are using the EyeOne Display2 device here. Other options are
available via the drop down box (below).
|
Once you have selected the
hardware device you are using, you can enter into all the other settings and
targets which we will talk through briefly below.
Within the application set-up section there are
several options available which you can either progress through them one by
one as shown above, or use the built in "guided tour" function which gives you
some background information and guidance as you go through.
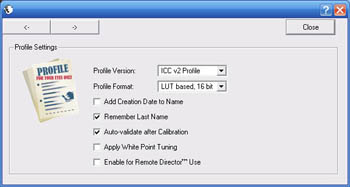
You can select some more advanced features such
as whether you want to use an ICC profile v2 or v4, and whether you want to
create a LUT calibration (of the graphics card, at 16-bit
accuracy) or of the matrix itself if the monitor supports hardware
calibration.
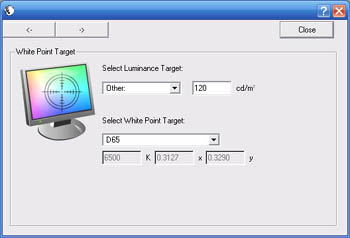
Within the hardware set-up section you need to
define your target settings for calibration and validation. This includes
colour temperature, luminance, gamma and black point. You can export these
settings if you want for use on multiple machines or just to back them up.
Within the profile evaluation the program tells
you which profile is currently active (if any) and provides you options to
validate (which we will come onto in a bit). There is also a tracking section
which allows you to track luminance and colour accuracy results over a given
time period if you want.
All in all there seemed to be a decent amount of
settings available, but not as many as some very detailed packages like
BasICColor offer. There was certainly enough to carry out (hopefully) accurate
calibration and define your settings. It was also good to see a validation
function within the software to test the results and provide dE information.
That's not something available in every bit of software.
The Calibration Process
Following the 'profile now' option takes you into
the automated calibration process. It should be noted that at no point does it
ask you or guide you to make any changes within the OSD menu. For this process
the settings of the screen itself were still at default and the calibration
would carry out all testing and profiling at a graphics card LUT level. You
might want to consider altering your screens OSD brightness setting to a
'sensible' figure as a starting point though, since if you have it set high the
backlight intensity is at a higher setting resulting in more heat output and
power consumption.
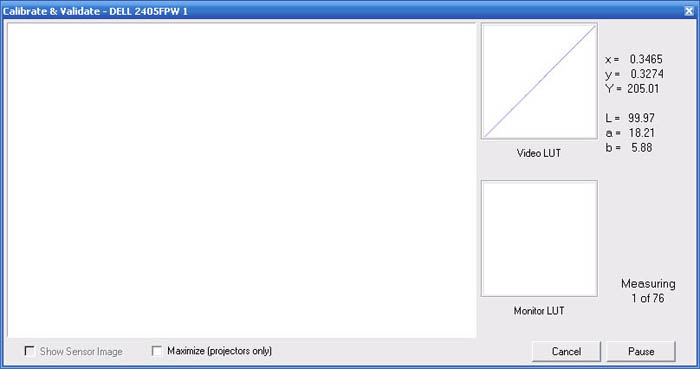
You're asked to place the colorimeter on the
screen over the profiling area which looks like the above image. The diagrams on
the right show the currently active gamma curves associated with the graphics
card LUT and the monitor LUT. In this example, only the graphics card LUT can be
adjusted but it is first restored to a default setting before anything happens
(mine was already at default from our previous test).
The software then automatically progresses with
the colour area changing between various shades of grey, before then showing a
red, blue and green colour. The whole process takes a reasonably long time of
about 7 minutes in total.
Testing The Success Of
The Calibration
After the automated calibration is complete it
produces the below validation report:
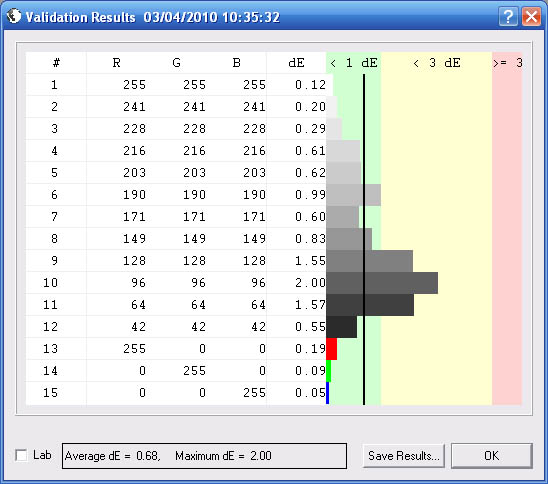
At the end, the verification program launches to
confirm the results which are shown above. A dE figure is given as an average
and maximum. A graph provides a nice visual validation as well, along with the
detailed values for each colour patch if you want to see it.

If you go into the 'current system profile'
section you are also given some details about the ICC profile which the process
creates for you and it confirmed the target points reached for colour
temperature, gamma, luminance and black point. This confirms black point at
0.211 cd/m2 which was the only setting we didn't 'define' as such at
the starting point, merely specifying 'minimum' as a target. In this result,
contrast ratio would be 569:1. For those who want to try the profile out, we
have saved our ColorEyes calibrated Dell 2405FPW profile in our
ICC profile database (usual caveats apply if you use it).
This result was quite pleasing really, with
ColourEyes software stating that it has successfully reduced average dE down to
0.68 and maximum is only 2.0. Overall, colour fidelity would be classified as
excellent by LaCie. Let's see how our control test with the LaCie Blue Eye Pro
software looks. I left everything as it was, but simply used LaCie's report and
test function to validate the success from a control point of view:
Dell 2405FPW - ColorEyes Calibrated Results
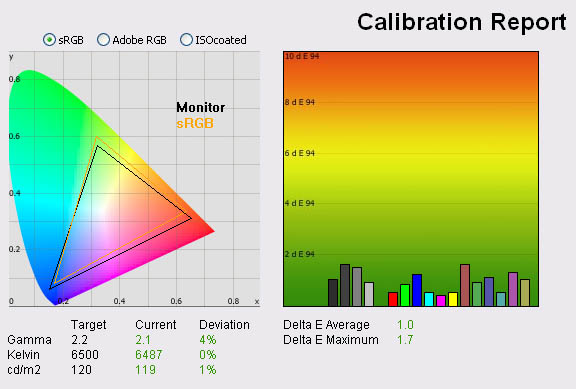
|
|
ColorEyes Display Pro
Calibrated Settings |
|
luminance (cd/m2) |
119 |
|
Black Point (cd/m2) |
0.21 |
|
Contrast Ratio |
567:1 |
The result was again pretty impressive. Gamma was
slightly off at 2.1, but still within 4% of the target setting. Colour
temperature and luminance were corrected nicely, and this was without any OSD
adjustments as well. Black depth was 0.21 as a result giving a contrast ratio of
567:1. Colour accuracy was also vastly improved compared with default screen
settings, with the ColorEyes calibration reducing average dE from 6.3 to 1.0 and
the max from 9.9 to 1.7. LaCie would classify the colour fidelity to be very
good here and a great improvement over default settings.
The results were pleasing, although the colour
accuracy was not quite as good as when calibrated with the LaCie Blue Eye Pro
software (dE average 0.4, maximum 1.0).
Conclusion
Overall the software was pretty effective and
certainly very easy to set up and operate. There was a decent amount of settings
and options to chose from, and the 'guided tour' was useful for those who need a
bit of explanation of each area if they are new to calibration. I felt the
actual profiling was a little lacking as it would have been useful if it was
able to guide you through optimal OSD settings as a starting point, particularly
for brightness control. You certainly wouldn't want to leave a screen at 100%
brightness for instance which is how many are set up as default. The process
also took a little too long for my liking but at least it's automated and you
can leave it to it.
The results were actually very good, with a decent
correction of gamma, luminance and colour temperature. Colour accuracy was also
corrected very nicely, although not quite to the degree of some other high end
software. Still, more than enough for most users I'm sure. The test and report
feature is also useful to validate the calibration and something which is not
always included in calibration software. Remember that this test was carried out
with a high end hardware device, so if using it with something of a lower
quality like the Spyder3, you may find results are not as good.
In regards to price, the $175 for just the
software seemed a little steep to me, although the 10-day trial was nice to see
and very generous. Packaged with the Spyder3 for $299 it was approx $50 more
expensive than DataColor's Spyder3Elite package which seemed reasonable, but it
would have been nice to have seen a package with the EyeOne Display 2 as well
perhaps.
|
Pros |
Cons |
|
Easy to follow and set up |
No guidance on OSD adjustments
offered |
|
Good correction of gamma,
luminance, colour temp and colour accuracy |
Calibration process takes a
considerable amount of time |
|
Automated profiling and
reported |
Slightly less accurate results
than some other software packages |
