Calibration Guide

Introduction
Calibration is a subject which comes up frequently wherever there is discussion of monitors. As you will hopefully realise from our reviews, there are two important things to consider when purchasing a new screen, and when you might be concerned about it’s ability to render colours accurately: 1) How does the screen perform at default colour settings?, and 2) how can it perform with correct calibration? There are several methods to calibrating your screen which we will discuss below in this article. However, it should be understood first of all that to get truly calibrated settings, and good colour accuracy, you are likely going to need to invest in a hardware calibration solution. This is why we discuss a monitors performance at default settings in our reviews and how the screen is preset in the factory before being shipped. Most users will not have access to hardware colorimeter/spectrophotometer devices, and they are generally not cheap. It’s important therefore to understand what kind of performance you can expect from your screen with basic software configuration.
Panel Technologies – Their Influence on Colour Accuracy
Panel technology does come into play to a degree when we discuss colour accuracy. There are some common misconceptions however which need correcting. Just because a screen is based on a particular panel technology, does not automatically make it the best for colour accuracy. It is often thought that an IPS panel will offer much better colour accuracy than a TN Film panel, but this is not necessarily a hard and fast rule. Things which do come into play though include:
- Viewing angles. For professional colour enthusiast displays, IPS is the most popular choice by manufacturers. This is because the technology offers very wide viewing angles, more so than TN Film and VA matrices. It also doesn’t suffer from the off-centre contrast shift anomaly which you can see on VA panels when moving away from a central field of view. It is also free of the pretty severe vertical contrast shifts you will see from TN Film panels.
- Colour Depth – For the best colour reproduction you probably need a panel capable of a full 8-bit colour depth, or perhaps a modern 10-bit panel. An 8-bit module offers a true 16.7 million colour palette without the need for FRC technologies used in 6-bit panels. IPS and VA panels typically offer this, whereas TN Film panels do not. Modern 10-bit panels are becoming more widely used, and most use FRC to increase the colour depth from 8-bit (8-bit +FRC) giving rise to a colour depth of 1.07 billion colours. There are very few ‘true’ 10-bit modules available but there are some out there, usually at a very high cost. Some models offer further enhancements such as a extended internal Look Up Tables (LUT’s) where an even wider colour palette is available to choose from. These can help improve gradients and colour rendering capabilities and are often used in higher end professional grade monitors.
- Colour Gamut. This describes the range of colours which the monitor can produce compared with that which the human eye can detect. You can read more about gamut here, but typically the more expensive screens feature enhanced gamut backlighting. As such, it is normally the models featuring IPS and VA panels which feature the wider gamuts. Modern LED backlighting is being more widely used as well, read more about that in this article.
- Colour Accuracy Potential. It is true that IPS panels are capable typically of very good colour accuracy, but often you will need to carry out proper calibration with a hardware calibration device to get anywhere near this. However, VA and TN Film panels are certainly capable nowadays of reaching excellent colour accuracy if calibrated correctly. If you look through our reviews, you will see some TN Film panels perform very admirably here, despite the assumption that it is an inferior technology by many people. You will also spot that default colour accuracy really does vary from one model to another, and so you may even find some screens with better default colour accuracy with a TN Film panel, than you see at default for an IPS panel (e.g Acer AL2216W vs NEC 20WGX2). All technologies can offer decent colour accuracy once calibrated, it is the other factors discussed above which normally lead people to chooce IPS if they are doing any colour critical work.
A Reminder Of Ideal Settings
We discuss this in our reviews regularly, but there are certain settings we aim for when calibrating an LCD screen:
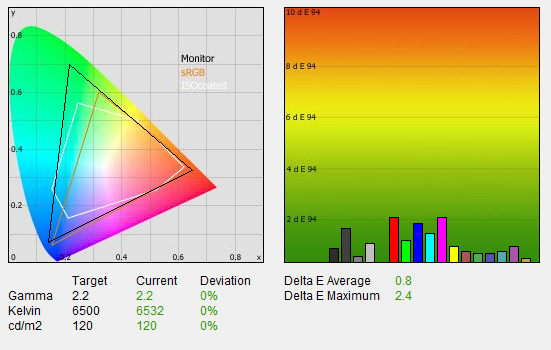
Above: example report diagrams for Dell 2407WFP-HC
- Gamma – This describes the non-linear relationship between the pixel levels in your computer and the luminance of your monitor. Gamma affects middle tones; it has no effect on black or white. If gamma is set too high, middle tones appear too dark. Conversely, if it’s set too low, middle tones appear too light. We aim for a gamma level of 2.2 which is the default for computer monitors and is the standard for the Windows operating system and the Internet-standard sRGB color space. The farther you drag the video system from this optimal level, the more calibration artefacts such as shadow banding and posterization appear. Therefore, a gamma of 2.2 allows for the maximum range of colors your system can display. <In depth Gamma Details>

Above: gamma curves
- Colour Temperature – We aim for a colour temperature of 6500k (D65) which is the colour temperature of daylight. <Colour Temperature Wiki>
- Luminance – We aim for a luminance (often referred to as brightness as well) of 120 cd/m2, which is the recommended luminance for LCD displays in normal lighting conditions.
- Colour Gamut – Represented by the CIE diagram (on the left of the report), this can’t be calibrated as such, it more gives an indication of how much of the human eye’s colour space the screen can cover in its reproducible shades. The larger the monitors gamut (represented by the triangle), the better really. <Colour Gamut Explained>
- Black Depth – is the monitor luminance or print reflectance for value = pixel level = 0; i.e. it is the deepest black in the monitor. The lower the value recorded, the better. We aim for 0.0 cd/m2 (truly black), but in practice it doesn’t reach this low on modern LCD screens.
- DeltaE / Colour Accuracy – We aim for the best colour accuracy possible, where the colour displayed by the monitor is as close as possible to the colour requested by the graphics card. On our DeltaE graphs (as shown above), the lower the bars are down the graph’s Y-axis, the better in terms of colour accuracy. For reference, LaCie describe the DeltaE readings as:
- If DeltaE >3, the color displayed is significantly different from the theoretical one, meaning that the difference will be perceptible to the viewer.
- If DeltaE <2, LaCie considers the calibration a success; there remains a slight difference, but it is barely undetectable.
- If DeltaE < 1, the color fidelity is excellent.
These are the settings we aim for when calibrating a monitor in our tests, and is what your calibration process should work towards, regardless of whether you are using software or hardware methods.
Software Calibration Methods
Software calibration methods can be handy in helping to adjust some basic settings on your screen. They are most useful in helping to get the screen operating at a comfortable setting, helping to get a decent contrast / brightness level, and a good colour balance. This is a good way to help improve the ‘feel’ and look of the screen, but it should be noted that it does not necessarily result in more accurate colour rendering from a strict point of view. Settings are normally altered either manually through the OSD options (RGB levels, contrast and brightness) or through similar controls at the graphics card level.
Commonly LCD monitors come set with a default 100% brightness which means that luminance is way above the desired 120 cd/m2 we aim for. This is frequently the main issue with LCD monitors, and is something which can be corrected to a comfortable level at least using software methods. Contrast can also be improved to a degree, and colour levels can be evened and at least appear to be at a nice setting. All these methods rely on the human eye, and so the individual preferences and ambient lighting conditions come into consideration here.
You can even use some test images for very basic manual set up as follows:
Contrast / Brightness

The first calibration utility is a simple gray scale consisting of 17 steps between white (255) and black (0). Adjust your monitor’s brightness and contrast controls so that the full range of the scale is visible. The darkest step visible (Step 16) should be just barely visible against the black background surrounding the scale.
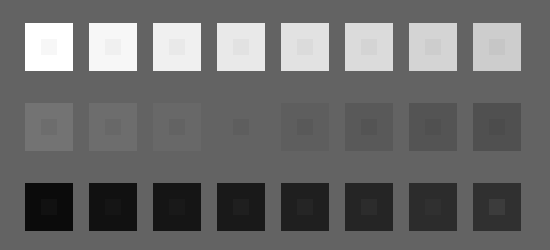
The second calibration utility gives a bit more control. You should be able to adjust the monitor controls and, if possible, the system gamma from your GFX card settings, to be able to detect the small squares within all of the larger squares of the array.
Colour Levels
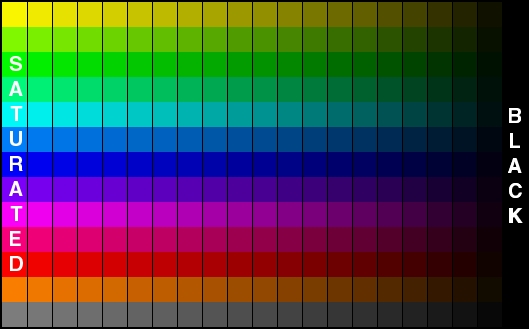
Adjust your monitor’s colour levels. If your monitor is properly calibrated you will see distinct steps between all 21 steps of each color strip and the steps will be uniform in appearance.
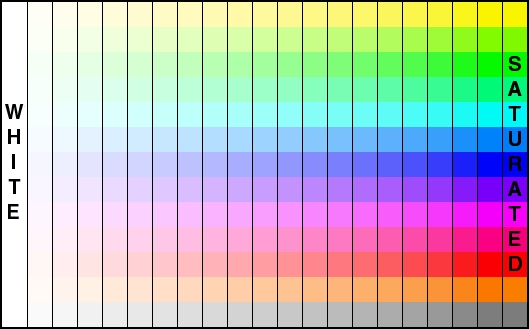
Adjust your monitor’s colour levels again. If your monitor is properly calibrated you will see distinct steps between most of the 21 steps of each color strip and the steps will be uniform in appearance. Most monitors do not display the lightest end of the scale accurately so the last 2-3 lightest steps may look the same.
There is a very useful website here (http://www.lagom.nl/lcd-test/) which gives you various tests and methods for calibrating your screen. Well worth a look for some free “by eye” calibration.
There are many different software tools available, and in fact many manufacturers like to package their own software with the screen to allow calibration. For instance, Samsung package some of their screens with Natural Color Pro software which allows the user to calibrate their screen quickly and easily. Further software tools are available which might be worth taking a look at as listed below. There are also various test images available which can be handy for you to test, with the human eye, the colour levels you have arrived at.
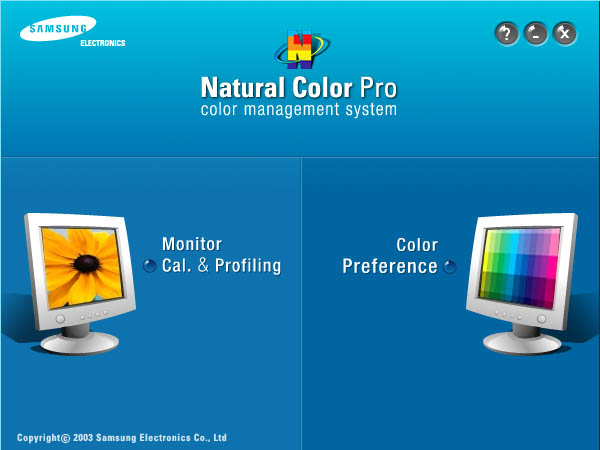
Above: Samsung’s Natural Color Pro software, sometimes packaged with their screens
Adobe Gamma – Free with Photoshop software
QuickGamma
Monitor Calibration Wizard
Test Images
Checkmon
Further Reading:
Lagom.nl Monitor Test Pages
Hardware Calibration Devices

Proper calibration of a monitor really requires you to use a hardware calibration device. These come in two varieties, with the more mainstream (and affordable) devices being colorimeters. You can also buy higher end spectrophotometers (such as the X-rite i1 Pro) which read the light differently, but the cost is probably prohibitive for most normal users. There are many different devices to choose from which vary greatly in price, performance and accompanying software packages. These devices are connected to your PC typically via USB, and feature a hardware module which you place over the screen. By running the software suite which comes with the device, the tool sits over a background which displays many different colours. These are then recorded by the device and used to establish how accurate the colours shown on the screen are compared with what is being requested by the graphics card. Once this difference is established, the device can be used to correct the difference as best as possible from the screen, and results in a calibrated profile being produced.
Hardware devices will typically run through the calibration process automatically once you have defined your target settings and been guided through some basic hardware adjustments using the OSD menu (brightness, contrast, RGB values). Apart from these changes, the majority of changes are implemented at a graphics card LUT (Look Up Table) level after that through the creation of the profile. Some higher end screens offer hardware level adjustments to the monitors LUT which can offer an even better level of accuracy. This is normally reserved for high end professional grade monitors.
The accuracy of these calibration devices obviously varies somewhat, and quite often you get what you pay for. Obviously the features and options of the software package come into play as well, and so cheaper devices typically offer limited calibration options and reporting functions, whereas high end devices are far more versatile. For professional grade calibration it is recommended to spend what is a considerable amount of money on a device which is well regarded. Manufacturers like Gretag and LaCie make a series of devices which are widely used on monitor review sites, and their higher end models feature extensive software options and provide detailed analysis and reporting of colour rendering.
If you want high end results, you are probably looking at spending in excess of £150 on a colorimeter, or >£800 if you want a spectrophotometer. The cost will vary depending on the software options taken with the device and anything else which might come in the package. There are of course cheaper options available which have proved popular. These are often more than adequate for most average users, and unless you’re really concerned with top notch accuracy for photo / graphics work, you probably don’t need much more. For example, the Spyder3 or Pantone Huey do a decent enough job of levelling colours and settings for most average users, and retails for around £60 in the UK. See our various reviews for more information about colorimeters, spectrophotometers and calibration software.
Calibration Device Reviews (TFT Central)
LaCie Blue Eye Pro
DataColor Spyder2Express
LaCie Blue Eye 2
Spyder3 Elite
X-Rite i1 Display 2
X-rite i1 Pro Spectrophotometer
Calibration Software Reviews (TFT Central)
ColorEyes Display Pro
NEC SpectraView Profiler
NEC SpectraView II
Manufacturers:
DataColor / ColorVision
LaCie
Xrite / GretagMacBeth
Pantone
Chromix / ColorEyes
ICC (International Color Consortium) Profiles
Profiles are commonly produced when calibrating a screen. They are preset saved settings for your particular graphics card / monitor combination and can be used to match different devices (e.g a monitor, printer, scanner, camera etc). These help ensure the settings remain consistent across all the devices, so that you don’t see different results on each one. Profiles are simply look-up tables that describe the properties of a color space. They define the most saturated colors available in a color space; i.e. the bluest blue or deepest black your monitor can produce. If you don’t have a profile, the trio of Red, Green, and Blue values (or CMYK) that make up a color have no particular meaning – you can say something is blue, but not exactly which shade of blue. Accurate profiles are the key to a color managed workflow. With accurate monitor and printer profiles, your prints will closely match what you see on your monitor. Without profiles, you need to rely on trial and error combined with guessing.
It should be noted that an ICC profile is produced based on your individual hardware components and set up. As such, it’s not possible to share ICC profiles with other users of the same monitor to achieve the exact same results. However, ICC profiles which are shared can often at least help improve settings and colour accuracy to a certain degree, and so are an easy method of attempting calibration without the need for a colorimeter. It certainly won’t hurt to try them if you can find an ICC profile has produced with a colorimeter and then has been shared by the user for your particular screen.
TFT Central has its own database of ICC profiles and monitor settings, which are taken from our own reviews and from reader submissions. You can view the entire ICC database here

Above: loading an ICC profile in Windows
Further Reading:
TFT Central ICC Profile and Monitor Settings Database
Drycreekphoto
Wikipedia
Installing ICC Profiles – A guide for different operating systems
Official Calibrated Monitor Profile Thread (HardForum – several ICC profiles made available to try)

Calibration Tips and Advice
- Make sure the screen has been turned on and warmed up for at least an hour before attempting calibration
- Try to minimise screen glare as much as possible, eliminating external light sources and working in a darkened room can help here
- The characteristics of a monitor change with time. It is a good idea to re-calibrate and profile your display every week or two
- If the screen features preset colour temperature modes, select the one you are aiming towards as a starting point (preferably 6500k / D65)
- If the screen features preset gamma modes, aim for the one which gives you a monitor gamma nearest to 2.2
- Your display adaptor software should be set to 24 or 32 bit color (True Color). To see the setting, right-click on the Windows wallpaper (the background outside any open windows), then click on Properties > Settings.
Useful Resources
TFT Central ICC Profile and Monitor Settings Database
Lagom.nl (good software / “by-eye” calibration website)
Drycreekphoto
Calibration Guide (Excellent guide to gamma and calibration by Norman Korean)
Colour Calibration Wiki
Monitor Calibration Guide
Monitor Calibration Systems and You Thread (Hardforum)